11.2. Using gThumb
Red Hat Enterprise Linux supports over 100 digital camera models. So, whether
your camera uses a USB or serial port to communicate with your
computer, it is likely that Red Hat Enterprise Linux supports it.
gThumb is a graphical application
that allows you to interface with your digital camera.
gThumb works directly with your
digital camera, allowing you to open, view, save, and delete
images directly. You can also download the images to your
computer and modify them with image manipulation programs such
as The GIMP (refer to Chapter 12 Working with Images for more information about image
manipulation tools).
To start gThumb, choose
(the main menu on the
panel) => => . You can also start
gThumb by typing
gthumb at a shell prompt.
Before you begin using gThumb,
configure it to work with your digital camera. From the
menu, select . The Import
Photos window opens. On the left is an icon of a
camera. If you have not configured
gThumb before, the icon has a red
slash through it and the label No camera
detected. Click on the icon to open the
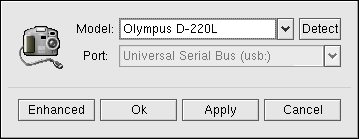
Camera Model window. This window was two
drop-down menus: the first allows you to select your camera
model from an extensive list, and the second allows you to
select the type of port your camera uses to connect to your
computer. Make your selections and click the
OK button. At the Import
Photos screen, select the destination of your
photos and click the Import button.
FIXME - Image of Import Screen
FIXME - Image of Camera Model Screen
Imported photos are listed in the right pane of the main screen.
To view an individual image, double-click on its thumbnail. To
return to viewing all images, click on the
Folders icon at the top left of the screen.
gThumb can also categorize your
photos. Double-click on a thumbnail to open the image in
gThumb's main screen. Select the
Categories icon from the toolbar. Scroll
through the list of categories and click on the ones to
associate with your image. You can create and deleted
categories by clicking on the New and
Delete icons. When you are finished, click
the OK button.
gThumb has many more features. Refer
to the Help Contents or view the
documentation at https://gthumb.sourceforge.net
for additional information.