Configuring and Unconfiguring a DHCP Server Using DHCP Manager
This section includes procedures to help you configure and unconfigure a DHCP server
with DHCP Manager. Note that you must be running an X Window
system such as CDE or GNOME to use DHCP Manager.
DHCP Manager can be run as superuser with the /usr/sadm/admin/bin/dhcpmgr command. See
About DHCP Manager for general information about the utility. See How to Start and Stop the DHCP Service (DHCP Manager) for more detailed information about
running DHCP Manager.
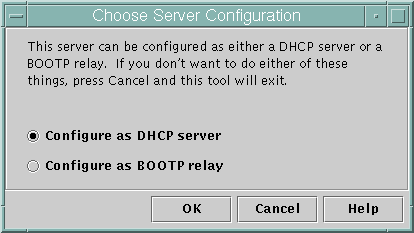
When you run DHCP Manager on a server that is not configured
for DHCP, the following screen is displayed. You can specify whether you want
to configure a DHCP server or a BOOTP relay agent.
Figure 14-1 Choose Server Configuration Dialog Box in DHCP Manager
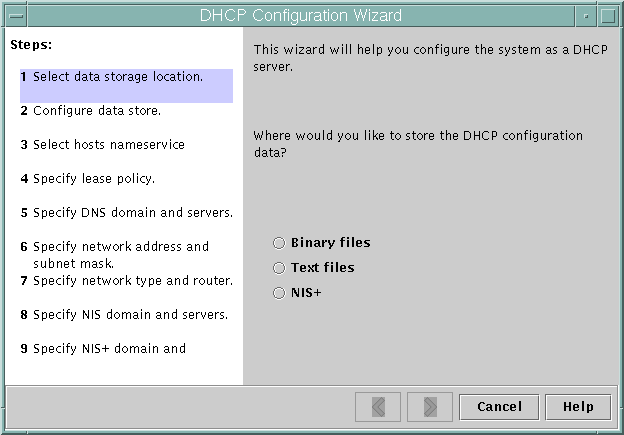
Configuring DHCP Servers
When you configure a DHCP server, DHCP Manager starts the DHCP Configuration Wizard,
which prompts you for information that is needed to configure the server. The
initial screen of the wizard is shown in the following figure.
Figure 14-2 DHCP Configuration Wizard's Initial Screen
When you finish answering the wizard prompts, DHCP Manager creates the items that
are listed in the following table.
Table 14-1 Items Created During DHCP Server Configuration
Item |
Description |
Contents |
|---|
Service configuration file, /etc/inet/dhcpsvc.conf |
Records keywords and values
for server configuration options. |
Data store type and location, and options that are
used with in.dhcpd to start the DHCP daemon when the system boots.
Do not edit this file manually. You must use dhcpmgr or dhcpconfig to
modify DHCP configuration information. |
dhcptab table |
DHCP Manager creates a dhcptab table if the
table does not already exist. |
Macros and options with assigned values. |
Locale macro (optional), which
is named Locale |
Contains the local time zone's offset in seconds from Universal
time (UTC). |
UTCoffst option with assigned number of seconds. |
Server macro, which is named
to match the server's node name |
Contains options whose values are determined by
input from the administrator who configured the DHCP server. Options apply to all
clients that use addresses owned by the server. |
The Locale macro, plus the following
options:
Timeserv, set to point to the server's primary IP address. LeaseTim, set to the number of seconds for the leases. LeaseNeg, if you selected negotiable leases. DNSdmain and DNSserv, if DNS is configured. Hostname, which must not be assigned a value. The presence of this option indicates that the host name must be obtained from the name service.
|
Network address macro, whose name is the same as the network
address of client's network |
Contains options whose values are determined by input from the
administrator who configured the DHCP server. Options apply to all clients that reside
on the network specified by the macro name. |
The following options:
Subnet, set to the subnet mask for the local subnet Router, set to the IP address of a router, or RDiscvyF, to cause the client to use router discovery Broadcst, set to the broadcast IP address. This option is present only if the network is not a Point-to-Point network. MTU , for the maximum transmission unit NISdmain and NISservs, if NIS is configured NIS+dom and NIS+serv, if NIS+ is configured
|
Network table for
the network |
An empty table is created until you create IP addresses for
the network. |
No content until you add IP addresses. |
How to Configure a DHCP Server (DHCP Manager)
Before You Begin
Make sure that you have read Chapter 13, Planning for DHCP Service (Tasks) before you configure your DHCP
server. In particular, you should use the guidelines in Making Decisions for Your DHCP Server Configuration (Task Map) to help you
perform the following tasks:
Select the system that you want to use as a DHCP server.
Make decisions about your data store, lease policy, and router information.
- Become superuser on the server system.
- Start DHCP Manager.
#/usr/sadm/admin/bin/dhcpmgr &
- Choose the option Configure as DHCP Server.
The DHCP Configuration Wizard starts, to help you configure your server.
- Select options, or type requested information, based on the decisions you made in
the planning phase.
If you have difficulty, click Help in the wizard window to open your
web browser and display help for the DHCP Configuration Wizard.
- Click Finish to complete the server configuration when you have finished specifying the
requested information.
- At the Start Address Wizard prompt, click Yes to configure IP addresses for
the server.
The Add Addresses to Network wizard enables you to specify which addresses to
place under the control of DHCP.
- Answer the prompts according to decisions you made in the planning phase.
See Making Decisions for IP Address Management (Task Map) for more information. If you have difficulty, click Help in the
wizard window to open your web browser and display help for the Add
Addresses to Network wizard.
- Review your selections, and then click Finish to add the IP addresses to
the network table.
The network table is updated with records for each address in the range
you specified.
See Also
You can add more networks to the DHCP server with the Network
Wizard, as explained in Adding DHCP Networks.
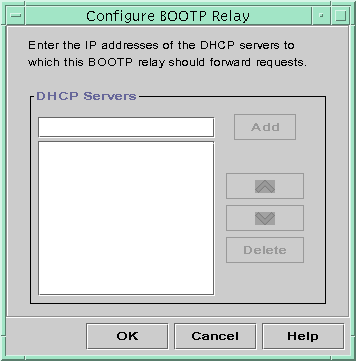
Configuring BOOTP Relay Agents
When you configure a BOOTP relay agent, DHCP Manager takes the following actions:
The following figure shows the screen displayed when you choose to configure a
BOOTP relay agent.
Figure 14-3 Configure BOOTP Relay Dialog Box in DHCP Manager
How to Configure a BOOTP Relay Agent (DHCP Manager)
Before You Begin
Make sure that you have read Chapter 13, Planning for DHCP Service (Tasks) before you configure your BOOTP
relay agent. In particular, you should see Selecting a Host to Run the DHCP Service for help in selecting the
system to use.
- Become superuser on the server system.
- Start the DHCP Manager.
#/usr/sadm/admin/bin/dhcpmgr &
If the system has not been configured as a DHCP server or BOOTP
relay agent, the DHCP Configuration Wizard starts. If the system has already been
configured as a DHCP server, you must first unconfigure the server. See
Unconfiguring DHCP Servers and BOOTP Relay Agents.
- Select Configure as BOOTP Relay.
The Configure BOOTP Relay dialog box opens.
- Type the IP address or host name of one or more DHCP servers,
and click Add.
The specified DHCP servers must be configured to handle BOOTP or DHCP requests
received by this BOOTP relay agent.
- Click OK to exit the dialog box.
Notice that DHCP Manager offers only the File menu to exit the
application and the Service menu to manage the server. The disabled menu options
are useful only on a DHCP server.
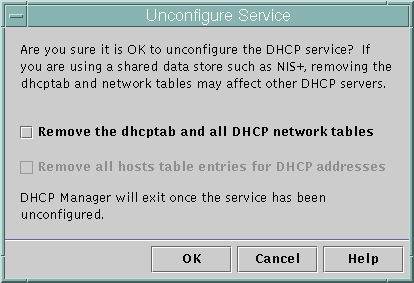
Unconfiguring DHCP Servers and BOOTP Relay Agents
When you unconfigure a DHCP server or a BOOTP relay agent, DHCP
Manager takes the following actions:
Stops the DHCP daemon (in.dhpcd) process
Removes the /etc/inet/dhcpsvc.conf file, which records information about daemon startup and the data store location
The following figure shows the screen that is displayed when you choose
to unconfigure a DHCP server.
Figure 14-4 Unconfigure Service Dialog Box in DHCP Manager
DHCP Data on an Unconfigured Server
When you unconfigure a DHCP server, you must decide what to do with
the dhcptab table and the DHCP network tables. If the data is
shared among servers, you should not remove the dhcptab and DHCP network tables.
If the tables are removed, DHCP would become unusable across your network. Data
can be shared through NIS+ or on exported local file systems. The file
/etc/inet/dhcpsvc.conf records the data store used and its location.
You can unconfigure a DHCP server but leave the data intact by
not selecting any of the options to remove data. If you unconfigure the
server and leave the data intact, you disable the DHCP server.
If you want another DHCP server to take ownership of the IP
addresses, you must move the DHCP data to the other DHCP server. You
must move the data before you unconfigure the current server. See Moving Configuration Data Between DHCP Servers (Task Map) for
more information.
If you are certain you want to remove the data, you can
select an option to remove the dhcptab and network tables. If you had
generated client names for the DHCP addresses, you can also elect to remove
those entries from the hosts table. Client name entries can be removed
from DNS, /etc/inet/hosts, or NIS+.
Before you unconfigure a BOOTP relay agent, be sure that no clients
rely on this agent to forward requests to a DHCP server.
How to Unconfigure a DHCP Server or a BOOTP Relay Agent (DHCP Manager)
- Become superuser.
- Start DHCP Manager.
#/usr/sadm/admin/bin/dhcpmgr &
- From the Service menu, choose Unconfigure.
The Unconfigure Service dialog box is displayed. If the server is a
BOOTP relay agent, the dialog box enables you to confirm your intention to
unconfigure the relay agent. If the server is a DHCP server, you must
decide what to do with the DHCP data and make selections in the
dialog box. See Figure 14-4.
- (Optional) Select options to remove data.
If the server uses shared data through NIS+ or in files shared
through NFS, do not select any options to remove the data. If the
server does not use shared data, select one option or both options to
remove the data.
See DHCP Data on an Unconfigured Server for more information about removing data.
- Click OK to unconfigure the server.
The Unconfigure Service dialog box and DHCP Manager are closed.


