Modifying slides
It
is highly recommended to avoid manually changing the formatting of
individual slides in a presentation; instead, use slide masters as
much as possible. A presentation can have multiple slide masters, so
the need for modifying slide backgrounds or other features should be
an exception rather than the rule. See Chapter 2 for details about
using slide masters.
Formating
the slide or page area
The
Page Setup dialog (Figure 138) is used for several purposes, some of
which depend on where you open the dialog. For example, if you are
in Notes view or Handout view when you open the Page Setup dialog,
you are setting up the page layout for Notes or Handouts,
respectively (see pages 186 and 191 for more information). If you
are in Normal view, you are formatting the slides themselves.
|
Note
|
Any
changes to the page format (size, margins, orientation, and so
on) apply to all
slides in the presentation. You cannot define more than one page
style in Impress, as you can in Writer or Calc.
You
can change the background of individual slides, as described on
page 183.
|
To
format the slide or page area:
Switch
to Normal view (click the tab in the main work area or select View
> Normal in the menu bar).
Select
Format > Page from
the menu bar, or right-click and choose Page Setup
from the pop up menu to open the Page Setup dialog, shown in
Figure 138.
The
Page
tab has three sections: Paper
format, Margins,
and Layout
settings. Settings
on this tab affect all slides in the presentation.
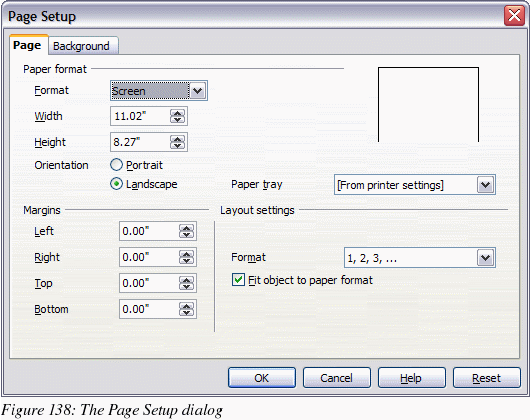
In
the Paper
format section, select the preferred Paper
format from the drop down list. Note that the
dimensions change automatically when a standard format is selected.
Despite the name (Paper format), the list contains selections for
displaying the slides as well as printing them on paper.
The
default values for the Screen
settings are optimized for screen presentation (4:3 ratio) but will
also print on Letter or A4 paper with landscape orientation. If
your computer uses a wide-screen monitor, you may wish to take
advantage of that by selecting the User
format and editing the Width and Height manually.
You
can also select the orientation of the slide or paper (Portrait or
Landscape) and the paper tray to be used. Note that in Impress you
cannot specify different trays for different pages (slides), as you
can in Writer; however, you can specify different trays for
printing slides, notes, and handouts. This is useful if, for
example, you want to print slides on transparencies and handouts on
ordinary paper.
For
more about printing presentations, see Chapter 10.
In
the Margins
section, you can change the spacing between the edges of the page
and the contents of the slide.
In
the Layout
settings section, select the page number format
in the Format drop down list. To allow resizing the slide
objects and fonts to fit the paper, select the Fit
object to paper format checkbox.
Click
OK to save your
changes.
Changing
the background of a slide
A
presentation can have multiple slide masters, so the need for
modifying slide backgrounds should be an exception. See Chapter 2
for details about using slide masters.
Applying
a background to a slide master or to individual slides is no
different from filling the area of a shape. See Chapter 6
(Formatting Graphic Objects) for details.
To
change the background for a slide:
Switch
to Normal view (click the tab in the main work area or select View
> Normal in the menu bar).
Select
the slide you want to change.
Select
Format > Page
from the menu bar, or right-click and choose Page
Setup from the pop up menu to open the Page Setup
dialog. Choose the Background
tab.
Follow
the instructions in “Formatting areas” in Chapter 6.
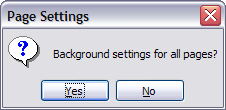
Click
OK to save the
changes. A pop-up dialog (shown below) asks if you want to change
the background on all slides. To change only the selected slide,
click No.
Choosing
a slide layout from the list
After
creating a new slide, decide what this slide will contain and what
layout is most suitable for the purpose. Impress offers various
types of predefined layouts that can be applied to a slide; these
layouts are shown in Figure 139.
To
apply a layout to a slide:
In
the Task pane, select the Layouts
tab. If the Task pane is not visible, select first View >
Task Pane.
Hover
the mouse cursor over the layout thumbnail to get a tooltip with a
summary of the contents included in the layout.
Click
on the selected layout to apply it to the slide.
|
Note
|
If
the layout is changed when the slide already contains contents,
Impress will not delete the contents, so slide elements may
overlap.
|

You
cannot create new AutoLayouts. However, if none of these layouts
suit your requirements, you can rearrange elements on an individual
slide and duplicate that slide as often as needed, copy it from one
presentation to another, or save it in a template.
All
the techniques discussed in Chapter 3 for working with text boxes
can be applied to the Title and AutoLayout text elements of the
slide, while the placeholder for images can be moved and resized as
discussed in Chapter 4. Chapter 7 describes how to include and
modify spreadsheets, charts, and other objects.
Choosing
a slide master from the list
In
the Task Pane, select the Master
Pages tab.
To
apply one of the slide masters to all
slides in your presentation, click on it in the
list.
To
apply a different slide master to one or more selected
slides:
In the Slide Pane
or the Slide Sorter view, select the slides you want to change.
In
the Task Pane, right-click on the slide master you want to apply to
the selected slides, and click Apply to Selected Slides
on the pop-up menu.
Chapter
2 discusses slide masters (also called “master slides” and
“master pages”) in detail.


