Formatting areas
Impress offers many
different options for formatting the fill of an area.
Start by selecting
the object to which the formatting will be applied.
When
the resizing handles appear, select Format
> Area from the menu bar. The dialog shown in Figure 93
is displayed.
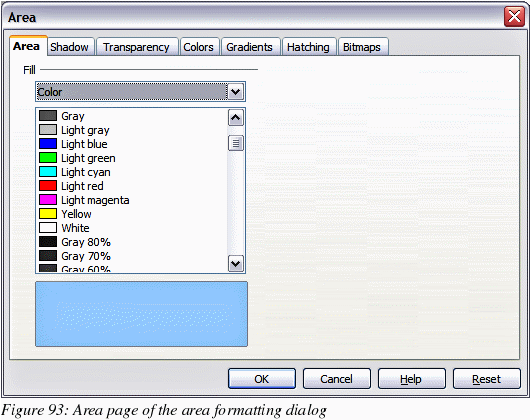
Select
the desired type
of fill from the drop-down list. The Area page changes to display
the choices available for that fill style, as described on the
following pages.
Select
the required fill and its parameters, and then click OK
to close the dialog and apply your selection.
Picking
the type of fill from the five available choices (None, Color,
Gradient, Hatching, and Bitmap) modifies the entries in the list
below and makes some new options appear in the Area page. The list
is populated with the default choices for the selected fill type. If
none of the choices is satisfactory, you can fully customize the
fill by using the page with the corresponding name in the same
dialog.
Creating
area fills
Impress
comes with many pre-defined area fills in four categories: colors,
gradients, hatching patterns, and bitmaps. If none of the provided
fills is satisfactory, you can fully customize them and create new
fills. The following sections describe how to create new fills and
how to apply them.
On
each page of the Area dialog, to modify the characteristics of an
existing fill, change those characteristics in the dialog and then
click the Modify
button. (In some cases, you can also change the name of the fill in
the same step.) However, it is recommended to create new fills or
modify custom fills, and not change the pre-defined ones.
Colors
For
color fills, select one from the list on the Area page, as shown in
Figure 93.
Creating
colors
On
the Colors page, shown in Figure 94, you can modify existing colors
or create your own.

Every
color is specified by a combination of the three primary colors
(Red, Green and Blue), hence the notation RGB. To create a new
color:
Enter
the name for the color in the Name
box.
Specify
the red, green and blue component on a 0 to 255 scale.
Alternatively specify the Cyan, Magenta, Yellow and black (K)
components, from 0% to 100%.
Click
the Add button.
The color is now added to the list on the Area page.
To modify a color:
Select the color
to modify from the list.
Enter
the new values that define the color (if necessary change the
settings from RGB to CMYK or viceversa).
Modify
the name as required.
Click
the Modify
button.
Alternatively,
use the Edit
button (this will open a new dialog), modify the color components as
required and click OK
to exit the dialog.
|
Tip
|
You
can also add custom colors
using Tools >
Options > OpenOffice.org > Colors.
This method makes the color available to all components of OOo,
whereas colors created using Format
> Area > Colors
are only available for Impress.
|
Gradients
A
gradient fill provides a smooth transition from one color to
another. The transition pattern may vary from a simple linear
transition to a more complex radial transition.
If
the predefined gradients are not satisfactory, you can create a new
gradient or modify an existing one.
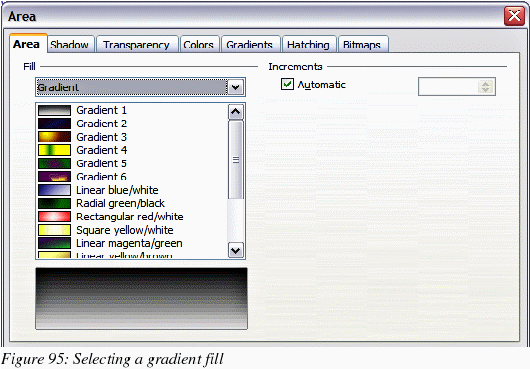
Select
Gradient
in the drop down list on the Area page and pick the gradient
from the list (see Figure 95). To manually input the number of steps
(increments) that should be applied, deselect the Automatic
checkbox and enter the number of steps required.
Creating
gradients
To
create a new gradient or to modify an existing one, select the
Gradients page from the Area dialog (shown in Figure 96). Several
types of gradients are predefined and in most cases changing the
From
and To
colors will be sufficient to obtain the desired result.

It
is highly recommended to create a new gradient even if you just want
to change the two colors rather than modifying the predefined ones
which should only be used as starting points.
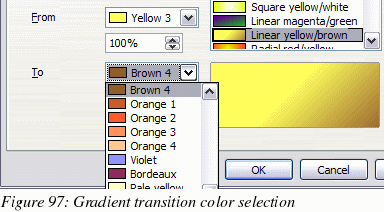
To create a new
gradient:
First
choose the From
and To
colors (Figure 97).
Then
choose a type of gradient from the list: Linear, Axial, Radial,
Ellipsoid, Square or Rectangular.
A
preview of the gradient type is shown under the available gradients
list in the middle of the dialog. Figure 98 shows an example.
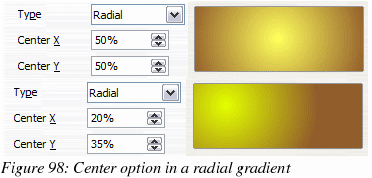
Depending
on the chosen type some options will be grayed out. Set all the
properties as desired (very often the default values will work
well). The properties to set to create a gradient are summarized in
Table 3.
Click
the Add button to
add the newly created gradient to the list. The gradient is now
available to all the OOo components and also for future
presentations. It pays to give it a memorable name.
Table 3:
Gradient properties
-
|
Property
|
Meaning
|
|
Center
X
|
For
Radial, Ellipsoid, Square and Rectangular gradients, modify
these values to set the horizontal offset of the gradient
center.
|
|
Center
Y
|
For
Radial, Ellipsoid, Square and Rectangular gradients, modify
these values to set the vertical offset of the gradient center.
|
|
Angle
|
Specifies
for all the gradient types the angle of the gradient axis
|
|
Border
|
Increase
this value to make the gradient start further away from the
border of the shape
|
|
From
|
Set
here the start color for the gradient. In the edit box below
enter the intensity of the color: 0% corresponds to black, 100%
to the full color.
|
|
To
|
Set
here the end color for the gradient. In the edit box below
enter the intensity of the color: 0% corresponds to black, 100%
to the full color.
|
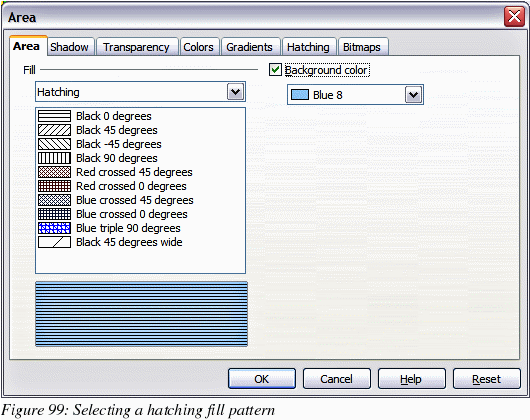
Hatching
A hatching fill is
a pattern of lines that is repeated throughout the area.
To
apply a hatching pattern to an area, go to the Area page, select
Hatching
from the drop down list and then select the desired hatching
from the list (Figure 99). To apply a background color to the
hatching pattern, selecting the Background
color checkbox and choose a color from the drop down
list.
As
for gradients and colors, if the predefined patterns are not
satisfactory, you can create a new pattern or modify a predefined
one.
Creating
hatching patterns
You
can create new hatching patterns or modify existing ones. Start by
selecting the Hatching
page of the Area dialog. This is shown in Figure 100.
As
for gradients and colors, if the predefined patterns are not
satisfactory, it is recommended to create a new pattern rather than
modify a predefined one. To do so:
Select
a pattern similar to the one that will be created as a starting
point.
Modify
the properties of the lines forming the pattern. A preview is
displayed in the window below the available patterns.
Click
the Add button
and choose a name for the newly created hatching.
The
properties that can be set for a hatching pattern are shown in Table 4.
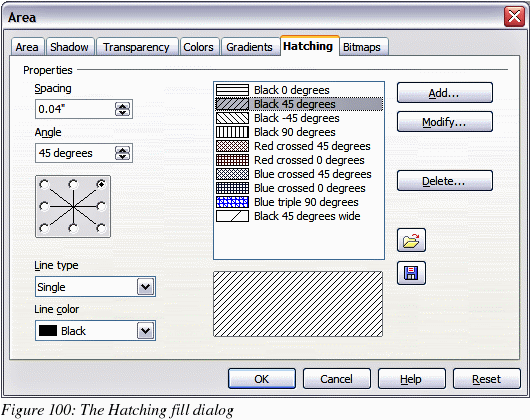
Table
4: Properties of hatching patterns
-
|
Property
|
Meaning
|
|
Spacing
|
Determines
the spacing between two lines of the pattern. As the value is
changed the preview window is updated.
|
|
Angle
|
Use
the mini map below the numerical value to quickly set the angle
formed by the line to multiples of 45 degrees. If the required
angle is not a multiple of 45 degrees, just enter the desired
value in the edit box.
|
|
Line
type
|
Set
single, double or triple line for the style of the pattern.
|
|
Line
color
|
Use
the list to select the color of the lines that will form the
pattern.
|
Bitmaps
The
last type of fill for an area is the bitmap fill.
On
the Area page, chose Bitmap
from the drop down list. Select from the list of bitmaps the
one to be used to fill the area. Note that any imported bitmaps
should be available in the list.
Set
the size, position and offset parameters (as applicable) in the
right hand side of the page, and then click OK
to close the dialog.
As
Figure 101 shows, when using a bitmap fill there are quite a number
of parameters to be configured. These are described in Table 5.
Table 5: Bitmap
fill properties
-
|
Property
|
Meaning
|
|
Size
– Original
|
Select
this box to retain the original size of the bitmap.
|
|
Size
– Relative
|
To
rescale the object deselect the Original checkbox and select
this one. The Width and Height edit boxes are enabled.
|
|
Size
– Width
|
When
Relative is selected 100% means that the bitmap original width
will be resized to occupy the whole fill area width, 50% means
that the width of the bitmap will be half that of the fill
area.
|
|
Size
– Height
|
When
Relative is selected 100% means that the bitmap original height
will be resized to occupy the whole fill area height, 50% means
that the height of the bitmap will be half that of the fill
area.
|
|
Position
– Anchor Map
|
Select
from the map the place of the area where the bitmap should be
anchored to.
|
|
Position
– X offset
|
When
tiling is enabled, enter in this box the offset for the width
of the bitmap in percentage values. 50% offset means that at
the anchor point of the bitmap OOo will place the middle part
of the bitmap and start tiling from there.
|
|
Position
– Y offset
|
This
will have the same effect of the X offset, but will work on the
height of the bitmap.
|
|
Position
– Tile
|
When
this checkbox is selected the bitmap will be tiled to fill the
area. The size of the bitmap used for the tiling is determined
by the Size settings.
|
|
Position
– Autofit
|
Stretches
the bitmap to fill the whole area. Selecting this checkbox
disables all the size settings.
|
|
Offset
– Row
|
If
tiling is enabled offsets the rows of tiled bitmaps by the
percentage entered in the box so that two subsequent rows are
not aligned.
|
|
Offset
– Column
|
If
tiling is enabled, offsets the columns of tiled bitmaps by the
percentage entered in the box so that two subsequent columns of
bitmaps are not aligned.
|
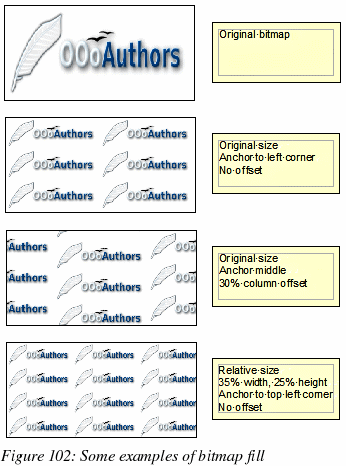
The
way some of these parameters work is difficult to describe; the best
way to understand them is to use them. Some examples of bitmap fills
are given in Figure 102 along with the parameters used.
Creating
and importing bitmaps
As for the other
types of fill, OOo comes with a number of predefined bitmaps, but
you can also add (import) new ones or to create your own pattern on
a 8x8 grid, using the Bitmaps
page of the Area dialog (shown in Figure 103).
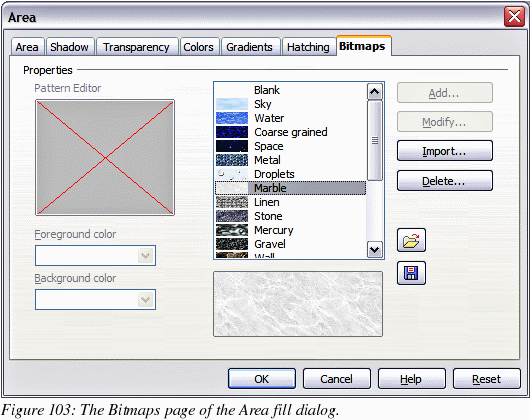
To
create a bitmap fill:
Start
with the Blank bitmap type on top of the list to activate the
Pattern editor.
Select
the Foreground and Background colors.
Start
creating the pattern by clicking with the left mouse button the
squares (pixels) that you want to be painted in the foreground
color. Use the right mouse button to apply the background color.
Check the preview window to see if the desired effect is achieved.
When
done, click Add
to save the pattern.
To
import a bitmap created in Draw or another program:
Click
the Import
button.
A
file picker dialog is displayed. Browse to the directory containing
the bitmap file and select it, then click Open.
Type
a name for the imported bitmap and click OK.
Formatting
shadows
Shadowing can be
applied to both lines and areas. To apply a shadow to an area, first
select the object to which shadowing should be applied, then select
Format > Area.
Shadows
can also be applied to lines, but it is not very obvious how to do
it. One way is to click the Shadow
icon on the Line and Filling toolbar (see the last tool in Figure 104).
The other way is to apply a style to the line that uses a shadow
(see “Using graphics styles to format graphics” on page 117 for
additional information on using styles).

Using
the first method, you cannot customize the shadow; it is applied
according to the default settings. The second method offers full
flexibility to configure the shadow properties. If the Line and
Filling toolbar is not shown when selecting an object, open it using
View > Toolbars
on the menu bar.
The
dialog to customize a shadow is shown in Figure 105.
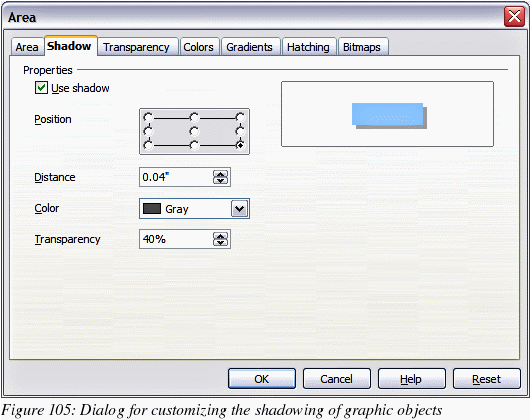
When
the Use shadow
checkbox is selected, the following parameters can be set:
Position:
the selected point in the mini map determines the direction in
which the shadow is cast.
Distance:
determines the distance between the object and the shadow.
Color:
sets the color of the shadow.
Transparency:
determines the amount of transparency for the shadow.
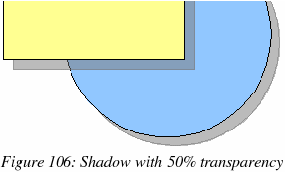
|
Tip
|
By
setting the transparency value above 0%, the objects below the
shadow are not completely hidden by the shadow. This produces a
pleasant visual effect, as shown in Figure 106.
|
Transparency
formatting
Transparency
is applicable to lines, areas, and shadows. To apply transparency to
lines, refer to “Formatting lines” on page 123; for shadows,
refer to “Formatting shadows” on page 141.
To
apply transparency to areas, select Format
> Area and then go to the Transparency page shown in
Figure 107.
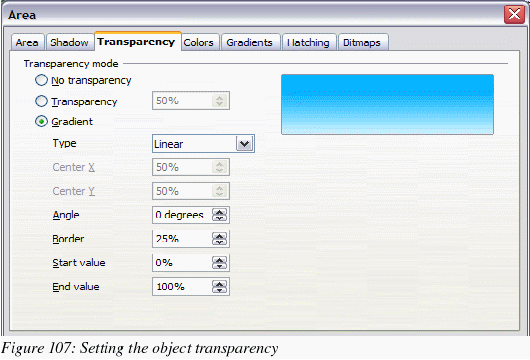
There
are two types of transparency: one which is uniformly applied to all
the area of the object, and the gradient one. To obtain a uniform
transparency, select Transparency
and then select the percentage of transparency required. For a
gradient transparency so that the area becomes gradually
transparent, select Gradient
and then set the parameters of the gradient:
Type:
pick between Linear, Axial, Radial, Ellipsoid, Quadratic or Square.
Center
X, Y: for some types of gradient, you can specify the
position of the center in percentage points.
Angle:
the angle of the gradient, applicable to all but the radial type of
gradients.
Border:
the percentage of the shape (measured from the edge) that is not
subject to the gradient settings.
Start
value: the transparency value of the start point of the
gradient: 0% is fully opaque, 100% means fully transparent.
End
value: the transparency value of the end point of the
gradient: 0% is fully opaque, 100% fully transparent.


