Using the picture toolbar
When you insert a suitable graphic image or select one already present in the document, the Picture toolbar appears. This toolbar can be either floating or docked. The figure below shows what the Picture toolbar looks like when it is floating. Two other toolbars can be opened from this one: the Graphic Filter toolbar, which can be torn off and placed elsewhere on the window, and the Color toolbar, which opens as a separate floating toolbar.
From these toolbars, you can apply small corrections to the graphic or obtain special effects.

1 From File
| 2 Filter
| 3 Graphics mode
| 4 Color
| 5 Transparency
| 6 Flip Horizontally
| 7 Flip Vertically
| 8 Graphics Properties
| 9 Invert
| 10 Smooth
| 11 Solarization
| 12 Aging
| 13 Charcoal Sketch
| 14 Relief
| 15 Mosaic
| 16 Posterize
| 17 Pop Art
| 18 Sharpen
| 19 Remove Noise
| 20 Red
| 21 Green
| 22 Blue
| 23 Brightness
| 24 Contrast
| 25 Gamma
(Above) Picture toolbar plus tear-off Graphic Filter toolbar and floating Color toolbar. Graphics mode (3) can be Default, Grayscale, Black/White, or Watermark.
Filters
Table 2 provides a short description of the available filters, however the best way to understand them is to see them in action. Feel free to experiment with the different filters and filters settings. remembering that you can undo all the changes by pressing Ctrl+Z or Alt+Backspace or by selecting Edit > Undo.
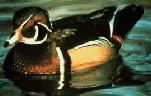
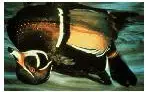
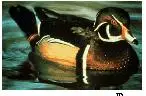
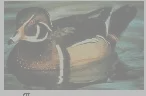
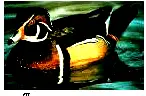
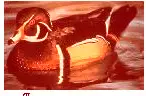
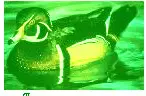
The figure below shows examples of some of the changes available on the Picture toolbar.
| Original Image
| Flipped Vertically
| Flipped Horizontally
| Light 50%
|
|
|
|
|
| Contrast 50%
| Red 50%
| Green 50%
| Blue 50%
|
|
|
|

|
Some graphic effects available from the Picture toolbar.
Table 1: Graphic filters and their effects
| Icon
| Name
| Effect
|

| Invert
| Inverts the color values of a color image or the brightness values of a grayscale image.
|

| Smooth
| Softens the contrast of an image.
|

| Sharpen
| Increases the contrast of an image.
|

| Remove noise
| Removes single pixels from an image.
|

| Solarization
| Mimics the effects of too much light in a picture. A further dialog box opens to adjust the parameters.
|

| Aging
| Simulates the effects of time on a picture. Can be applied several times. A further dialog box opens to adjust the aging level.
|

| Posterize
| Makes a picture appear like a painting by reducing the number of colors used.
|

| Pop Art
| Modifies the picture dramatically.
|

| Charcoal
| Displays the image as a charcoal sketch.
|

| Relief
| A dialog box is displayed to adjust the light source that will create the shadow and, hence, the relief effect.
|

| Mosaic
| Joins groups of pixels into a single area of one color.
|
Color
Use this dialog box to modify the individual RGB color components of the image (red, green, blue) as well as the brightness, contrast, and gamma of the image. If the result is not satisfactory, you can press Control+Z to restore the default values.
Setting the object transparency
Modify the percentage value in the Transparency box
 on the Picture toolbar to make the image more transparent. This is particularly useful when creating a watermark or when wrapping the image in the background.


