View options
The choices of View options affect the way the document window looks and behaves.
In the Options dialog box, click OpenOffice.org > View. On the page displayed, set the options to suit your personal preferences. Some of them are described below.
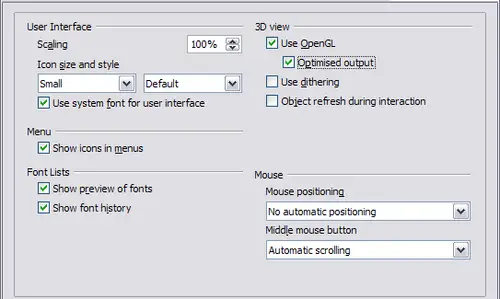
Choosing View options for the OpenOffice.org applications.
User Interface – Scaling
If the text in the help files and on the menus of the OOo user interface is too small or too large, you can change it by specifying a scaling factor. Sometimes a change here can have unexpected results, depending on the screen fonts available on your system. However, it does not affect the font size of the text in your documents.
User Interface – Icon size and style
The first box specifies the display size of toolbar icons (Automatic, Small, or Large). The Automatic icon size option uses the setting for your operating system. The second box specifies the icon set (theme); here the Automatic option uses an icon set compatible with your operating system and choice of desktop: for example, KDE or Gnome on Linux.
User Interface – Use system font for user interface
If you prefer to use the system font (the default font for your computer and operating system), instead of the font provided by OOo, for the user interface, select this option.
User interface – Screen font antialiasing
(Not available in Windows.) Select this option to smooth the screen appearance of text. Enter the smallest font size to apply antialiasing.
Menu – icons in menus
Select this option if you want icons as well as words to be visible in menus.
Font Lists - Show preview of fonts
When you select this option, the font list looks like the left picture below, with the font names shown as an example of the font; with the option deselected, the font list shows only the font names, not their formatting (right pictures). The fonts you will see listed are those that are installed on your system.
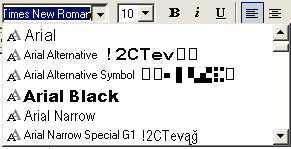 Font list showing preview |
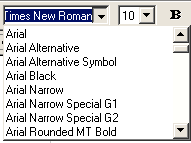 Font list without preview |
Font Lists - Show font history
When you select this option, the last five fonts you have assigned to the current document are displayed at the top of the font list.
3D view – Use OpenGL
Specifies that all 3D graphics from Draw and Impress will be displayed in your system using OpenGL-capable hardware. If your system does not have OpenGL-capable hardware, this setting will be ignored.
3D view – Use OpenGL – Optimized output
Select this option for optimized OpenGL output. Disable the optimization in case of graphical errors of 3D output.
3D view – Use dithering
The Use dithering option uses dithering to display additional colors when the computer’s graphics system offers less than the optimal 16 million (24-bit) colors. Dithering creates the illusion of new colors and shades by varying the pattern of color pixels. Varying the patterns of black and white dots, for instance, produces different shades of grey.
 | Internally, 3-D graphics are always created with 16 million colors (24-bit color depth) and dithering can be used to compensate when fewer actual colors are available. Without dithering, several bits of color information would be omitted, leading to significantly reduced image quality.
|
3D view – Object refresh during interaction
Specifies that if you rotate or move a 3-D object, the full display is rotated or moved and not a grid frame.
 | Press Shift+Control+R to restore or refresh the view of the current document.
|
Mouse positioning
Specifies if and how the mouse pointer will be positioned in newly opened dialog boxes.
Middle mouse button
Defines the function of the middle mouse button.
- Automatic scrolling – dragging while pressing the middle mouse button shifts the view.
- Paste clipboard – pressing the middle mouse button inserts the contents of the “Selection clipboard” at the cursor position.
The “Selection clipboard” is independent of the normal clipboard that you use by Edit > Copy/Cut/Paste or their respective keyboard shortcuts. Clipboard and the “Selection clipboard” can contain different contents at the same time.
| Function | Clipboard | Selection clipboard
|
| Copy content | Edit > Copy Control+C | Select text, table, or object.
|
| Paste content | Edit > Paste Control+V pastes at the cursor position. | Clicking the middle mouse button pastes at the mouse pointer position.
|
| Pasting into another document | No effect on the clipboard contents. | The last marked selection is the content of the selection clipboard.
|


