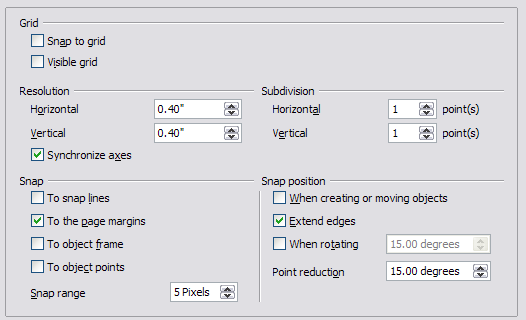
Grid options
The Grid page defines the grid settings for Impress. Using a grid helps you determine the exact position of your objects. You can also set this grid in line with the snap grid.
If you have activated the snap grid but wish to move or create individual objects without snap positions, you can press the Ctrl to deactivate the snap grid for as long as needed.
In the Options dialog, click OpenOffice.org Impress > Grid.
Specifying grid options for Impress.
Grid section
Snap to grid activates the “snap” function.
Visible grid displays grid points on the screen. These points will not display or print as part of a presentation.
Resolution section
Here you can set the unit of distance for the spacing between horizontal and vertical grid points and subdivisions (intermediate points) of the grid.
Gridlines are displayed in the form of dotted lines. Closer the dots are, more visible is the gridline. You can set how closer these dots are in the 'Subdivision' section.
Synchronize axes changes the current grid settings symmetrically.
Snap section
To snap lines snaps the edge of a dragged object to the nearest snap line when you release the mouse button. You can also use the Snap to Guides icon
 on the Options toolbar.
To the page margins aligns the contour of the graphic object to the nearest page margin. The cursor or a contour line of the graphics object must be in the snap range. You can also use the Snap to Page Margins icon
 on the Options toolbar.
To object frame aligns the contour of the graphic object to the border of the nearest graphic object. The cursor or a contour line of the graphics object must be in the snap range. You can also use the Snap to Object Border icon
 on the Options toolbar.
To object points aligns the contour of the graphic object to the points of the nearest graphic object. The cursor or a contour line of the graphics object must be in the snap range. You can also use the Snap to Object Points icon
 on the Options toolbar.
Snap range defines the snap distance between the mouse pointer and the object contour. Impress snaps to a snap point if the mouse pointer is nearer than the distance selected in the Snap range box.
Snap position section
When creating or moving objects restricts graphic objects vertically, horizontally or diagonally (45°) when creating or moving them. You can temporarily deactivate this setting by pressing the Shift key.
Extend edges creates a square based on the longer side of a rectangle when the Shift key is pressed before you release the mouse button. This also applies to an ellipse (a circle will be created based on the longest diameter of the ellipse). When the Extend edges box is not marked, a square or a circle will be created based on the shorter side or diameter.
When rotating restricts the rotation of graphic objects within the rotation angle that you selected in the When rotating box. If you want to rotate an object outside the defined angle, press the Ctrl key when rotating. Release the key when the desired rotation angle is reached.
Point reduction defines the angle for point reduction. When working with polygons, you might find it useful to reduce their editing points.


