Working across spreadsheets, web pages and database data
Working
across spreadsheets
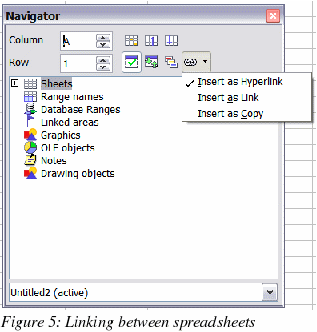
Calc’s
Navigator can be used to copy or link to data from another
spreadsheet (source).
To
insert a link (or reference) to or copy a cell or range of cells with
the Navigator:
Open
the source and the target documents.
Open
the Navigator from the
target document. Use the Edit > Navigator command or the
F5 shortcut. Select the Drag mode
you want to use (see ).
Insert
as Hyperlink - creates a hyperlink back to
the source file.
Insert
as Link – insert a linked copy of the
data in the target document.
Insert
as Copy – copies the range to the
target document, but does not link it to the source range.
Select
the source document from the box at the bottom of the dialog.
Browse
to the Range names category and open it by clicking on the
plus (+) sign. If there are no named ranges in the source document
there will be no ranges available for insertion.
Select
and drag the range you want to link to the target sheet.
|
Note
|
If
the cell range in the source spreadsheet you want to insert in has
not been defined as a named range, define it by using the Define
Names dialog accessible from the Insert > Names >
Define menu item, or use the Ctrl-F3 shortcut. Only
named ranges will appear in the Navigator.
|

To
refer to the contents of cells in another spreadsheet document, or
workbook, the syntax is 'url
of other workbook'#$sheetname.cellrange.
For
example, on a Linux system:
'file:///home/hillview/Documents/Tests/Address.xls'#$Sheet1.A1
or,
on a Windows system:
'file:///C:/Documents/Tests/Address.xls'#$Sheet1.A1
To
input these links, you can:
Type
in the formula up to the point where the link is required.
Select
Window >
[to select the desired document].
It
is not obvious that this is working, but it is. Select the desired
cell or range of cells.
Select
Window >
[select the original document].
Finish
entering the formula.
What is disconcerting is that the
value displayed is based on the value of the cell (or range of cells)
when the linked document was last saved.
So, to check it, save the linked
document and update the link in the document (Edit
> Links) that contains the link.
|
Note
|
Links
created using the prevous examples, including the Navigator’s
drrg and drop method, do not update automatically.
To
update them, use Edit >
Links > [select the desired link] >
Update. The update works from the saved file – so if
both files are open and the file that the link is based on is
updated, that file must be saved before updating the link.
|
To
have persistent updating of data between two spreadsheets, insert
Dynamic
Data Exchange (DDE)
links:
Select
and copy the range of cells to be linked to.
Change
to the spreadsheet that requires the link and select the
Open
the Paste
Special
dialog, Edit > Paste Special
and
check the Link
option (the checkbox at the bottom left of the dialog).
Click
OK to insert the DDE link.
These
cells will have a persistent link to the contents of the other sheet
and the values returned can then be used in other formulas.
Links
to HTML data or other spreadsheets
To
link to data on the Internet:
In
a browser navigate to the desired page.
Copy
the URL.
In
Calc, Insert > Link to
External Data.
Paste
in the URL.
This
step is not obvious: press Enter,
wait a moment and the bottom list box (called Available
tables/ranges) will show:
HTML_all
(the entire page)
HTML_tables
(all the tables on the page)
HTML_1
(each table consecutively numbered on the page)
Select
the desired option from the list box.
Optionally
check the Update every checkbox and specify how often to
update.
The
same process can be used for linking to data in spreadsheets.
|
Note
|
The
source file must be saved before the update can take place. (In
OOo, AutoSaves overwrite the original
file, so with AutoSaves turned on, this feature could be more
useful than it first appears.)
|
Links
to database data
Display
the Data
source viewer (F4).
In
the Data
Explorer window, navigate to the desired table or
query (if it is not visible click Explorer
on or off–left button in the Data
source toolbar).
Drag
the table or query onto the sheet. (See Chapter 11, “Getting
Started with Base” in the Getting
Started guide for information about working with
data sources, such as registering the data source.)
