Since KWord is a frames based word processor, an understanding of
frames and framesets is necessary for all but the most simple of documents.
This section is designed to give you a firm understanding of how
to create, destroy and manipulate frames so KWord can provide you with
the exact document you want.
Before we continue our discussion of Frames, its important that we
define a couple terms now:
-
Frame
-
A frame is a rectangular space on the page. This space defines an
area where text (or other data), can be placed.
-
Frameset
-
A frameset is a group of frames. Each frame in the frameset has a
position within the frameset
The position is determined by their placement on the page. If frames extend across the entire width of the page, the frame which begins closest
to the top of the page is Frame #1. The next frame that is closest to the top of the page is Frame #2, etc.
If the frames do not extend across the width of the page, the frame whose
left edge is closest to the left margin will be frame #1. In this case,
the vertical position of the frame is ignored.
All text flows from one frame to another
within a
frameset, and only within a frameset.
Text flows from frame
to frame within the frameset
according to the position of each
frame
on the page (and therefore the order of the frames within the frameset).
As an example: If we have a frameset that consists of three
frames (#1, #2, and #3).
As we type text into Frame #1, the text is shaped to the outline
of Frame #1.
When the text will no longer fit within Frame #1, it is
automatically continued into Frame #2.
Text moves freely between frames
within a frameset. If you insert text in the middle of a frame, all text after the inserted text is
rearranged as you type.
You can select a frame within a frameset two ways:
There should now be 8 squares around the edges of the frame.
Adding a Text Frame to a Document
Adding a text frame can be done one of three ways:
-
By selecting
->
from the menubar
-
You can use the keyboard shortcut:
F10
-
or by clicking
 on the toolbar.
Whatever method you choose, KWord responds by changing the cursor
to a set of cross hairs.
Using the mouse, place the crosshairs at the desired position of the upper left corner of the
new text frame.
Click once with the left mouse button.
Alternative, first position the text caret at the place where you want to insert
the frame. When the mouse cursor changes to crosshairs, press
Enter
.
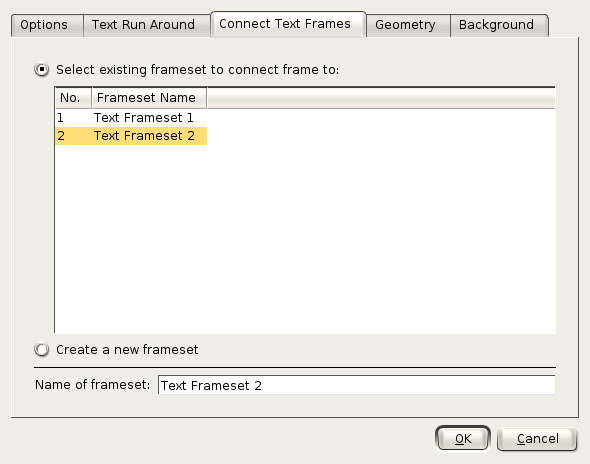
A dialog box appears.
This dialog box is used to determine which frameset this new frame will belong to.
Using the screenshot as an example, a new text frame has been created in a
document which currently has two framesets (called
Text Frameset
1
, and
Text Frameset 2
).
You now have the option of either:
-
Add the new frame to one of the previously created
framesets.
-
To do this, simply select the frameset you want the new frame to belong to.
(Either
Text Frameset 1
, or
Text Frameset 2
in the example.)
When this text frame is created, the new text frame will become
a member of the selected frameset.
-
Create a new frameset.
-
If you want this to be a new frameset, you should enter a descriptive
name for your new frameset. (A name which will tell you what you might
find in that frameset). This name should be entered in the text box
labeled
Name of frameset:
.
This newly added frame will be the
only frame in the frameset.
The other tabs in this dialog box, can be used to set some options
for this frame. For more information on these options, see the section
entitled Setting the properties for a frame.
If you click
OK
, the new frame will be
created.
If you click
Cancel
, the new frame will not
be created, and you will be returned to editing your document.
Tip
By default, KWord creates a small frame with the upper left corner of the
frame located on the page where you clicked with the mouse cursor. After the frame is
created, you are expected to reshape the frame to fit your needs.
If you would prefer to establish the shape of your frame
while you are
creating
the frame, simply click the left mouse button where you want the upper left corner to
be placed and hold the button down. Drag the mouse towards the opposite corner of the frame to establish the
boundaries of the new frame. As
you drag the mouse, you will see a box drawn. This box represents the
boundaries of your new text frame. When you are satisfied with the size and shape of the new text
frame, release the mouse button.
Deleting a Frame From a Document
You may decide you no longer need a frame in your document. You
could leave it blank (so it would not be visible in the final output),
but you should delete it to keep your document as simple as
possible.
Begin by clicking on the text frame border of the frame you want
to delete. (Or holding down the
Ctrl
key and clicking inside the frame with the
left mouse button.)
There are now 8 squares on the edges of the frame.
If this is the frame you want to delete, you can do so by:
-
Press the
Delete
key.
-
Selecting
->
from the menubar
-
While the cursor is on the border of the frame you want to delete,
click once with the right mouse button. A small menu will appear. Select
.
Moving a frame around on the page is easy.
Begin by clicking on the text frame border of the frame you want
to move. (Or holding down the
Ctrl
key and clicking inside the frame with the
left mouse button.)
There are now 8 squares on the edges of the frame.
Click and hold the left mouse button on the border again and drag the cursor in the direction you want to move the
frame.
You will see an outline of the frame as you move it. When the
outline is where you want it, release the mouse button.
Tip
A faster way to move the frame, can be done by holding down the
Ctrl
and
Shift
keys on the keyboard and click and hold with the left mouse button. Drag
the mouse cursor on the page and when the frame is in the correct location, release
the left mouse button.
It is also easy to change the size or shape of a frame.
Begin by clicking on the text frame border of the frame you want
to change. (Or holding down the
Ctrl
key and clicking inside the frame with the
left mouse button.) This selects
this frame as the current frame.
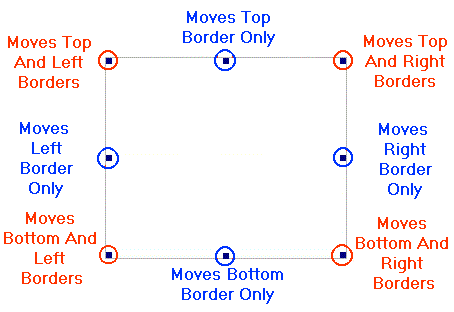
There are now 8 squares on the edges of the frame. By moving
these squares, you will be able to drag the frame border(s) to a new
location.
Each square will move a different combination of borders.
As an example: To move the bottom border of a frame, place the
mouse over the box at the six o'clock position in the frame. When the
mouse is over the box, it will change to a double headed arrow.
Now click with the left mouse button
and hold the button down. As you move the mouse up and down on the
page, you will see that the frame changes shape to match the movements of
the mouse. When the bottom edge of the frame is at the new location,
simply release the mouse button, and the changes will become
permanent.
Note
If you are using a Text Oriented Template, you cannot change
the size of the primary frame by dragging the edges of the frame. If you
want to resize this frame, you must do so by Changing the margins
Reconnecting Frames in a Frameset/Changing text flow.
Normally, each new text frame is created with a specific
purpose. Sometimes, however, as the document is changed, changes to the text flow
will need to be made. To accomplish this, you will need
to know how to move a frame from one frameset to another.
First click on the frame border of the frame you want to
move to another frameset.
You can change the frameset of the currently selected frame by
selecting
->
from the menubar
Tip
You can also accomplish this by clicking on the frame border once with the right mouse button, and selecting
Frame/Frameset Properties...
from the popup menu.
This will bring up a dialog box with five tabs. Select the tab
labeled
Connect Text Frames
.
You will be presented with a list of framesets. Simply select the new
frameset.
When you click
OK
, the currently selected frame will be added
to that frameset.
When two frames occupy the same place on a page, they must overlap.
When they overlap, one frame sits
above
the other frame.
You can raise and lower the frames to change which frame sits above the other frames by using four commands.
-
Bring to Front
-
To raise a frame, select the frame by clicking once on the frame border with the left mouse button.
Select
->
from the menubar.
This will place the frame on top of
all other frames
that it overlaps.
-
Raise Frame
-
To raise a frame, select the frame by clicking once on the frame border with the left mouse button.
Select
->
from the menubar.
This will move the frame up
one level
of any frame that it overlaps.
Tip
Pressing
Ctrl
+
Shift
+
R
is the
same as selecting
Raise Frame
from the menubar.
-
Send to Back
-
To lower a frame, select the frame by clicking once on the frame border with the left mouse button.
Select
->
from the menubar.
This will place the frame below
all other frames
that it overlaps.
-
Lower Frame
-
To lower a frame, select the frame by clicking once on the frame border with the left mouse button.
Select
->
from the menubar.
This will move the frame down
one level
of any frame that it overlaps.
Tip
Pressing
Ctrl
+
Shift
+
L
is the
same as selecting
Lower Frame
from the menubar.
A hard frame break is a special formatting character. It is
invisible on the final printed output.
The purpose of a hard frame break, is to force all the
text that follows it into the next frame in the frameset.
If we have the following sentence: “We have nothing to
fear but fear itself”
and we insert a Hard Frame Break, just before the word
“but”, we will end up with one frame containing “We have nothing
to fear”, and the next frame in the frameset beginning with
“but fear itself”.
To add a Hard Frame Break, you should first place the keyboard
cursor where you want the break to be located in the document.
A Hard Frame Break can be inserted one of two ways:
If you want to remove a Hard Frame Break, you simply delete it
like you would any other character.
Tip
Since this is not a character that
you can normally see in KWord, it will be easier to delete a Hard Frame Break with the following procedure.
-
Select
->
from the menubar. This will make the breaks visible.
-
Find the newly revealed Page Break, labeled
--- Frame Break ---
.
Place the mouse pointer in
front of this and click once with the left mouse button. This will place the cursor directly in front of the page break.
-
Now press the
Delete
key.