-
->
-
If you have been using a tool such as the line drawing tool which does
not allow you to select other objects, you can use this menu item to
return to the normal selection cursor.
-
->
-
Changes the cursor to a double headed curved arrow. Click with the left mouse button onto an object
and keep the button pressed.Drag with the cursor to rotate the object on the slide around its center. When you are
happy with the position of the object, release the mousebutton to stop
rotating.
If you change your mind and wish to cancel the rotation, use
->
to later undo it.
-
->
-
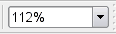
Allow you to zoom in or out in the current slide. You can see the zoom factor in the
Edit
toolbar, in the zoom indicator.
Left clicking on the slide will
. Right clicking on the current slide will present you a menu to allow you to
, to
, to
, to
or
, to
or
which put back all objects in your view.
This action has the same effect as
->
on another form.
-
->
-
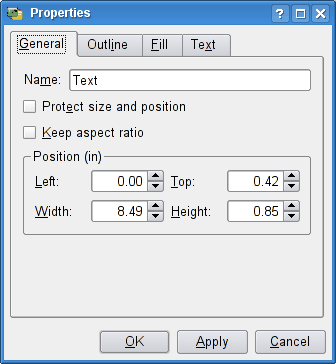
Open the
Properties
dialog for the currently selected object on your slide.
The
Properties
dialog for an object allows you to manipulate it in a
very detailed manner. You can change several properties for the selected object, like the text color if the object is text or the depth if the object is a picture.
-
->
-
This is where you can manipulate the stacking order of
objects on the slide.
An object that is on top will cover, either partially or fully
depending on its size, all other objects beneath it. Meanwhile an
object on the bottom of the stack may not be visible at all, as it is
covered up by other objects. An object in the middle may be partially
covered by other objects, while partially covering yet more objects
itself.
You can send the selected object down or up a layer, or directly
to the top or bottom of the stack.
-
->
-
In the submenu you can quickly align all the currently
selected objects with a side of the slide, or center them either
vertically or horizontally.
-
->
(
Ctrl
+
G
)
-
If you are drawing, you might want to make something out of
several objects. Arrange the individual parts where you
want them, select one, then hold down the
Ctrl
key
as you click in the others you want to group together. Click
and from then on they act as
if they are just one thing. It glues things together.
-
->
(
Ctrl
+
Shift
+
G
)
-
If you decide that you want to alter an object that is made out
of several pieces, you can unglue it with this tool. Click somewhere
away from the object to deselect it, then click to select one of its
parts.
-
->
-
This puts a colored copy of either text or a drawn object behind
it. You can make nice “dropped shadows” for logos with
this tool. To enable this item, ensure that you have object(s)
selected (you will see the six small black boxes around the
outline.) You choose the color, select which way the shadow is going to
fall and select a distance. For text it looks nice if you set the
distance to two or three. Click
Apply
to see the result of your settings for all selected objects on the slide
without leaving the dialog.
-
->
-
Allows you to set the page details. You can specify the margins,
the orientation, either portrait (higher than wide) or Landscape
(wider than high) formats. There are many templates, such as screen,
A4, US legal.
-
->
-
Toggle the display of the header field on the current slide. Header content can only be added in the master slide but you can choose to display the header only on some slides with this action.
-
->
-
Toggle the display of the footer field on the current slide. Footer content can only be added in the master slide but you can choose to display the footer only on some slides with this action.
-
->
-
Allows you to alter the background to your presentation
slides. Your options are
Color/Gradient
, (which lets you
set either a plain color or one of many gradients)
or
Picture
, which gives a dialog box to find the picture
you want. Set the
View mode:
for this picture
to
Scaled
,
Centered
,
or
Tiled
.
If you want a plain color, click in the box to select
it. Gradients only work when you have chosen two colors. The picture
option allows you to center the picture, zoom it to cover the entire
slide (if it is smaller than the screen, this is very useful) or tile
it. This is used when you want a small pattern to repeat across the
page. It's probably best used with patterns rather than pictures of
logos.
You can get rid of a picture by selecting another one or
choosing a color/gradient.