|
 |
|
| |
This filter rounds the corners of an image, optionally adding a
drop-shadow and a background layer.
The filter works on RGB and grayscale images that contain only one
layer. It creates a copy of the image or can optionally work on the
original. It uses the current background color to create a background
layer.
11.7.2.
Activate the filter
This filter is found in the image window menu under
→ → .
-
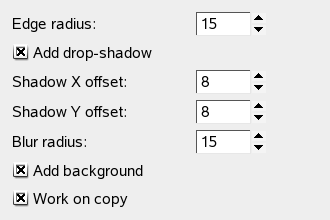
Edge radius
-
Rounding corners is done by selecting a quarter of a circle at
every corner and removing the area not covered by this selection.
The “edge radius” is the radius of the constructing
circle.
In the examples below, the filter was applied to a 100x100 pixels
image, with varying edge radius. For radius = 50, the four
quadrants just form a circle with diameter = 100, which exactly
fits into the original image outline. A radius greater than 50 is
possible, but look what happens...
-
Add drop-shadow
-
When this option is checked, the filter will cast a shadow behind
your image after rounding the image corners.
-
Shadow X/Y offset
-
X and Y offset determine where the shadow will be placed in
relation to the image. Offset is measured in pixels. High values
make the shadow look like it's far away, and low values will make
it look closer to the image.
Note that the shadow offsets as well as the blur radius are
limited to background area.
-
Blur radius
-
When Add drop-shadow is checked, you may
select a blur radius, which will be used by the
Drop Shadow filter.
The image will be enlarged in both dimensions depending on the
blur radius and the shadow offsets.
-
Add background
-
When you check this option (it is checked by default), the filter
will add a background layer below the existing layer, filled with
the current background color. The size of this new layer depends
on the blur radius and the shadow offsets.
-
Work on copy
-
If checked, the filter creates a new window containing a copy of
the image with the filter applied. The original image remains
unchanged.
|
|
|