21.3 Configuring the Boot Loader with YaST
The easiest way to configure the boot loader in your SUSE Linux Enterprise system is to
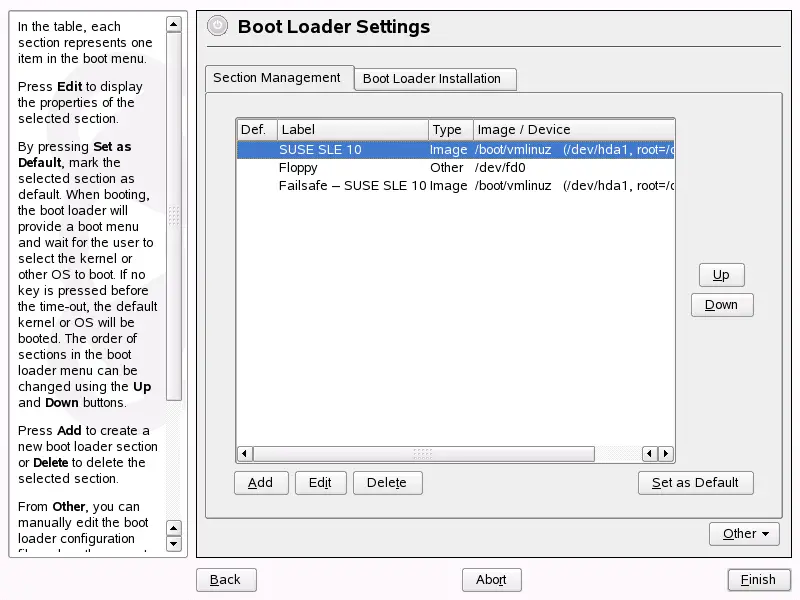
use the YaST module. In the YaST Control Center, select . As in Figure 21-1, this shows the current boot loader
configuration of your system and allows you to make changes.
Use the tab to edit, change, and delete
boot loader sections for the individual operating systems. To add an option,
click . To change the value of an existing option,
select it with the mouse and click . If you do not
want to use an existing option at all, select it and click
. If you are not familiar with boot loader options,
read Section 21.2,
Booting with GRUB first.
Use the tab to view and change
settings related to type, location, and advanced
loader settings.
21.3.1 Boot Loader Type
Set the boot loader type in . The
default boot loader in SUSE Linux Enterprise is GRUB. To use LILO, proceed as
follows:
Changing the Boot Loader Type
-
Select the tab.
-
For ,
select .
-
In the dialog box that opens, select one of the following
actions:
- Propose New Configuration
-
Have YaST propose a new configuration.
- Convert Current Configuration
-
Have YaST convert the current configuration. When converting the
configuration, some settings may be lost.
- Start New Configuration from Scratch
-
Write a custom configuration. This action is not available during the
installation of SUSE Linux Enterprise.
- Read Configuration Saved on Disk
-
Load your own /etc/lilo.conf. This action is not
available during the installation of SUSE Linux Enterprise.
-
Click to save the changes
-
Click in the main dialog to apply the
changes.
During the conversion, the old GRUB configuration is saved to disk. To use
it, simply change the boot loader type back to GRUB and choose
. This
action is available only on an installed system.
NOTE: Custom Boot Loader
If you want use a boot loader other than GRUB or LILO, select
. Read the documentation
of your boot loader carefully before choosing this option.
21.3.2 Boot Loader Location
To change the location of the boot loader, follow these steps:
Changing the Boot Loader Location
-
Select the tab then select one
of the following options for :
- Master Boot Record of /dev/hdX
-
This installs the boot loader in the MBR of a disk. X identifies the
hard disk, for example, a, b, c, or d:
hda => ide0 master
hdb => ide0 slave
hdc => ide1 master
hdd => ide1 slave
- Boot Sector of Boot Partition /dev/hdXY
-
The boot sector of the /boot partition. This
option is the default if you have several operating systems installed
on your hard drive. The Y stands for the partition (1, 2, 3, 4, 5,
etc.) as in:
/dev/hda1
- Boot Sector of Root Partition /dev/hdXY
-
The boot sector of the / (root) partition. Unless
a /boot partition is necessary or the MBR needs to
be used, this is the preferred default.
- Other
-
Use this option to specify the location of the boot loader manually.
-
Click to apply your changes.
21.3.3 Default System
To change the system that is booted by default, proceed as follows:
Setting the Default System
-
Open the tab.
-
Select the desired system from the list.
-
Click .
-
Click to activate these changes.
21.3.4 Boot Loader Time-Out
The boot loader does not boot the default system immediately. During the
time-out, you can select the system to boot or write some kernel parameters.
To set the boot loader time-out, proceed as follows:
Changing the Boot Loader Time-Out
-
Open the tab.
-
Click .
-
Check .
-
In , change the value of by typing in a new value, clicking the appropriate
arrow key with your mouse, or by using the arrow keys on the keyboard.
-
Click .
-
Click to save the changes.
Set for the boot menu should be displayed permanently without timing out by
disabling .
21.3.5 Security Settings
Using this YaST module, you can also set a password to protect
booting. This gives you an additional level of security.
Setting a Boot Loader Password
-
Open the tab.
-
Click .
-
In , check and set your password.
-
Click .
-
Click to save the changes.
21.3.6 Disk Order
If your computer has more than one hard disk, you can specify the boot
sequence of the disks to match the BIOS setup of the machine (see Section 21.2.2,
The File device.map). To do so, proceed as follows:
Setting the Disk Order
-
Open the tab.
-
Click .
-
If more than one disk is listed, select a disk and click
or to reorder the displayed
disks.
-
Click to save the changes.
-
Click to save the changes.
Using this module, you can also replace the master boot record with generic
code, which boots the active partition. Click in .
Enable to activate the
partition that contains the boot loader. Click to
save the changes.