21.8. Apache HTTP Secure Server Configuration
This section provides basic information on the Apache HTTP Server with the mod_ssl security module enabled to use the OpenSSL library and toolkit. The combination of these three components are referred to in this
section as the secure Web server or just as the secure server.
The mod_ssl module is a security module for the Apache HTTP Server. The mod_ssl module uses the tools provided by the OpenSSL Project to add a very important feature to the Apache
HTTP Server — the ability to encrypt communications. In contrast, regular HTTP communications between a browser and a Web server are sent in plain text, which could be intercepted and read by someone along the route between the browser and the
server.
This section is not meant to be complete and exclusive documentation for any of these programs. When possible, this guide points to appropriate places where you can find more in-depth documentation on particular subjects.
This section shows you how to install these programs. You can also learn the steps necessary to generate a private key and a certificate request, how to generate your own self-signed certificate, and how to install a certificate to use with your secure
server.
The mod_ssl configuration file is located at /etc/httpd/conf.d/ssl.conf. For this file to be loaded, and hence for mod_ssl to work, you must
have the statement Include conf.d/*.conf in the /etc/httpd/conf/httpd.conf file. This statement is included by default in the default Apache HTTP Server configuration
file.
21.8.1. An Overview of Security-Related Packages
To enable the secure server, you must have the following packages installed at a minimum:
-
httpd
-
The httpd package contains the httpd daemon and related utilities, configuration files, icons, Apache HTTP Server modules, man pages, and other files used by the Apache HTTP
Server.
-
mod_ssl
-
The mod_ssl package includes the mod_ssl module, which provides strong cryptography for the Apache HTTP Server via the Secure Sockets Layer (SSL) and Transport Layer Security
(TLS) protocols.
-
openssl
-
The openssl package contains the OpenSSL toolkit. The OpenSSL toolkit implements the SSL and TLS protocols, and also includes a general purpose cryptography library.
-
crypto-utils
-
The crypto-utils package provides a set of utilities to generate and manage SSL certificates and private keys. Among these utilities is genkey.
Additionally, other software packages provide certain security functionalities (but are not required by the secure server to function):
21.8.2. An Overview of Certificates and Security
Your secure server provides security using a combination of the Secure Sockets Layer (SSL) protocol and (in most cases) a digital certificate from a Certificate Authority (CA). SSL handles the encrypted communications as well as the mutual
authentication between browsers and your secure server. The CA-approved digital certificate provides authentication for your secure server (the CA puts its reputation behind its certification of your organization's identity). When your browser is
communicating using SSL encryption, the https:// prefix is used at the beginning of the Uniform Resource Locator (URL) in the navigation bar.
Encryption depends upon the use of keys (think of them as secret encoder/decoder rings in data format). In conventional or symmetric cryptography, both ends of the transaction have the same key, which they use to decode each other's transmissions. In
public or asymmetric cryptography, two keys co-exist: a public key and a private key. A person or an organization keeps their private key a secret and publishes their public key. Data encoded with the public key can only be decoded with the private
key; data encoded with the private key can only be decoded with the public key.
To set up your secure server, use public cryptography to create a public and private key pair. In most cases, you send your certificate request (including your public key), proof of your company's identity, and payment to a CA. The CA verifies the
certificate request and your identity, and then sends back a certificate for your secure server.
A secure server uses a certificate to identify itself to Web browsers. You can generate your own certificate (called a "self-signed" certificate), or you can get a certificate from a CA. A certificate from a reputable CA guarantees that a website is
associated with a particular company or organization.
Alternatively, you can create your own self-signed certificate. Note, however, that self-signed certificates should not be used in most production environments. Self-signed certificates are not automatically accepted by a user's browser — users
are prompted by the browser to accept the certificate and create the secure connection. Refer to Section 21.8.4, “Types of Certificates” for more information on the differences between self-signed and CA-signed certificates.
Once you have a self-signed certificate or a signed certificate from the CA of your choice, you must install it on your secure server.
21.8.3. Using Pre-Existing Keys and Certificates
If you already have an existing key and certificate (for example, if you are installing the secure server to replace another company's secure server product), you can probably use your existing key and certificate with the secure server. The following
two situations provide instances where you are not able to use your existing key and certificate:
-
If you are changing your IP address or domain name — Certificates are issued for a particular IP address and domain name pair. You must get a new certificate if you are changing your IP address or domain name.
-
If you have a certificate from VeriSign and you are changing your server software — VeriSign is a widely used CA. If you already have a VeriSign certificate for another purpose, you may have been considering using your
existing VeriSign certificate with your new secure server. However, you are not be allowed to because VeriSign issues certificates for one specific server software and IP address/domain name combination.
If you change either of those parameters (for example, if you previously used a different secure server product), the VeriSign certificate you obtained to use with the previous configuration will not work with the new configuration. You must obtain a
new certificate.
If you have an existing key and certificate that you can use, you do not have to generate a new key and obtain a new certificate. However, you may need to move and rename the files which contain your key and certificate.
Move your existing key file to:
/etc/pki/tls/private/server.key
Move your existing certificate file to:
/etc/pki/tls/certs/server.crt
If you are upgrading from the Red Hat Secure Web Server, your old key (httpsd.key) and certificate (httpsd.crt) are located in
/etc/httpd/conf/. Move and rename your key and certificate so that the secure server can use them. Use the following two commands to move and rename your key and certificate files:
mv /etc/httpd/conf/httpsd.key /etc/pki/tls/private/server.key mv /etc/httpd/conf/httpsd.crt /etc/pki/tls/certs/server.crt
Then, start your secure server with the command:
/sbin/service httpd start
21.8.4. Types of Certificates
If you installed your secure server from the RPM package provided by Red Hat, a randomly generated private key and a test certificate are generated and put into the appropriate directories. Before you begin using your secure server, however, you must generate your own key
and obtain a certificate which correctly identifies your server.
You need a key and a certificate to operate your secure server — which means that you can either generate a self-signed certificate or purchase a CA-signed certificate from a CA. What are the differences between the two?
A CA-signed certificate provides two important capabilities for your server:
-
Browsers (usually) automatically recognize the certificate and allow a secure connection to be made, without prompting the user.
-
When a CA issues a signed certificate, they are guaranteeing the identity of the organization that is providing the webpages to the browser.
If your secure server is being accessed by the public at large, your secure server needs a certificate signed by a CA so that people who visit your website know that the website is owned by the organization who claims to own it. Before signing a
certificate, a CA verifies that the organization requesting the certificate was actually who they claimed to be.
Most Web browsers that support SSL have a list of CAs whose certificates they automatically accept. If a browser encounters a certificate whose authorizing CA is not in the list, the browser asks the user to either accept or decline the connection.
You can generate a self-signed certificate for your secure server, but be aware that a self-signed certificate does not provide the same functionality as a CA-signed certificate. A self-signed certificate is not automatically recognized by most Web
browsers and does not provide any guarantee concerning the identity of the organization that is providing the website. A CA-signed certificate provides both of these important capabilities for a secure server. If your secure server is to be used in a
production environment, a CA-signed certificate is recommended.
The process of getting a certificate from a CA is fairly easy. A quick overview is as follows:
-
Create an encryption private and public key pair.
-
Create a certificate request based on the public key. The certificate request contains information about your server and the company hosting it.
-
Send the certificate request, along with documents proving your identity, to a CA. Red Hat does not make recommendations on which certificate authority to choose. Your decision may be based on your past experiences, on the experiences of your friends
or colleagues, or purely on monetary factors.
Once you have decided upon a CA, you need to follow the instructions they provide on how to obtain a certificate from them.
-
When the CA is satisfied that you are indeed who you claim to be, they provide you with a digital certificate.
-
Install this certificate on your secure server and begin handling secure transactions.
Whether you are getting a certificate from a CA or generating your own self-signed certificate, the first step is to generate a key. Refer to Section 21.8.5, “Generating a Key” for instructions.
You must be root to generate a key.
First, use the cd command to change to the /etc/httpd/conf/ directory. Remove the fake key and certificate that were generated during the installation with the following commands:
rm ssl.key/server.key rm ssl.crt/server.crt
The crypto-utils package contains the genkey utility which you can use to generate keys as the name implies.
To create your own private key, please ensure the crypto-utils package is installed. You can view more options by typing man genkey in your terminal. Assuming you wish to generate keys for www.example.com using the genkey utility, type in the following command in your terminal:
genkey www.example.com
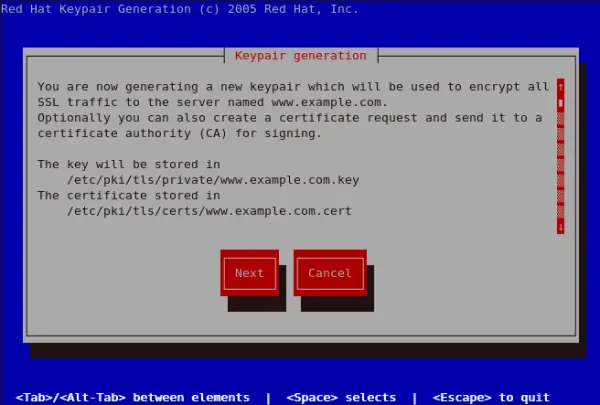
Please note that the make based process is no longer shipped with RHEL 5. This will start the genkey graphical user interface. The figure below illustrates the first screen. To navigate, use the keyboard arrow and tab keys. This windows indicates where your key will be stored and prompts you to proceed or cancel the operation. To proceed to the next step, select Next and press the Return (Enter) key.
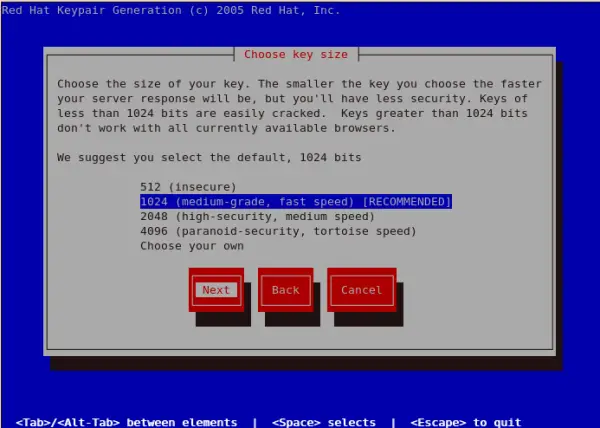
The next screen prompts you to choose the size of your key. As indicated, the smaller the size of your key, the faster will the response from your server be and the lesser your level of security. On selecting your preferred, key size using the arrow keys, select Next to proceed to the next step. The figure below illustrates the key size selection screen.
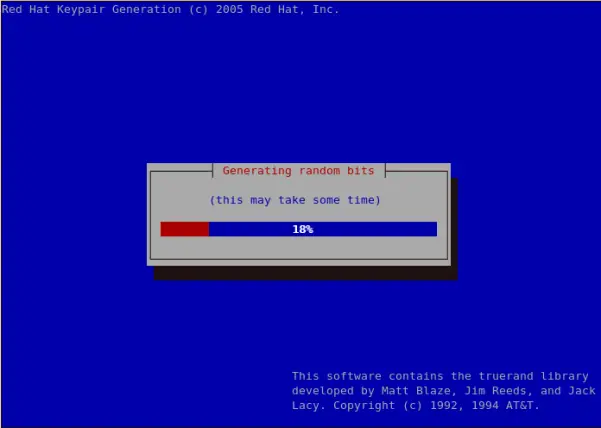
Selecting the next step will initiate the random bits generation process which may take some time depending on the size of your selected key. The larger the size of your key, the longer it will take to generate it.
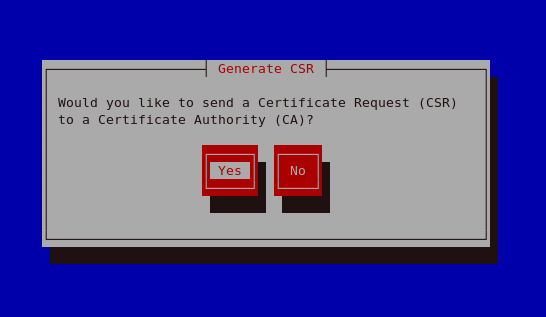
On generating your key, you will be prompted to send a Certificate Request (CSR) to a Certificate Authority (CA).
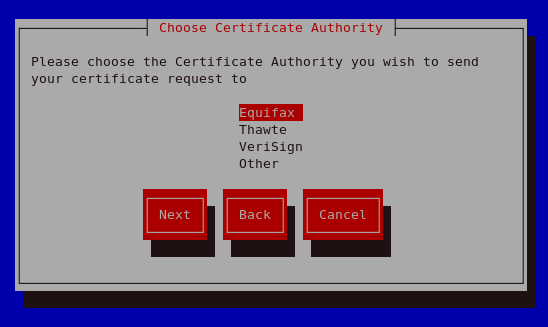
Selecting Yes will prompt you to select the Certificate Authority you wish to send your request to. Selecting No will allow you to generate a self-signed certificate. The next step for this is illustrated in Figure 21.17, “Generating a self signed certificate for your server”.
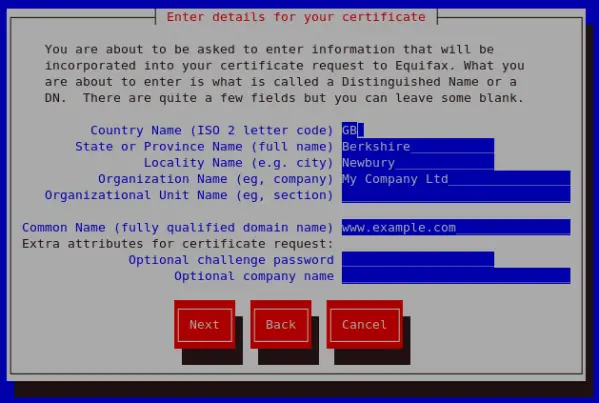
On Selecting your preferred option, select Next to proceed to the next step. The next screen allows you to enter the details of your certificate.
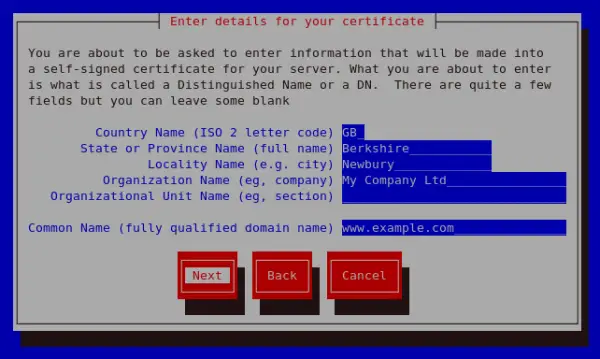
If you prefer to generate a self signed cert key pair, you should not generate a CSR. To do this, select No as your preferred option in the Generate CSR screen. This will display the figure below from which you can enter your certificate details. Entering your certificate details and pressing the return key will display the Figure 21.19, “Protecting your private key” from which you can choose to encrypt your private key or not.
On entering the details of your certificate, select Next to proceed. The figure below illustrates an example of a the next screen displayed after completing the details for a certificate to be sent to Equifax. Please note that if you are generating a self signed key, for your server, this screen is not displayed.
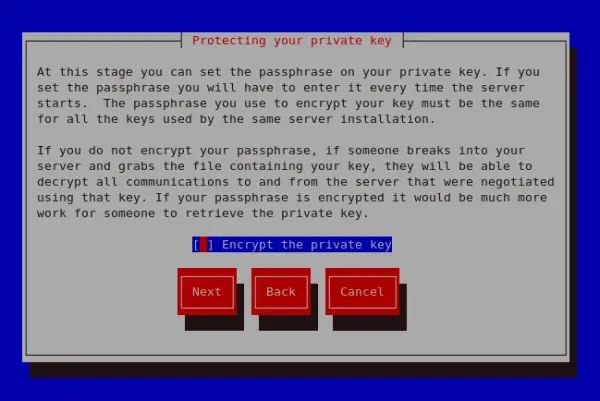
Pressing the return key, will display the next screen from which you can enable or disable the encryption of the private key. Use the spacebar to enable or disable this. When enabled, a [*] character will be displayed. On selecting your preferred option, select Next to proceed to the next step.
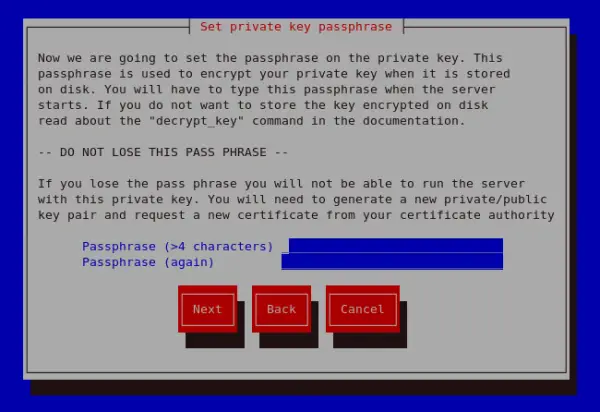
The next screen allows you to set your key passphase. Please do not lose this pass phase as you will not be able to run the server without it. You will need to regenerate a new private or public key pair and request a new certificate from your CA as indicated. For security, the passphase is not displayed as you type. On typing your preferred passphase, select Next to go back to your terminal.
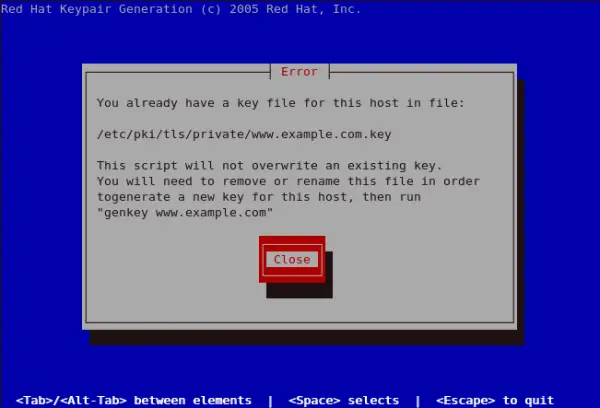
If you attempt to run genkey makeca on a server that has an existing key pair, an error message will be displayed as illustrated below. You need to delete your existing key file as indicated to generate a new key pair.
21.8.6. How to configure the server to use the new key
The steps to configure the Apache HTTP Server to use the new key are:
-
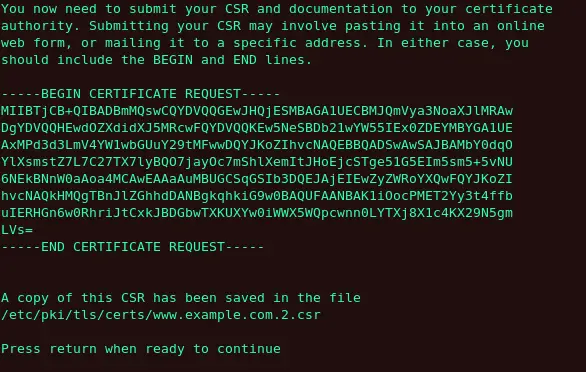
Obtain the signed certificate from the CA after submitting the CSR.
-
Copy the certificate to the path, for example /etc/pki/tls/certs/www.example.com.crt
-
Edit /etc/httpd/conf.d/ssl.conf. Change the SSLCertificateFile and SSLCertificateKey lines to be.
SSLCertificateFile /etc/pki/tls/certs/www.example.com.crt
SSLCertificateKeyFile /etc/pki/tls/private/www.example.com.key
where the "www.example.com" part should match the argument passed on the genkey command.