26.3 Configuring an LDAP Server with YaST
Use YaST to set up an LDAP server. Typical use cases for LDAP servers
include the management of user account data and the configuration of
mail, DNS, and DHCP servers.
NOTE: Capitalization of the Names of the LDAP Objects
The YaST LDAP modules used to capitalize the names of all LDAP objects
they created or showed. Now YaST obeys the correct spellings according
to the name schema.
To set up an LDAP server for user account data, make sure the
yast2-ldap-server and
openldap2 packages and packages they depend on
are installed. Then proceed as follows:
-
Log in as root.
-
Start YaST and select to
invoke the configuration wizard.
-
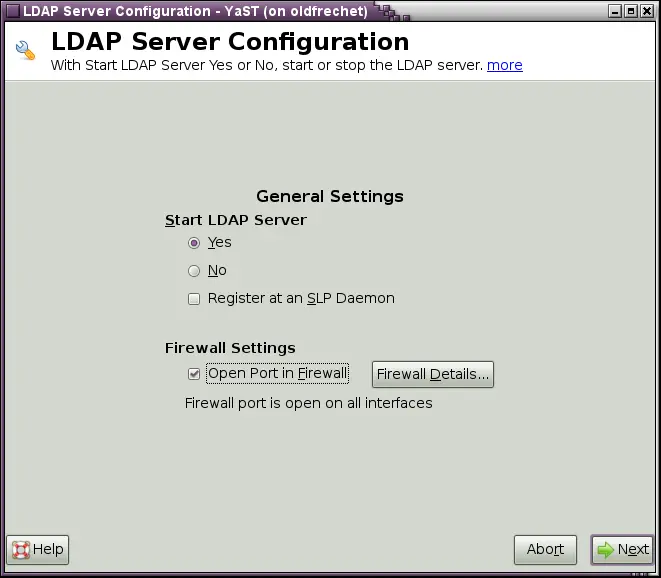
Configure the of your LDAP server
(you can change these settings later)—see
Figure 26-2:
-
Set LDAP to be started.
-
If the LDAP server should announce its services via SLP, check
.
-
Configure .
-
Click .
-
Consider to . TLS is an encryption
technology. For more information, see
Step 4.
-
Confirm with entering an
and then clicking
—see
Figure 26-2.
-
Check the and
click to exit the configuration wizard.
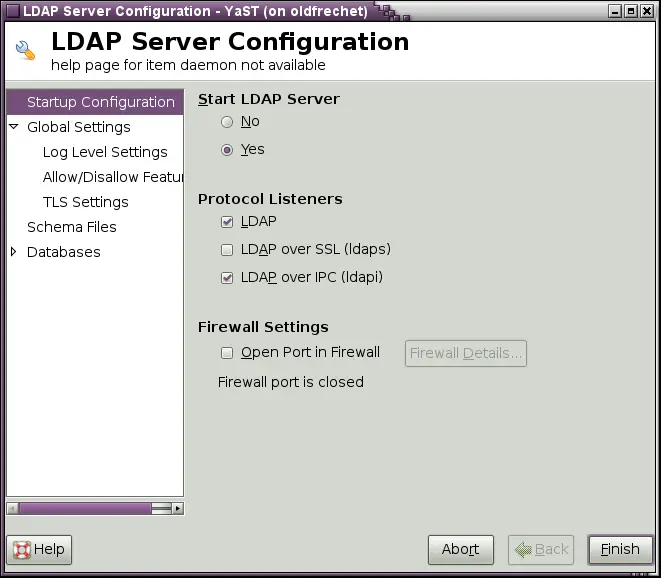
For changes or additional configuration start the LDAP server module
again and in the left pane expand to
make subentries visible—see
Figure 26-4:
-
With , configure the degree of
logging activity (verbosity) of the LDAP server. From the predefined
list, select or deselect the logging options according to your needs.
The more options are enabled, the larger your log files grow.
-
From determine the
connection types the LDAP server should allow. Choose from:
- LDAPv2 Bind Requests
-
This option enables connection requests (bind requests) from clients
using the previous version of the protocol (LDAPv2).
- Anonymous Bind When Credentials Not Empty
-
Normally the LDAP server denies any authentication attempts with
empty credentials (DN or password). Enabling this option, however,
makes it possible to connect with a password and no DN to establish
an anonymous connection.
- Unauthenticated Bind When DN Not Empty
-
Enabling this option makes it possible to connect without
authentication (anonymously) using a DN but no password.
- Unauthenticated Update Options to Process
-
Enabling this option allows non-authenticated (anonymous) update
operations. Access is restricted according to ACLs and other rules
(see Section 26.7.1, Global Directives in slapd.conf).
-
Then from determine which
flags the LDAP server should disallow. Choose from:
- Disable Acceptance of Anonymous Bind Requests
-
- Disable Simple Bind Authentication
-
- Disable Forcing Session to Anonymous Status upon StartTLS Operation Receipt
-
- Disallow the StartTLS Operation if Authenticated
-
-
To configure secure communication between client and server, proceed
with :
-
Activate to enable TLS and SSL
encryption of the client/server communication.
-
Either by specifying the exact
path to its location or enable the . If the is not available because it has not been
created during installation, go for first— for more information, see
Section 35.2, YaST Modules for CA Management.
Add Schema files to be included in the server's configuration by
selecting in the left part of the dialog.
The default selection of schema files applies to the server providing a
source of YaST user account data.
YaST allows to add traditional Schema files (usually with a name
ending in .schema) or LDIF files containing Schema
definitions in OpenLDAP's LDIF Schema format.
To configure the databases managed by your LDAP server, proceed as
follows:
-
Select the item in the left part of the
dialog.
-
Click to add the new database.
-
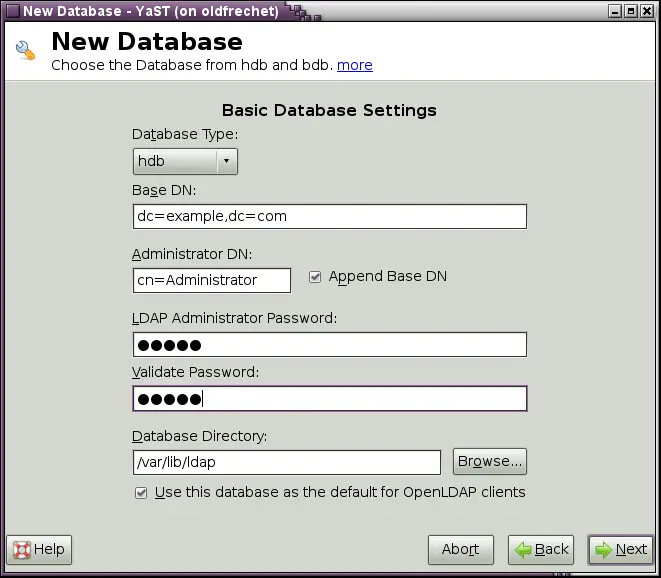
Enter the requested data:
-
-
Enter the base DN of your LDAP server.
-
-
Enter the DN of the administrator in charge of the server. If you
check , only provide the
cn of the administrator and the system fills in
the rest automatically.
- LDAP Administrator Password
-
Enter the password for the database administrator.
- Use This Database as the Default for OpenLDAP Clients
-
For convenience, check this option if wanted.
-
In the next dialog, enable enforcement of password policies to provide
extra security to your LDAP server:
-
Check to be able to
specify a password policy.
-
Activate to have clear
text passwords be hashed before they are written to the database
whenever they are added or modified.
-
provides a
meaningful error message to bind requests to locked accounts.
WARNING: Locked Accounts in Security Sensitive Environments
Do not use the
option if your environment is sensitive to security issues, because
the Locked Account
error message provides security
sensitive information that can be exploited by a potential attacker.
-
Enter the DN of the default policy object. To use a DN other than the
one suggested by YaST, enter your choice. Otherwise accept the
default settings.
-
Complete the database configuration by clicking
.
If you have not opted for password policies, your server is ready to run
at this point. If you chose to enable password policies, proceed with the
configuration of the password policy in detail. If you chose a password
policy object that does not yet exist, YaST creates one:
-
Enter the LDAP server password. In the navigation tree below
expand your database object and activate
the item.
-
Make sure is activated.
Then click .
-
Configure the password change policies:
-
Determine the number of passwords stored in the password history.
Saved passwords may not be reused by the user.
-
Determine whether users can change their password and whether they
need to change their password after a reset by the administrator.
Optionally require the old password for password changes.
-
Determine whether and to what extent passwords should be subject to
quality checking. Set a minimum password length that must be met
before a password is valid. If you select , users are allowed to use encrypted passwords
although the quality checks cannot be performed. If you opt for
only those passwords
that pass the quality tests are accepted as valid.
-
Configure the password aging policies:
-
Determine the minimum password age (the time that needs to pass
between two valid password changes) and the maximum password age.
-
Determine the time between a password expiration warning and the
actual password expiration.
-
Set the number of postponement uses of an expired password before the
password expires entirely.
-
Configure the lockout policies:
-
Enable password locking.
-
Determine the number of bind failures that trigger a password lock.
-
Determine the duration of the password lock.
-
Determine for how long password failures are kept in the cache before
they are purged.
-
Apply your password policy settings with .
To edit a previously created database, select its base DN in the tree to
the left. In the right part of the window, YaST displays a dialog
similar to the one used for the creation of a new database—with the
main difference that the base DN entry is grayed out and cannot be
changed.
After leaving the LDAP server configuration by selecting
, you are ready to go with a basic working
configuration for your LDAP server. To fine-tune this setup, make use of
OpenLDAP's dynamic configuration backend.
The OpenLDAP's dynamic configuration backend stores the configuration
in an LDAP database itself. That database consists of a set of
.ldif files in /etc/openldap/slapd.d.
There is no need to access these files directly. To access the settings you can
either use the YaST LDAP server module (the
yast2-ldap-server package) or an LDAP client such as
ldapmodify or ldapsearch. For more
information on the dymanic configuration of OpenLDAP, see the OpenLDAP
Administration Guide.