Subsections
- 5.6.1 The Normal, Dissolve, and Behind Blending Modes
- 5.6.2 The Addition, Subtract, and Difference Blending Modes
- 5.6.3 The Multiply (Burn), Divide (Dodge), Screen, and Overlay Blending Modes
- 5.6.4 The Darken Only and Lighten Only Blending Modes
- 5.6.5 The Hue, Saturation, Value, and Color Blending Modes
5.6 The Blending Modes
Usually layers are opaque, which means that upper layers cover and
visually block lower ones. Blending modes change this behavior and
allow some color features of a layer to be combined with the colors of
layers below it. Blending modes can also be used to affect how color
from a painting tool combines with the layer the paint is applied to.
Figure
5.11(a)
Figure 5.11:
The Blending Mode Menus
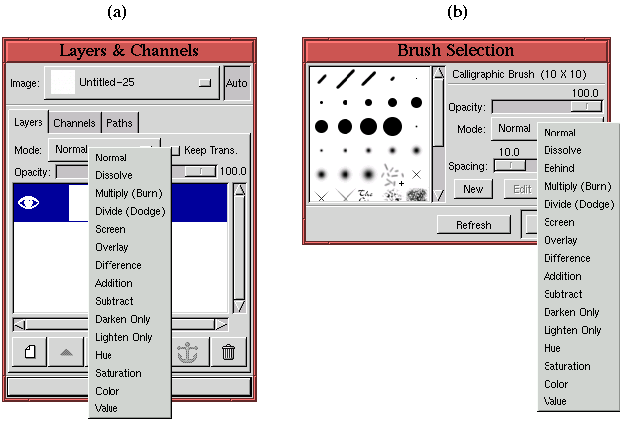 |
illustrates the blending mode menu for layers, which is found in the
Layers dialog. Figure
5.11(b) shows the
blending mode menu for painting tools
, which is found in the
Brush Selection dialog.
5.1 The menu in the
Brush Selection dialog applies the selected blending mode to all
the paint tools: the
Pencil,
Paintbrush,
Airbrush,
Ink Pen, and
Xinput Airbrush tools. In addition, this
menu controls the way the
Bucket Fill,
Gradient, and
Clone tools apply their paint.
The different blending modes are described in this section, and their
practical uses and applications are described in the next. The GIMP
has 16 different blending modes. They are listed in the following
five logical groups:
- Normal, Dissolve, and Behind (available in paint mode only)
- Difference, Addition, and Subtract
- Multiply (Burn), Divide (Dodge), Screen, and Overlay
- Darken Only and Lighten Only
- Hue, Saturation, Color, and Value
In the following descriptions of the blending modes, the pixels of the
upper layer (or of the applied paint) are referred to as the
foreground pixels and those of the lower layer or layers as the
background pixels. The notations F and B are used to represent
their respective values. Blending the foreground pixel value F with
the background value B yields the resultant pixel value R.
5.6.1 The Normal, Dissolve, and Behind Blending Modes
Normal, Dissolve, and Behind are pseudo-blending
modes because they don't really combine the foreground and background
pixel values of the image.
Normal mode is the default GIMP behavior where the foreground
pixels are visible and the background pixels are not. Of course, this
can be changed by adjusting the opacity slider in the Layers dialog
(more on opacity and transparency is discussed in
Section
5.7).
Dissolve mode works by allowing a percentage of background
pixels to be seen through the foreground. It does this by making some
parts of the foreground partially transparent and the rest fully
transparent. These two sets are intermingled in a random way. For
the Dissolve mode to have an effect, the foreground layer must
have an alpha channel with values less than 255. The alpha channel
for a layer can be modified with a layer mask. The details of working
with layer masks are discussed in Section
4.2.
Figure
5.12
Figure 5.12:
The Dissolve Blending Mode
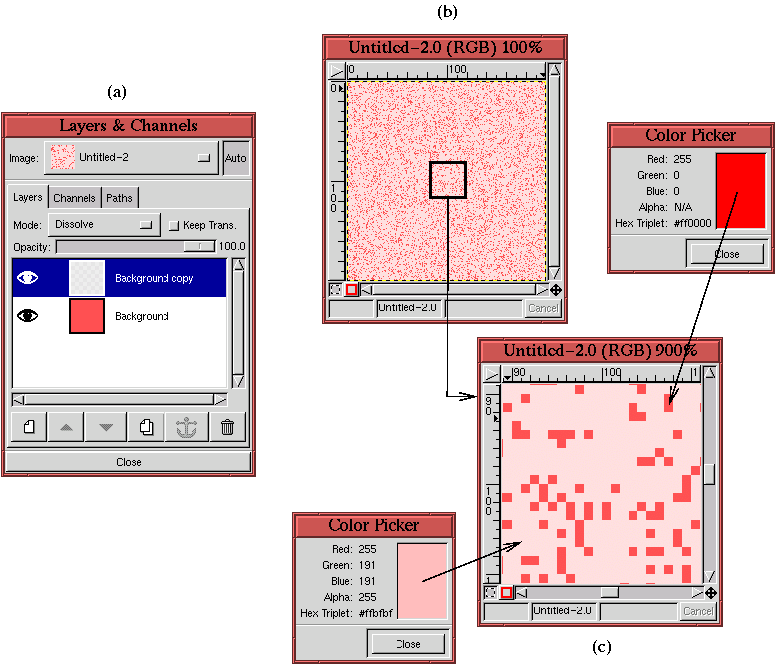 |
illustrates the use of
Dissolve.
Figure
5.12(a) shows the Layers dialog which
illustrates how this example is constructed. The image consists of
two layers: a red background and a white foreground. The foreground
has a uniform alpha channel set to a value of 191 (about 75% opaque).
The Mode menu in Figure
5.12(a) shows that the
Dissolve mode has been chosen for the foreground.
Figure
5.12(b) shows the result of the Dissolve blending mode. Due to the value of the foreground's alpha
channel the result is that 75% of the white pixels are 75% opaque
and 25% are fully opaque. The details of the effect can be more
clearly seen in the small region framed by the black box shown in
Figure
5.12(b). This region is zoomed 900%
and redisplayed in Figure
5.12(c), which makes
the relationship of the red and white pixels more apparent.
Unlike all the other blend modes in the GIMP, the Behind mode
only works with painting tools. It is not available as a blending
mode for layers. To understand how it works, imagine a pane of glass
that has something painted on the front surface but there are some
parts of the pane that are bare, or have only a partially transparent
paint on it. Painting on the back surface of the pane lets the color
from this new paint show through to the front wherever the front is
not fully opaque. Figure
5.13
Figure 5.13:
The Behind Blending Mode
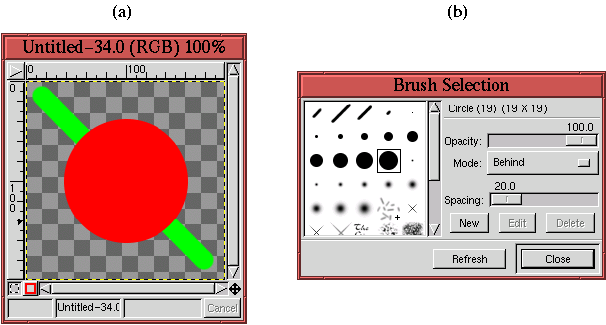 |
illustrates this effect.
In Figure
5.13(a), a single-layer image with a
centered red circle is displayed. The rest of the layer is
transparent. The Brush Selection dialog, shown in
Figure
5.13(b), has been used to choose a large,
hard brush and to set the blending mode to Behind. The figure
shows the result of painting a bright green stripe, using the Paintbrush tool, through the red circle. In Behind mode,
however, the green is only seen through the transparent parts of the
layer. This mode only works for layers with alpha channels.


