Using the Wizard to create a query
Queries created by the wizard provide a list or lists of information based upon what one wants to know. It is possible to obtain a single answer or multiple answers, depending upon the circumstances. Queries which require calculations are best created with the Design view.
In the main database window, click the Queries icon in the Databases section, then in the Tasks section, click Use Wizard to Create Query. The Query Wizard window opens. The information we want is what albums are by a certain musical group or individual (the album's author). We can include when each album was bought.
 | When working with a query, more than one table can be used. Since different tables may contain the same field names, the format for naming fields in a query is Table name and field name. A period (.) is placed between the table name and the field name.
|
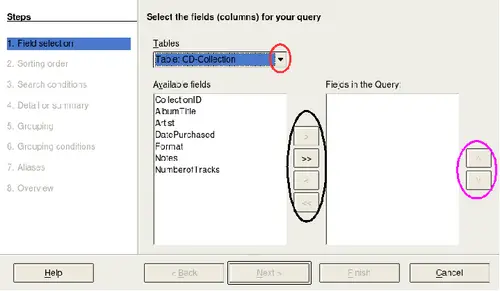
First page of the Query Wizard.
Top of page
Step 1: Select the fields.
- Select the CD-Collection table from the dropdown list of tables.
- If the Tables selection is not Table: CD-Collection, click the arrow (circled in red in Figure 66).
- Click Table: CD-Collection in the list to select it.
- Select fields from the CD-Collection table in the Available fields list.
- Click AlbumTitle, and use the > button to move it to the Fields in Query list.
- Move the Artist and DatePurchased fields in the same manner.
- Use the up arrow to change the order of the fields: artist, album, and date purchased.
- Click the CD-Collection.Artist field.
- Click the up arrow to move it above CD-Collection.AlbumTitle.
- Click Next.
-
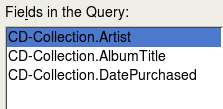
List of fields added to the query.
 | To change the order of the fields, select the field you want to move and click the up or down arrow to move it up or down.
|
Top of page
Step 2: Select the sorting order.
Up to four fields can be used to sort the information of our query. A little simple logic helps at this point. Which field is most important?
In our query, the artist is most important. The album title is less important, and the date purchased is of least importance. Of course, if we were interested in what music we bought on a given day, the date purchased would be the most important.
-
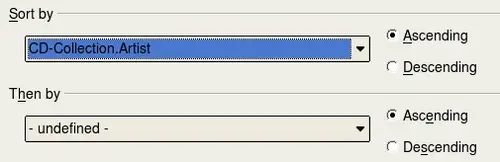
Sorting order page.
- Click the first Sort by dropdown list.
- Click CD-Collection.Artist to select it.
- If you want the artists to be listed in alphabetical order (a-z), select Ascending on the right. If you want the artist listed in reverse order (z-a), select Descending on the right.
- Click the second Sort by dropdown list.
- Click CD-Collection.ArtistTitle.
- Select Ascending or Descending according to the order you want.
- Repeat this process for CD-Collection.DatePurchased.
- Click Next.
Top of page
Step 3: Select the search conditions.
The search conditions available are listed below. They allow us to compare the name we entered with the names of the artist in our database and decide whether to include a particular artist in our query or not.
- is equal to: the same as
- is not equal to: not the same as
- is smaller than: comes before
- is greater than: comes after
- is equal or less than: the same as or comes before
- is equal or greater than: the same as or comes after
- like: similar to in some way
|
| These conditions apply to numbers, letters (using the alphabetical order), and dates.
|
- Since we are only searching for one thing, we will use the default setting of Match all of the following.
- We are looking for a particular artist, so select is equal to.
- Enter the name of the artist in the Value box. Click Next.
Top of page
Step 4: Select type of query.
We want simple information, so the default setting: Detailed query is what we want. Click Next at the bottom of the window.
|
| Since we have a simple query, the Grouping and Grouping conditions are not needed. Those two steps are skipped in our query.
|
Step 5: Assign aliases if desired.
We want the default settings. Click Next.
Step 6: Overview.
Name the query (suggestion: Query_Artists). To the right of this are two choices. Select Display Query. Click Finish.
Step 7: Modify the query.
We are skipping this step since we have nothing to modify. If you select the Modify Query choice, the query would open in Design view. To make modifications, follow the instructions in the next section, “Using the Design View to create a query".
Top of page


