Follow Techotopia on Twitter

On-line Guides
All Guides
eBook Store
iOS / Android
Linux for Beginners
Office Productivity
Linux Installation
Linux Security
Linux Utilities
Linux Virtualization
Linux Kernel
System/Network Admin
Programming
Scripting Languages
Development Tools
Web Development
GUI Toolkits/Desktop
Databases
Mail Systems
openSolaris
Eclipse Documentation
Techotopia.com
Virtuatopia.com
Answertopia.com

How To Guides
Virtualization
General System Admin
Linux Security
Linux Filesystems
Web Servers
Graphics & Desktop
PC Hardware
Windows
Problem Solutions
Privacy Policy


7.21. Partitioning Your System

If you chose one of the three automatic partitioning options and did not select Review , skip ahead to Section 7.23, “Package Group Selection”.
If you chose one of the automatic partitioning options and selected Review , you can either accept the current partition settings (click Next ), or modify the setup manually in the partitioning screen.

Note

Please note that in the text mode installation it is not possible to work with LVM (Logical Volumes) beyond viewing the existing setup. LVM can only be set up during graphical installation.
If you chose to create a custom layout, you must tell the installation program where to install Fedora. This is done by defining mount points for one or more disk partitions in which Fedora is installed. You may also need to create and/or delete partitions at this time.

Note

If you have not yet planned how to set up your partitions, refer to Appendix A, An Introduction to Disk Partitions and Section 7.21.4, “Recommended Partitioning Scheme”. At a bare minimum, you need an appropriately-sized root partition, and a swap partition equal to twice the amount of RAM you have on the system. Itanium system users should have a /boot/efi/ partition of approximately 100 MB and of type FAT (VFAT), a swap partition of at least 512 MB, and an appropriately-sized root (/) partition.
Partitioning on x86, AMD64, and Intel 64 Systems
The main partitioning screen.
Figure 7.19. Partitioning on x86, AMD64, and Intel® 64 Systems

With the exception of certain esoteric situations, anaconda can handle the partitioning requirements for a typical installation.

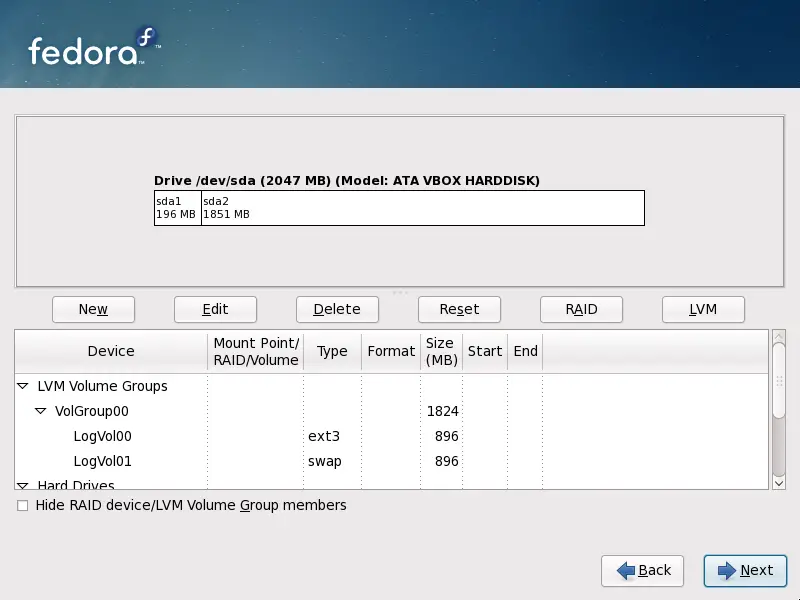
7.21.1. Graphical Display of Hard Drive(s)

The partitioning screen offers a graphical representation of your hard drive(s).
Using your mouse, click once to highlight a particular field in the graphical display. Double-click to edit an existing partition or to create a partition out of existing free space.
Above the display, you can review the Drive name (such as /dev/hda), the Geom (which shows the hard disk's geometry and consists of three numbers representing the number of cylinders, heads, and sectors as reported by the hard disk), and the Model of the hard drive as detected by the installation program.


  Published under the terms of the Open Publication License Design by Interspire