Plug-in From Existing JAR Archives
 File > New > Project... > Plug-in Development > Plug-in from existing JAR archive
from the top level menu.
The creation of a plug-in project from existing JAR archives is a two-step process:
- Select the JAR archives
- Specify the plug-in properties
JAR Selection
The JAR Selection wizard page lists the JAR archives to be included in the plug-in.
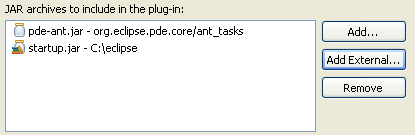
The Add... button opens a dialog that lets you browse the workspace for JAR archives.
The Add External... button opens a file dialog that lets you browse the file system for JAR archives.
Plug-in Properties
The Plug-in Properties wizard page allows you to specify the plug-in project settings, plug-in properties and target platform.
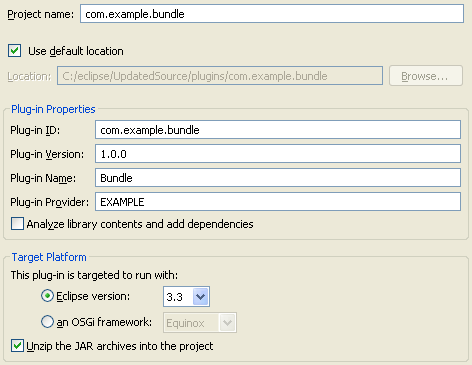
It is recommended to use the reverse domain naming convention (e.g. com.example.bundle) for the project name.
The Location field specifies the default project location as a subdirectory nested inside the workspace location. The project location can be changed to any writable location by unchecking the Use default location checkbox and entering the location of choice.
A Plug-in ID is mandatory and must comply with the
plugin.dtd. It is recommended - but not mandatory - for the plug-in ID to match the project name.
A Plug-in Version is mandatory and must be of the form major.minor.service (e.g. 1.3.0).
A Plug-in Name is the translatable presentation name of the plug-in. This field is required.
A Plug-in Provider is the translatable name of the plug-in provider. This field is optional.
You can optionally use PDE to Analyze library contents and add dependencies.
PDE analyzes the contents of the libraries specified on the
Jar Selection page, looking for dependencies that may be
required by the plug-in project. These dependencies are then automatically
added to the Manifest.
Target Platform
The Target Platform options are intended as a pre-filter that determines which pages of the manifest editor should be visible when the new plug-in project is created.
For instance, the Extensions and Extension Points pages will be visible if the Eclipse version option is chosen but hidden if the an OSGi framework option is chosen.
Also, the Package Visibility section in the Runtime page of the manifest editor will be hidden if the standard OSGi framework option is selected; since, this section offers Equinox-specific tooling.
Unzipping JARs
Whether the JARs should be zipped or unzipped depends on how you want to package the plug-in. If the plug-in is to be shipped as a single JAR - which is the recommended format as of Eclipse 3.1 - the individual JAR archives should be unzipped. If the plug-in is to be shipped as a flat directory, then the individual JAR archives should be left intact.


