Advanced - Adding JAR Files to a MIDlet Suite
This document provides guidance on how to add external JAR files to
a MIDlet Suite project.
Types of JAR Files
From the point of view of a Java ME project, there are two general categories of
JAR files that might be added to a MIDlet Suite project. It is very important
that you understand the distinction between the two, since they have to be
added differently to get the result you want. The two categories are:
-
Hardware JAR Files
This category of JAR files contain functionality that allows a MIDlet to interact
with hardware that is part of the phone or other mobile device onto which your
MIDlet will be installed. A JAR file that contains Bluetooth™ interface
classes is one example of this category.
JAR files of this type are obtained from the device manufacturer, usually as
part of a Wireless Toolkit (WTK), or else as an add-on to one. The JAR files
exist solely to allow you, the Java ME developer, to compile your MIDlet properly
against them so that it has all the correct references when your MIDlet is
deployed. You will not be installing the classes in a Hardware JAR file
onto the mobile device - they will already be there waiting for you.
-
Application JAR Files
This category of JAR files contains classes that you, the Java ME developer
may or may not have written, but which will end up as part of the MIDlet
that you will deploy to the mobile device. An example of a JAR file in
this category might be one that contains an XML parsing library that you
will use to handle data that your MIDlet will send to, or receive from,
a server.
JAR files of this type are typically obtained from sources other than
the device manufacturer. Certainly, if you wrote the code in the JAR
file, it's in this category.
The reason for the distinction has to do with what MTJ needs to do
with the classes in the JAR file. For Hardware JAR files, MTJ needs
ensure that the classes in the file are part of your classpath during the
build process so that your MIDlet will compile properly, however these
classes must not be packaged up as part of your
deployed MIDlet. To do so would be to attempt to override classes that
are already implemented in the mobile device. This would probably not
work, in the first place, since many of these classes have native code
hooks which cannot be used from inside the "sandbox" in which a MIDlet
runs. In the second place, a MIDlet that contains native hooks should
fail the mandatory preverification step that is part of the deployment
process. Finally, even if that didn't happen, no self-respecting
MIDlet container should allow a MIDlet to override system classes - it
should reject the MIDlet as being invalid.
For Application JAR files, on the other hand, MTJ needs to extract
all the classes, resources, etc., combine them together with the corresponding
items in the MIDlet suite project, and put them all into the resulting
deployable JAR file. Java ME devices do not have the concept of a classpath
the way that J2SE and J2EE systems do. A Java ME suite consists of only
two files - a JAR file and a JAD file. Every class or resource that your
MIDlet will access must therefore be bundled together into the single
JAR file.
MTJ distinguishes between the two categories of JAR files based on
the way that you add the file to the system and, potentially, the
"export" setting associated with the jar file. It is therefore important
that you:
- determine the correct category for the JAR file and then
- add it to the system in the correct manner.
Adding Hardware JAR files
There are two different ways that hardware JAR files can be
added to the system. They can either be added via the
Device Management preference page, or they can be added
directly to the project, but not exported.
Using Device Definitions to Add Hardware JAR files
Hardware JAR files may be added as a new library
from the
Device Management
preferences page. In many cases, MTJ is able to extract
all the relevant information from your Wireless Toolkit to create
the appropriate library definitions. If it does not,
you first need to add a new library to a device definition
(see
here for how
to do this). Finally, modify your MIDlet Suite Project's project
properties to use the new or updated device definition.
Once this is done, the JAR file will be included in your project's
build path, so that the compiler will find the relevant class
definitions, however MTJ will not attempt to include these
classes in your deployed JAR file - as far as MTJ is concerned,
this JAR file is now part of the Wireless Toolkit, and is there
for reference purposes only.
If, when you try to run your MIDlet in the emulator, particularly
in OTA mode, you get complaints about illegal classes, this may
be a sign that you have incorrectly added a Hardware JAR to the system as if
it were an Application JAR.
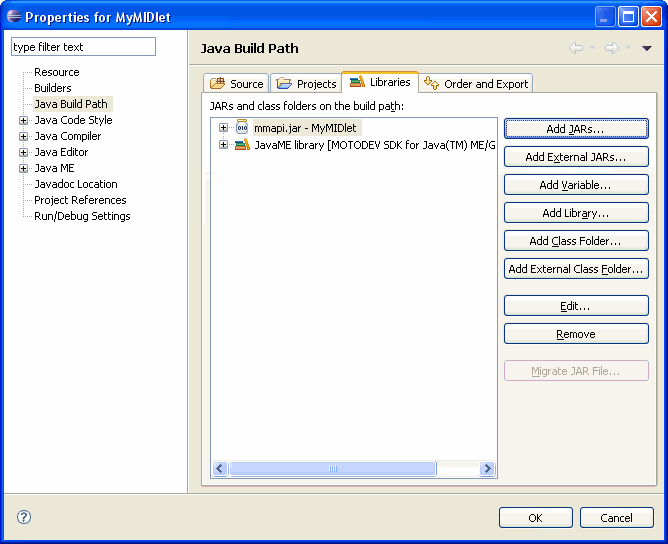
Adding Directly To A Project
Hardware JAR files may also be added to a project by simply
adding them to the "Libraries" tab in the "Java Build Path" portion
of the project properties. For example, in the project shown below,
the file mmapi.jar has been added
to the project.
If you add a JAR file this way, however, it is vitally important
that you not have the checkbox next
to this item checked on the "Order and Export" page, as shown below:
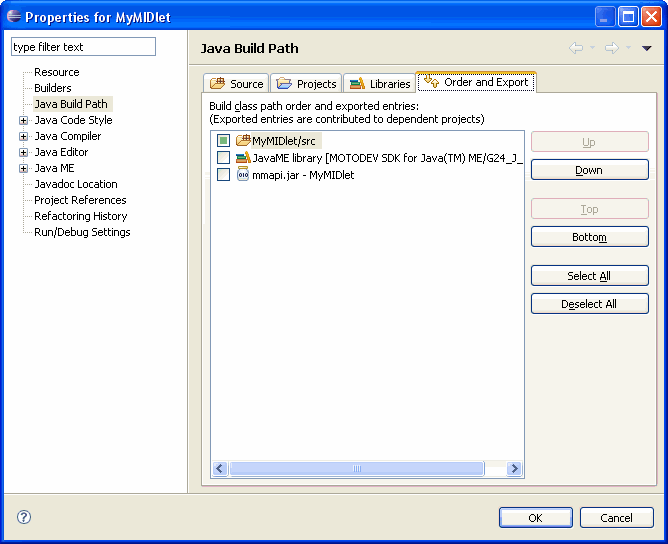
If this box is checked, MTJ will attempt to preverify and included
the contents of mmapi.jar in the
deployed JAR file, which would obviously be wrong.
Which Approach Is Better?
The developers of MTJ feel that, in the vast majority of cases, it is
better to use the first approach - using device definitions to add the
Hardware JAR files. This approach allows the changes to be reused across projects,
and more properly associate the Hardware JAR files with the devices
which, after all, describe the hardware to your project. If, for some reason,
you cannot follow that approach however, the second course of action - adding
the JAR file to the project but not exporting it - is now available to you.
Adding Application JAR files
Application JAR files must
be added to your project's build path
just the way you would with JAR files in any non-Java ME project.
Select Properties from the
Project menu, click on the
Java Build Path item in the left-hand
pane, and then add the JAR files (or class directories) to the
list in the right-hand portion of the dialog box.
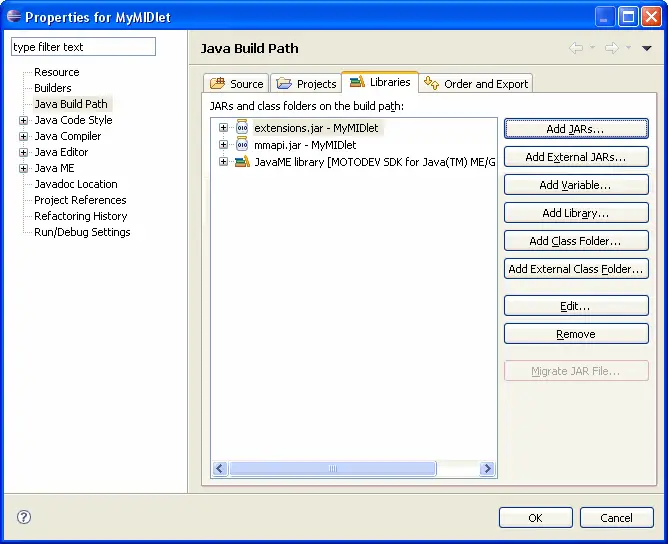
Thus, in the example above, we are adding the Application JAR file
extensions.jar to the project in
addition to the Hardware JAR file mmapi.jar.
It is
essential that
you put a check in the check box next to Applications JAR files in the
"Order and Export" tab of the Java Build Path, as shown below:

Once you have done this, the classes in the JAR file or class
directory will both be part of your project's build path, as well
as deployed in your project's JAR file.
Thus, in the example shown,
the case above, MTJ will
collect the classes and other resources in
extensions.jar, preverify them, and include them as part
of your deployed MIDlet. MTJ will not, however,
do this with mmapi.jar, since the checkbox is empty.
The resources in mmapi.jar will be available at
compile time, but will not be deployed.
If, when you try to run your MIDlet in the emulator, particularly
in OTA mode, you get a
ClassNotFoundException, this is a
signal that the relevant classes did not get bundled into your
deployed JAR file. This is usually a sign that you have not added
the Application JAR file to your project's Java Build Path properly,
or have forgotten to check the "export" box.
Emulator Caveats
If you are using a special feature, such as Bluetooth, video, etc.,
you may run into a situation in which you correctly add the hardware JAR
as specified above, your application compiles perfectly, but then when
you run it in the emulator, the hardware device does not seem to function.
In all likelihood, this is not an MTJ issue - it is
most likely an issue with
the Java ME emulator. In many circumstances the emulator in a Wireless
Toolkit has just enough support for a hardware feature to allow your
MIDlet to load, but doesn't contain truly functional emulation for all
the hardware features of the physical device itself. Unfortunately,
there is nothing we can do to help you with this.


