Device Management
This document describes the management of device definitions in
MTJ.
Device Management Preferences
In order to use MTJ, you must configure at least one Device
Definition. Device management in MTJ allows significant control over the
device definitions available to MIDlet Suites and emulator launching.
Devices are managed from within the Preferences dialog of Eclipse. To
reach the device management functionality:
-
Select the Preferences menu item from Eclipse's
Window menu.
-
Expand the Java ME item in the pane to the left and click on Device
Management.
The Device Management page displays the devices that are
currently known to MTJ. From this page, it is possible to import new
devices, redefine current devices and remove definitions.
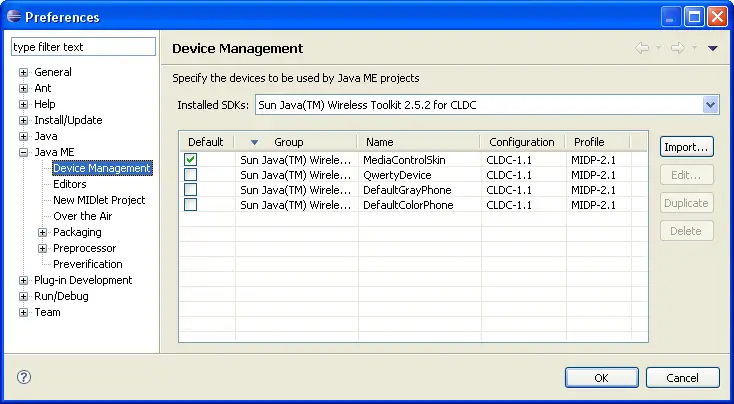
The Default column allows a single device to be
chosen as the default. The default device will be initially selected
when creating new MIDlet suites and emulator launch configurations.
Importing Devices
MTJ is aware by default of a number of different types of
wireless toolkits and their associated structure. These devices can be
imported into MTJ automatically for use by project definitions and
emulator launching.
- Select Import...
-
In the resulting dialog, select the root directory to be
searched to find known devices definitions.
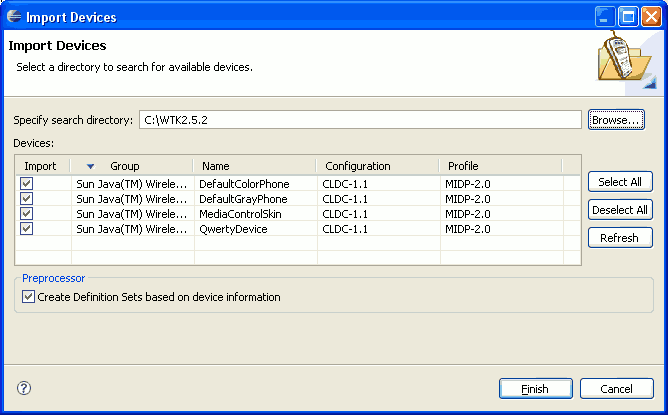
As you leave the search directory text field or select the Refresh
button, MTJ will begin looking for devices in the specified directory
and all subdirectories. As of version 1.5.0 of MTJ, it is no longer
necessary to pick the "perfect" directory in order to have devices
imported, as MTJ should be able to locate them if they reside anywhere
within the specified directory. MTJ will display the devices that are
found as they are found. If you wish to stop the search at any time,
select the Cancel button. After the search has
completed, use the checkboxes to select the device definitions to be
imported. Finally, choose Finish to complete the
import process.
-
When you have successfully completed adding the device, you
should see the imported devices in the device management preferences.

Save the definitions by selecting Finish.
Duplicate a Device Definition
In certains cases, you may find that an imported device
definition is close to what you would like but could use a few small
changes. In a case like this, you may use the Duplicate
button to create an exact copy of the selected device definition. The
duplicated device definition can then be altered as necessary without
changing the original.
NOTE: It is not a requirement that you
duplicate a device prior to altering it. If you make changes to an
imported device and you would like to get back to the original, simply
remove the device definition and re-import it.
Edit a Device Definition
MTJ attempts to understand many of the wireless toolkits that are
available to developers. Unfortunately, keeping up with the different
vendors and the various ways that toolkits are structured is very
difficult. Even in cases that MTJ is able to identify and import a
device definition, it is possible that it might be incorrect or not
quite what you were looking for. Select the Edit...
button to launch the edit dialog.
The tabbed dialog provides control over the definition of a
device, including the emulator executable, launch command and libraries
that define that device. When the edit dialog is opened, the contents
will be filled to match the selected device definition. When all changes
have been completed, select the OK button on the dialog
and OK on the device management preferences.
Basic Properties
The first tab of the edit dialog presents many of the properties
that make up the definition of the device. Each of these properties
works together to provide the environment necessary for MTJ and care
must be taken when making changes. For more information on configuring
the properties available on this page, see Editing Basic DeviceProperties.
Libraries
The Libraries tab of the edit dialog allows the
selection and configuration of the libraries that make up the device
definition. Using the controls on this page, it is possible to add and
remove functionality from a device definition. This is useful in
restricting available API's to create a more generic project. See Editing DeviceLibraries for more details.
Advanced Properties
The Properties tab of the edit dialog displays
the properties defined by the selected device. Properties may not be
altered at this time.
Example: Creating a MIDP 1.0 Device
In many cases, importing devices will result in a device with
greater functionality than might be required for testing. It is possible
to create a device definition using device management. For example,
using the standard wireless toolkit, creation of a MIDP 1.0 device can
be done with the following steps.
- Open the Device Management preferences.
- Duplicate the device that is closest to what you want. For
instance, choose the DefaultColorPhone.
- Edit the copy of the device device.
- On the
basics page, alter the launch command template.
Change -Xdevice:%device% to be -Xdevice:DefaultColorPhone (without
the quotes).
- Switch to the libraries page of
the editor dialog.
- Use Add... to add cldcapi10.jar. It should automatically be
recognized as CLDC 1.0.
- Remove the original cldcapi11.jar.
- Use Add... to add midpapi10.jar. It should automatically be
recognized as MIDP 1.0.
- Remove the original midpapi20.jar.
- Press OK to commit the edits to the device.
- Press OK on the preferences dialog.


