|
 |
|
| |
7.13 SaX2
Configure the graphical
environment of your system with
. This opens the
SUSE Advanced X11 Configuration interface (SaX2),
where you can configure devices such as your mouse,
keyboard, or display devices. This
interface can also accessed from the main menu by clicking
.
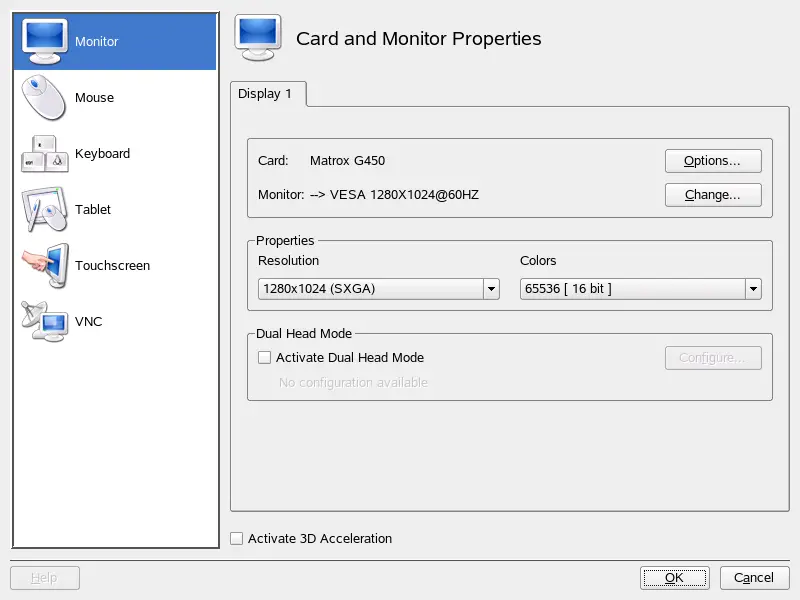
7.13.1 Card and Monitor Properties
Adjust the settings for your graphics card and display
device in . If you have more
than one graphics card installed, each device is
shown in a separate dialog reachable by a tab. At the top of the dialog,
see the current settings for the selected graphics card and the monitor that
is attached to it. If more than one screen can be connected to the card
(dual head), the monitor on the primary output is shown. Normally, the card
and display device are detected automatically by the system during
installation. However, you can tune many parameters manually or even change
the display device completely.
HINT: Autodetecting New Display Hardware
If you change your display hardware after installation, use sax2
-r on the command line to cause SaX2 to detect your
hardware. You must be root to
run SaX2 from the command line.
Graphics Card
It is not possible to change the graphics card because only known models are
supported and these are detected automatically. However, you can change many
options that affect the behavior of the card. Normally, this should not be
necessary because the system already has set them up appropriately during
installation. If you are an expert and want to tweak some of the options,
click next to the graphics card and select the
option to change. To assign a value needed to
a certain option, enter this value in the dialog that appears after
selecting that option. Click to close the options
dialog.
Monitor
To change the current settings for the monitor, click
next to the monitor. A new dialog opens in which
to adjust various monitor-specific settings. This dialog has several
tabs for various aspects of monitor operation. Select the first tab to
manually select the vendor and model of the display device in two lists. If
your monitor is not listed, you can choose one of the VESA or LCD modes that
suit your needs or, if you have a vendor driver disk or CD, click
and follow the instructions on the screen to
use it. Check to use display power
management signaling. , with
the geometrical properties of the monitor, and
, with the ranges for the
horizontal and vertical sync frequencies of your monitor, are normally set up
correctly by the system, but you can modify
these values manually. After making all adjustments, click
to close this dialog.
WARNING: Changing Monitor Frequencies
Although there are safety mechanisms, you should still be very careful when
changing the allowed monitor frequencies manually. Incorrect values might
destroy your monitor. You should always refer to the monitor's manual
before changing frequencies.
Resolution and Color Depth
The resolution and color depth can be chosen directly from two
lists in the middle of the dialog. The resolution you select here marks the
highest resolution to use. All common resolutions down to 640x480 are also
added to the configuration automatically. Depending on the graphical
desktop used, you can switch to any of these later without the need
for reconfiguration.
Dual Head
If you have a graphics card with two outputs installed in your computer, you
can connect two screens to your system. Two screens that are attached to the
same graphics card are referred to as
dual head. SaX2 automatically detects multiple
display devices in the system and prepares the configuration accordingly. To
use the dual head mode of a graphics card, check at the bottom of the dialog and click
to set the dual head options and the
arrangement of the screens in the dual head dialog.
The tabs in the row at the top of the dialog each correspond to a
graphics card in your system. Select the card to configure and set
its multihead options in the dialog below. In the upper part of the
multihead dialog, click to configure the
additional screen. The possible options are the same as for the first
screen. Choose the resolution to use for this screen from the
list. Select one of three possible multihead modes.
- Traditional Multihead
-
Each monitor represents an individual unit. The mouse pointer can switch
between the screens.
- Cloned Multihead
-
In this mode, all monitors display the same contents. The mouse is only
visible on the main screen.
- Xinerama Multihead
-
All screens combine to form a single large screen. Program windows can be
positioned freely on all screens or scaled to a size that fills more than
one monitor.
NOTE:
Linux currently does not offer 3D support for Xinerama multihead
environments. In this case, SaX2 deactivates the 3D support.
The arrangement of the dual head environment describes the sequence of the
individual screens. By default, SaX2 configures a standard layout that
follows the sequence of the detected screens, arranging all screens in a row
from left to right. In the part of the
dialog, determine the way the monitors are arranged by selecting
one of the sequence buttons. Click to close the
dialog.
HINT: Using a Beamer with Laptop Computers
To connect a beamer to a laptop computer, activate dual head mode. In this
case, SaX2 configures the external output with a resolution of 1024x768
and a refresh rate of 60 Hz. These values suit most beamers very well.
Multihead
If you have more than one graphics card installed in your computer, you can
connect more than one screen to your system. Two or more screens that are
attached to different graphics cards are referred to as
multihead. SaX2 automatically detects multiple
graphics cards in the system and prepares the configuration accordingly. By
default, SaX2 configures a standard layout that follows the sequence of
the detected graphics cards, arranging all screens in a row from left to
right. The additional tab allows for changing
this layout manually. Drag the icons representing the individual screens in
the grid and click to close the dialog.
Testing the Configuration
Click in the main window after completing the
configuration of your monitor and your graphics card, then test your
settings. This ensures that your configuration is suitable for your devices.
If the image is not steady, terminate the test immediately by pressing
Ctrl+Alt+Backspace and
reduce the refresh rate or the resolution and color depth.
NOTE:
Regardless of whether you run a test, all modifications are only activated
when you restart the X server.
7.13.2 Mouse Properties
Adjust the settings for your mouse in . If
you have more than
one mouse with different drivers installed, each driver is shown in a
separate tab. Multiple devices operated by the same driver
are shown as one mouse. Activate or deactivate the currently selected mouse
with the check box at the top of the dialog. Below the check box,
see the current settings for that mouse. Normally, the mouse is detected
automatically, but you can change it manually if the automatic detection
fails. Refer to the documentation for your mouse for a description of the
model. Click to select the vendor and model from
two lists then click to confirm your selection. In
the options part of the dialog, set various options for operating your
mouse.
-
If your mouse has only two buttons, a third button is emulated when
you click both buttons simultaneously.
-
Check this box to use a scroll wheel.
-
If your mouse does not have a scroll wheel but you want to use similar
functionality, you can assign an additional button for this. Select the
button to use. While pressing this button, any movement of
the mouse is translated into scroll wheel commands. This feature is
especially useful with trackballs.
When you are satisfied with your settings, click to
confirm your changes.
NOTE:
Any changes you make here take effect only after you restart the
X server.
7.13.3 Keyboard Properties
Use this dialog to adjust the settings for operating your keyboard in the
graphical environment. In the upper part of the dialog, select the type,
language layout, and variant. Use the test field at
the bottom of the dialog to check if special characters are displayed
correctly. Select additional layouts and variants to use from the
list in the middle. Depending on the type of your desktop, these may be
switched in the running system without the need for reconfiguration.
After you click , the changes are applied immediately.
7.13.4 Tablet Properties
Use this dialog to configure a graphics tablet attached to your system. Click
the tab to select vendor and model from
the lists. Currently, SUSE® Linux Enterprise
supports only a limited number of graphics
tablets. To activate the tablet, check
at the top of the dialog.
In the dialog, configure the connection to
the tablet. SaX2 enables the configuration of graphics tablets connected
to the USB port or the serial port. If your tablet is connected to the serial
port, verify the port. /dev/ttyS0 refers to the first
serial port. /dev/ttyS1 refers to the second. Additional
ports use similar notation. Choose appropriate
from the list and select the suitable
for your needs.
If your graphics tablet supports electronic pens, configure them in
. Add eraser and pen and set their
properties after clicking .
When you are satisfied with the settings, click to
confirm your changes.
7.13.5 Touchscreen Properties
Use this dialog to configure touchscreens attached to your system. If you
have
more than one touchscreen installed, each device is shown in a separate
dialog reachable by a tab. To activate the currently selected touchscreen,
check at the top of the
dialog. Select vendor and model from the lists below and set an appropriate
at the bottom.
You can configure touchscreens connected to the USB port
or the serial port. If your touchscreen is connected to the serial port,
verify the port. /dev/ttyS0 refers to the first serial
port. /dev/ttyS1 refers to the second. Additional ports
use similar notation. When you are satisfied with your settings, click
to confirm your changes.
7.13.6 Remote Access Properties
VNC (Virtual Network Computing) is a client-server
solution that gives access a remote X server with a slim and
easy-to-use client. This client is available for a variety of operating
systems, including Microsoft Windows, Apple's MacOS, and Linux. Find
additional information about VNC at https://www.realvnc.com/.
Use this dialog to configure your X server as a host for VNC sessions. If you
want VNC clients to connect to your X server, check . Set a
password to restrict access to your VNC-enabled X server. Check
if more than one VNC client
should connect to the X server at the same time. Allow HTTP access by
checking and setting the port
to be use in .
When you are satisfied with your settings, click to
save your changes.
|
|
|