You can change the way your KDE desktop looks and behaves to
suit your own personal tastes and needs.
3.1 Changing Individual Desktop Elements
In the following, find some examples of how to change
individual desktops elements.
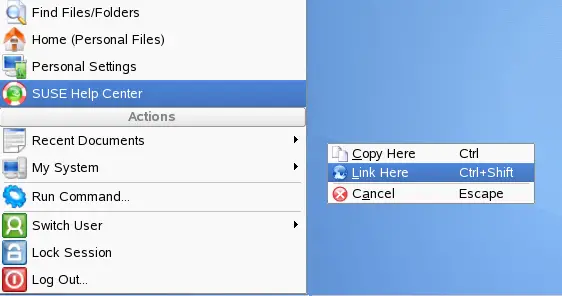
Adding Program Icons to Your Desktop
To create a link to an application and place it on the
desktop, proceed as follows:
-
Click the main menu button.
-
Browse to the desired program.
-
Left-click and drag the menu entry to the desktop then
release the mouse button.
-
Select from the context menu
that appears then position the icon as desired.
To delete an icon from your desktop, right-click the program
icon and select .
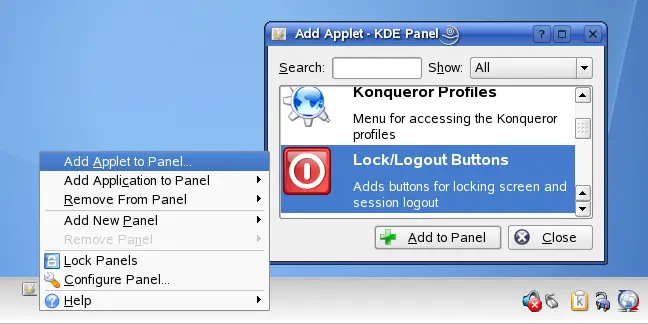
Customizing the KDE Panel
You can customize the KDE panel according to your preferences
by adding, deleting, or moving icons or changing the overall
appearance of the panel.
-
To add or remove icons from the panel, right-click an empty
patch in the panel. A context-menu appears.
-
To add an application, click and select the desired application from one of
the categories of the submenu.
-
To add an applet (miniprogram), click and, from the dialog box that appears, select the
desired applet. Click to insert
the applet into the panel.
-
To remove icons from the panel, select or and choose the icon to remove.
-
To change the overall appearance or behavior of the panel,
select from the context menu. A
configuration dialog appears where you can adjust further
settings.
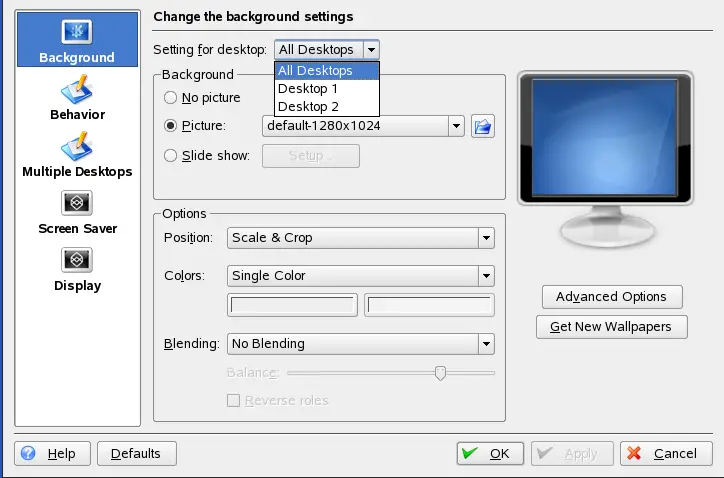
Changing the Desktop Background
You can change the background colors of your desktop or select
a picture to use as the background. Because KDE offers virtual
desktops (see Section 4.0,
Using Virtual Desktops), you
can apply these changes to one or all of your virtual desktops.
-
Right-click an empty patch of the desktop and select
. A configuration dialog
appears.
-
In select the virtual
desktops to which the changes should apply.
-
If you want a different picture as the background, click
and select one of the pictures
provided by the list. To use a custom picture, click the folder
button beneath the list and select an image file from the file
system.
-
Click to have multiple images
appear in a slide show mode.
-
If you do not want a picture on the background, click
.
-
From the group, click the left
button below to select the color for
your background. For a multicolor background, set
to an option other than and click the right button below to select a
second color.
-
Click then to
close the configuration dialog.
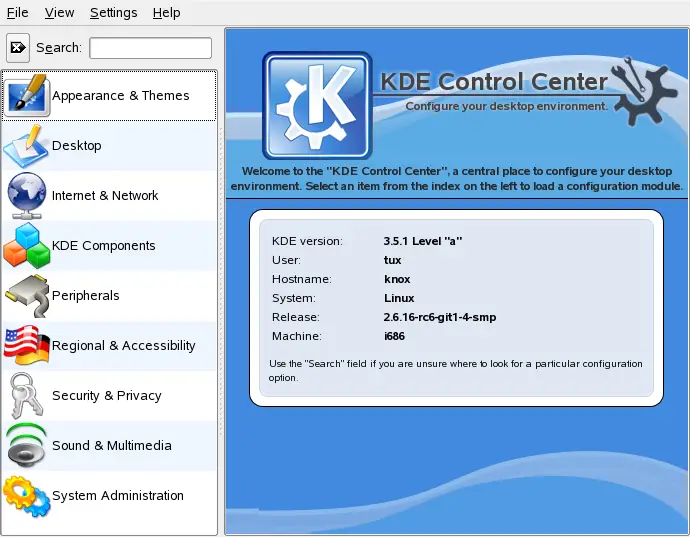
3.2 Using the KDE Control Center
Apart from changing individual desktop elements, KDE allows you
to personalize your desktop to a very high degree. Find more
settings to adjust the overall appearance and behavior of your
desktop in the KDE Control Center. There, you can also change fonts,
keyboard and mouse configuration, regional and language settings,
parameters for your Internet and network usage, and more.
Start the Control Center from the main menu by selecting
or press
F2
and enter kcontrol.
The sidebar provides different categories with a subset of
settings each. To get an impression of the numerous possibilities,
just click a category icon and explore the possibilities provided
there.
For an overview of all categories, switch to a tree view.
Change the view by selecting .
Clicking an item displays the corresponding settings on the
right. Change the settings as desired. No changes take effect until
you click . Reset all items on the page to
the default values by clicking .
Performing tasks in some areas of the Control Center requires system
administrator (otherwise known as root) permissions.