|
 |
|
| |
|
|
Red Hat Enterprise Linux 9 Essentials Book now available.
Purchase a copy of Red Hat Enterprise Linux 9 (RHEL 9) Essentials Red Hat Enterprise Linux 9 Essentials Print and eBook (PDF) editions contain 34 chapters and 298 pages
|
9.2.4. Using a Key-Based Authentication
To improve the system security even further, you can enforce the use the key-based authentication by disabling the standard password authentication. To do so, open the /etc/ssh/sshd_config configuration file in a text editor such as vi or nano, and change the PasswordAuthentication option as follows:
PasswordAuthentication no
To be able to use ssh, scp, or sftp to connect to the server from a client machine, generate an authorization key pair by following the steps below. Note that keys must be generated for each user separately.
If you complete the steps as root, only root will be able to use the keys.
If you reinstall your system and want to keep previously generated key pair, backup the ~/.ssh/ directory. After reinstalling, copy it back to your home directory. This process can be done for all users on your system, including root.
9.2.4.1. Generating Key Pairs
To generate an RSA key pair for version 2 of the SSH protocol, follow these steps:
-
Generate an RSA key pair by typing the following at a shell prompt:
~]$ ssh-keygen -t rsa
Generating public/private rsa key pair.
Enter file in which to save the key (/home/john/.ssh/id_rsa):
-
Press Enter to confirm the default location (that is, ~/.ssh/id_rsa) for the newly created key.
-
Enter a passphrase, and confirm it by entering it again when prompted to do so. For security reasons, avoid using the same password as you use to log in to your account.
After this, you will be presented with a message similar to this:
Your identification has been saved in /home/john/.ssh/id_rsa.
Your public key has been saved in /home/john/.ssh/id_rsa.pub.
The key fingerprint is:
e7:97:c7:e2:0e:f9:0e:fc:c4:d7:cb:e5:31:11:92:14 [email protected]
The key's randomart image is:
+--[ RSA 2048]----+
|             E.  |
|            . .  |
|             o . |
|              . .|
|        S .    . |
|         + o o ..|
|          * * +oo|
|           O +..=|
|           o*  o.|
+-----------------+
-
Change the permissions of the ~/.ssh/ directory:
~]$ chmod 755 ~/.ssh
-
Copy the content of ~/.ssh/id_rsa.pub into the ~/.ssh/authorized_keys on the machine to which you want to connect, appending it to its end if the file already exists.
-
Change the permissions of the ~/.ssh/authorized_keys file using the following command:
~]$ chmod 644 ~/.ssh/authorized_keys
To generate a DSA key pair for version 2 of the SSH protocol, follow these steps:
-
Generate a DSA key pair by typing the following at a shell prompt:
~]$ ssh-keygen -t dsa
Generating public/private dsa key pair.
Enter file in which to save the key (/home/john/.ssh/id_dsa):
-
Press Enter to confirm the default location (that is, ~/.ssh/id_dsa) for the newly created key.
-
Enter a passphrase, and confirm it by entering it again when prompted to do so. For security reasons, avoid using the same password as you use to log in to your account.
After this, you will be presented with a message similar to this:
Your identification has been saved in /home/john/.ssh/id_dsa.
Your public key has been saved in /home/john/.ssh/id_dsa.pub.
The key fingerprint is:
81:a1:91:a8:9f:e8:c5:66:0d:54:f5:90:cc:bc:cc:27 [email protected]
The key's randomart image is:
+--[ DSA 1024]----+
|   .oo*o.        |
|  ...o Bo        |
| .. . + o.       |
|.  .   E o       |
| o..o   S        |
|. o= .           |
|. +              |
| .               |
|                 |
+-----------------+
-
Change the permissions of the ~/.ssh/ directory:
~]$ chmod 775 ~/.ssh
-
Copy the content of ~/.ssh/id_dsa.pub into the ~/.ssh/authorized_keys on the machine to which you want to connect, appending it to its end if the file already exists.
-
Change the permissions of the ~/.ssh/authorized_keys file using the following command:
~]$ chmod 644 ~/.ssh/authorized_keys
To generate an RSA key pair for version 1 of the SSH protocol, follow these steps:
-
Generate an RSA key pair by typing the following at a shell prompt:
~]$ ssh-keygen -t rsa1
Generating public/private rsa1 key pair.
Enter file in which to save the key (/home/john/.ssh/identity):
-
Press Enter to confirm the default location (that is, ~/.ssh/identity) for the newly created key.
-
Enter a passphrase, and confirm it by entering it again when prompted to do so. For security reasons, avoid using the same password as you use to log into your account.
After this, you will be presented with a message similar to this:
Your identification has been saved in /home/john/.ssh/identity.
Your public key has been saved in /home/john/.ssh/identity.pub.
The key fingerprint is:
cb:f6:d5:cb:6e:5f:2b:28:ac:17:0c:e4:62:e4:6f:59 [email protected]
The key's randomart image is:
+--[RSA1 2048]----+
|                 |
|     . .         |
|    o o          |
|     + o E       |
|    . o S        |
|       = +   .   |
|      . = . o . .|
|       . = o o..o|
|       .o o  o=o.|
+-----------------+
-
Change the permissions of the ~/.ssh/ directory:
~]$ chmod 755 ~/.ssh
-
Copy the content of ~/.ssh/identity.pub into the ~/.ssh/authorized_keys on the machine to which you want to connect, appending it to its end if the file already exists.
-
Change the permissions of the ~/.ssh/authorized_keys file using the following command:
~]$ chmod 644 ~/.ssh/authorized_keys
The private key is for your personal use only, and it is important that you never give it to anyone.
9.2.4.2. Configuring ssh-agent
To store your passphrase so that you do not have to enter it each time you initiate a connection with a remote machine, you can use the ssh-agent authentication agent. If you are running GNOME, you can configure it to prompt you for your passphrase whenever you log in and remember it during the whole session. Otherwise you can store the passphrase for a certain shell prompt.
To save your passphrase during your GNOME session, follow these steps:
-
Make sure you have the openssh-askpass package installed. If not, refer to Section 1.2.2, “Installing” for more information on how to install new packages in Red Hat Enterprise Linux.
-
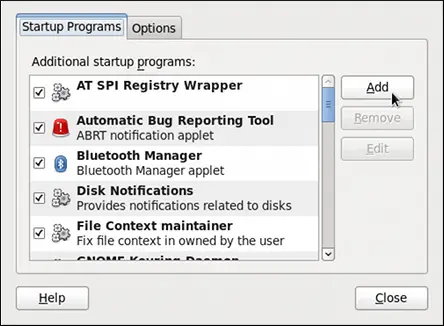
Select → → from the panel. The Startup Applications Preferences will be started, and the tab containing a list of available startup programs will be shown by default.
-
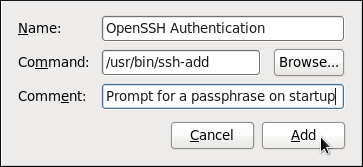
Click the Add button on the right, and enter /usr/bin/ssh-add in the Command field.
-
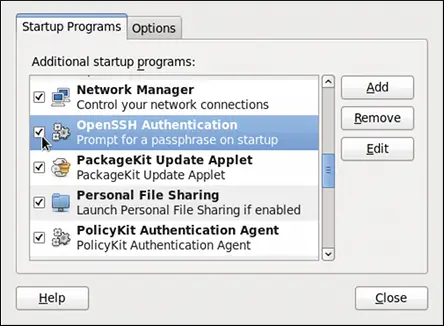
Click Add and make sure the check box next to the newly added item is selected.
-
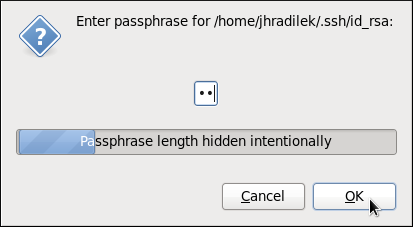
Log out and then log back in. A dialog box will appear prompting you for your passphrase. From this point on, you should not be prompted for a password by ssh, scp, or sftp.
To save your passphrase for a certain shell prompt, use the following command:
~]$ ssh-add
Enter passphrase for /home/john/.ssh/id_rsa:
Note that when you log out, your passphrase will be forgotten. You must execute the command each time you log in to a virtual console or a terminal window.
|
|
|