virt-manager is the desktop application which can be used to manage guests.
You can use Red Hat's Virtual Machine Manager to:
Create new domains.
Configure or adjust a domain's resource allocation and virtual hardware.
Summarize running domains with live performance and resource utilization statistics.
Display graphs that show performance and resource utilization over time.
Use the embedded VNC client viewer which presents a full graphical console to the guest domain.
Before creating new guest virtual machines you should consider the following options. This list is a summery of the installation process using the Virtual Machine Manager.
The name for your guest virtual machine.
Decide whether you will use full virtualization (required for non-Red Hat Enterprise Linux guests. Full virtualization provides more flexibility but less performance) or para-virtualization (only for Red Hat Enterprise Linux 4 and 5 guests. Provides performance close to bare-metal).
Identify installation media and kickstart (if appropriate) locations.
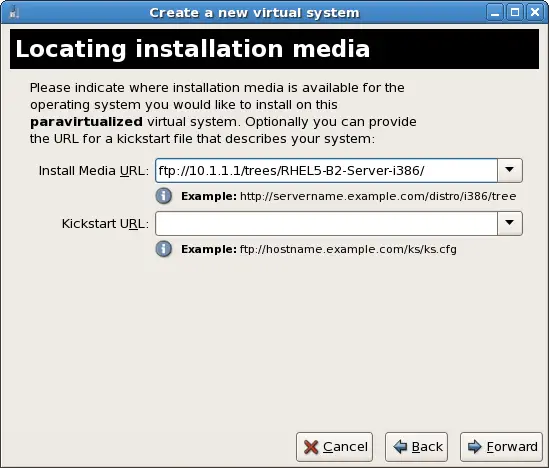
Para-virtualized guests required network based installation media. That is your installation media must be hosted on a nfs, ftp or http server.
Fully virtualized guests require iso images, CD-ROMs or DVDs of the installation media available to the host system.
If you are creating a fully virtualized guest, identify the operating system type and variant.
Decide the location and type (for example, a file or partition) of the storage for the virtual disk
Select the network connection
Decide how much of your physical memory and cpu cores, or processors, you are going to allocate the guest. Be aware of the physical limitations of your system and the system requirements of your virtual machines.
Review your selected options and start the installation.
VNC is used for graphical installations.
Note:
You must install Red Hat Enterprise Linux 5, virt-manager, and the kernel packages on all systems that require virtualization. All systems then must be booted and running the Red Hat Virtualization kernel.
If virt-manager is not working properly...
If virt-manager is not working, it is usually due to one of these common problems:
you have not booted the correct kernel. Verify you are running the kernel-xen kernel by running uname.
the virtualization extensions are not enabled or available on your hardware. Verify your hardware has the virtualization extensions for full virtualization, read Chapter 1, System requirements.
These are the steps required to install a guest operating system on Red Hat Enterprise Linux 5 using the Virtual Machine Monitor:
Procedure 20.1. Creating a guest with virt-manager
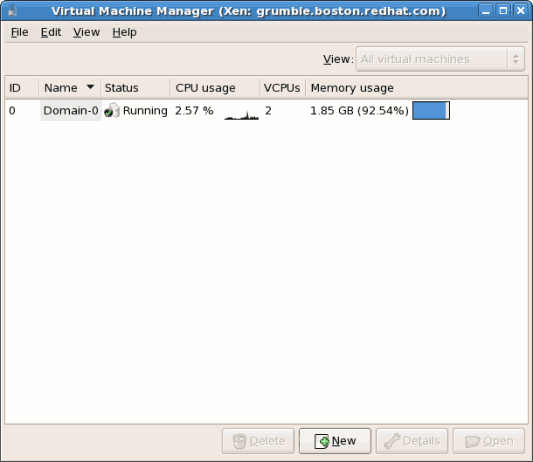
From the Applications menu, select System Tools and then Virtual Machine Manager.
The Virtual Machine Manager main window appears.
Figure 20.6. Virtual Machine Manager window
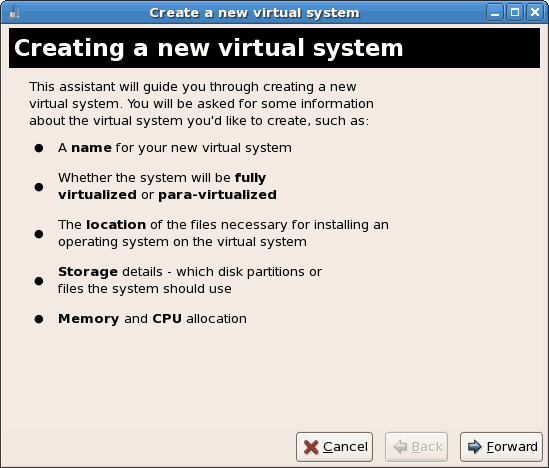
From the File menu, select New machine.
Figure 20.7. Selecting a new machine
The Creating a new virtual system wizard appears.
Click Forward.
Figure 20.8. Creating a new virtual system wizard
Enter the name of the new virtual system, this name will be the name of the configuration file for the virtual machine, the name of the virtual disk and the name displayed by virt-manager's main screen.
Choose para-virtualization or full virtualization (hardware virtualization). Now you can continue by clicking the Forward button.
Figure 20.9. Naming the virtual system
Warning
Do not use the kernel-xen as the file name for a Red Hat Enterprise Linux 5 fully virtualized guest. Using this kernel on fully virtualized guests can cause your system to hang.
Fully virtualized guests do not use the kernel-xen kernel
If you are using an Installation Number when installing Red Hat Enterprise Linux on a fully virtualized guest, be sure to deselect the Virtualization package group during the installation. The Virtualization package group option installs the kernel-xen kernel.
Para-virtualized guests are not affected by this issue. Para-virtualized guests always use the kernel-xen kernel.
Enter the location of your install media. The location of the kickstart file is optional. Then click Forward .
Figure 20.10. Locating the installation media for para-virtualized guests
Storage media
For installation media on an http server the address should resemble "https://servername.example.com/pub/dist/rhel5" where the actual source on your local host is /var/www/html/pub/dist/rhel5.
For installation media on an ftp server the address should resemble "ftp://servername.exampe.com/dist/rhel5", where the actual source on your local host is /var/ftp/pub/dist/rhel5.
For installation media on an NFS server the address should resemble "nfs:servername.example.com:/dist/rhel5". The actual location depends on your NFS share. Use the system-config-nfs command to configure NFS to share media.
For more information on configuring these network services read the relevant sections of your Red Hat Enterprise Linux Deployment Guide in the System->Documentation menu.
Networked installation media must be accessible
The installation media and kickstart files must be accessible for the host and the guest in order to install. You must take into account the IP address of both host and guest and you may need to use the IP addresses instead of hostnames.
Tip: networked media for para-virtualization
You can use an iso image, a local CD-ROM or DVD to install para-virtualized guests. To enable this, mount the iso file or disk and host the image with NFS. To mount an iso image locally use the command:
# mount -o loop image.iso /mountpoint
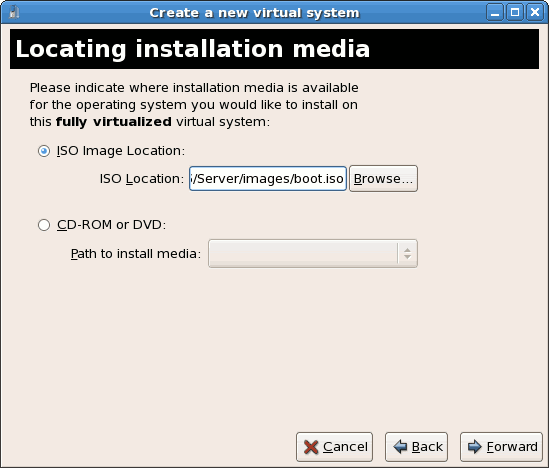
For fully virtualized guests you must use an .iso file, CD-ROM or DVD.
Figure 20.11. Locating installation media for fully virtualized guests
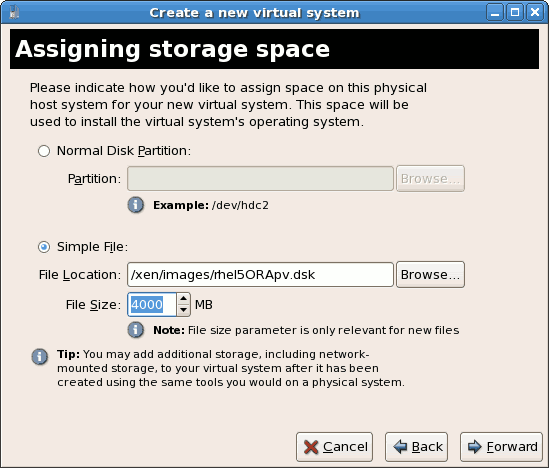
Install either to a physical disk partition or install to a virtual file system within a file.
Note
This example installs a virtual system within a file.
The default SELinux policy only allows storage of virtualization disk images in the /var/lib/xen/images folder.
To install images at a different location, /virtimages for example, open a terminal and create the /virtimages directory and set the SELinux policy settings with the command restorecon -v /virtimages. Specify your newly created location and the size of the virtual disk, then click Forward.
Save time by initializing guest image files
Creating a new disk image may take a while depending on the size and your system configuration. You can create a file before hand by using dd – for example to build an empty 6GB file you could use:
Remember if you have created this file outside of the /var/lib/xen/images folder the file will need SELinux settings changed. Change the SELinux policy for the file with the command:
restorecon -v /path/to/file
Figure 20.12. Assigning the storage space
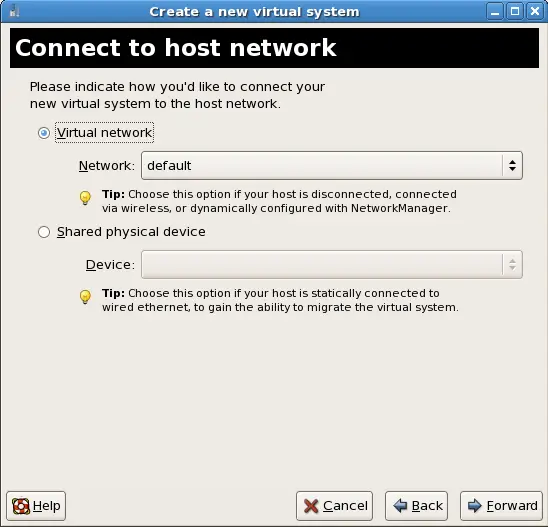
Connecting to the host network
Choose the “Shared Physical Device” option to allow the guest access to the same network as the host and accessible to other computers on the network.
Choose the “Virtual Network” option if you want your guest to on a virtual network. You can bridge a virtual network making it accessible to external networked computers, read Chapter 8, Configuring networks and guests for configuration instructions.
Select memory to allocate the guest and the number of virtual CPUs then click Forward.
Figure 20.14. Allocating Memory and CPU
Note
Avoid allocating more memory to all of your virtual machines than you have physically available. Over allocating will cause the system to use the swap partition excessively, causing unworkable performance levels.
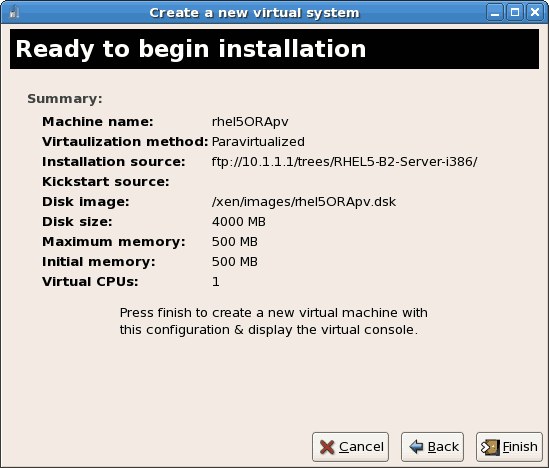
Review your selections, then click Forward to open a console and the files start to install.
Figure 20.15. The final virt-manager screen
Your virtual machine will begin to boot.
Figure 20.16. The virtual machine's boot output
Type xm create -c xen-guest to start the Red Hat Enterprise Linux 5 guest. Right click on the guest in the Virtual Machine Manager and choose Open to open a virtual console.