14.4. Establishing a Modem Connection
A modem can be used to configure an Internet connection over an active phone line. An Internet Service Provider (ISP) account (also called a dial-up account) is required.
To add a modem connection, follow these steps:
-
Click the Devices tab.
-
Click the New button on the toolbar.
-
Select Modem connection from the Device Type list, and click Forward.
-
If there is a modem already configured in the hardware list (on the Hardware tab), the Network Administration Tool assumes you want to use it to establish a modem
connection. If there are no modems already configured, it tries to detect any modems in the system. This probe might take a while. If a modem is not found, a message is displayed to warn you that the settings shown are not values found from the probe.
-
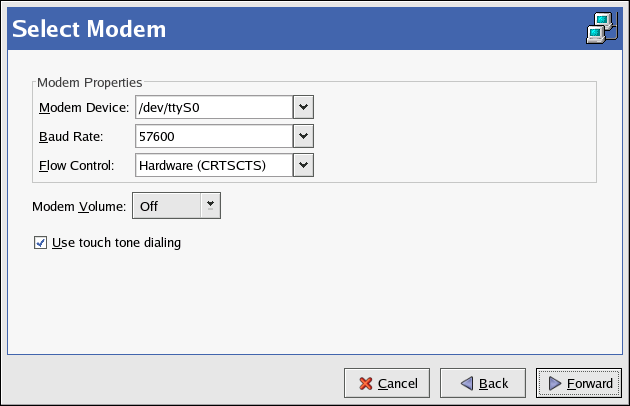
After probing, the window in Figure 14.6, “Modem Settings” appears.
-
Configure the modem device, baud rate, flow control, and modem volume. If you do not know these values, accept the defaults if the modem was probed successfully. If you do not have touch tone dialing, uncheck the corresponding checkbox. Click
Forward.
-
If your ISP is in the pre-configured list, select it. Otherwise, enter the required information about your ISP account. If you do not know these values, contact your ISP. Click Forward.
-
On the IP Settings page, select whether to obtain an IP address automatically or whether to set one statically. Click Forward when finished.
-
On the Create Dialup Connection page, click Apply.
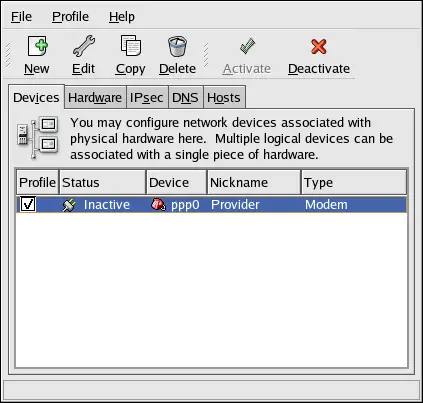
After configuring the modem device, it appears in the device list with the type Modem as shown in Figure 14.7, “Modem Device”.
Be sure to select => to save the changes.
After adding the modem device, you can edit its configuration by selecting the device from the device list and clicking Edit. For example, when the device is added, it is configured not to start at boot time by
default. Edit its configuration to modify this setting. Compression, PPP options, login name, password, and more can also be changed.
When the device is added, it is not activated immediately, as seen by its Inactive status. To activate the device, select it from the device list, and click the Activate button.
If the system is configured to activate the device when the computer starts (the default), this step does not have to be performed again.