|
 |
|
| |
3.2 Configuring Desktop Objects
Your KDE desktop comes with a predefined set of desktop icons. By
adding various objects such as folders, files, or links, you can create
additional icons on your desktop and arrange them as you like.
Adding Program Icons to the Desktop or Panel
To create a link to an application and place it on the desktop
or the panel, proceed as follows:
-
Click the main menu button and browse to the desired
application.
-
Right-click and select or
from the context menu that
appears. If these menu items are not available, your desktop
elements are probably locked. Unlock them first as described in
Section 1.2.1, Locking and Unlocking Desktop Objects.
If your desktop objects are not locked, you can also just drag
items from the main menu onto the desktop and drop them there to
create a link to this application or folder.
-
To change the icon position on the desktop, left-click the
icon and drag it to the desired place.
To delete an icon from your desktop, right-click the icon
icon and select .
Adding Widgets to the Desktop or Panel
Widgets are small applications that can be integrated into
your desktop or your panel.
-
To add widgets to you desktop, right-click an empty patch on
your desktop and select .
To add a widget to the panel, right-click an empty patch on
the panel, and select .
If these menu items are not available, your desktop elements
are probably locked. Unlock them first as described in Section 1.2.1, Locking and Unlocking Desktop Objects.
-
In the dialog box that appears, you can limit the selection
of widgets that is shown with the drop-down list at the top.
-
Select a widget and click . The
widget appears on your desktop or in your panel.
-
To position the widget on your desktop, left-click the widget
and drag it to the desired place. To align all widgets to a
grid, right-click an empty patch on the desktop and select
or .
To remove a widget from your desktop, right-click the widget
and select the entry.
Alternatively,
hover your mouse pointer over the widget and click the X symbol
in the frame.
Configuring Widgets
In order to configure widgets, the desktop elements need to be
unlocked as described in Section 1.2.1, Locking and Unlocking Desktop Objects.
-
To configure a widget, hover your mouse pointer over the
widget until a translucent frame appears around the widget,
showing a number of symbols.
If the frame does not appear, your widgets are probably
locked. Unlock them first as described in Section 1.2.1, Locking and Unlocking Desktop Objects
-
To change the widget size, left-click the star symbol in the
frame and keep the mouse button pressed while moving your cursor
across the desktop to scale the widget size.
-
To rotate the widget in any direction, left-click the arrow
symbol in the frame and keep the mouse button pressed while moving
your cursor in a circle across the desktop. There is a sticky
boundary in the horizontal and vertical positions where you can
clamp the widget, if you like. Of course, you can
also arrange it in any tilted position.
-
To change the contents, settings, or properties of a widget,
left-click the wrench symbol in the frame. In the configuration
dialog box that appears, set the options according to your
wishes.
Use the X symbol in the frame if you want to
close the widget.
You can change the background colors of your desktop or select a
picture to use as the background. Because KDE offers virtual desktops, you
can apply these changes to one or all of your virtual desktops.
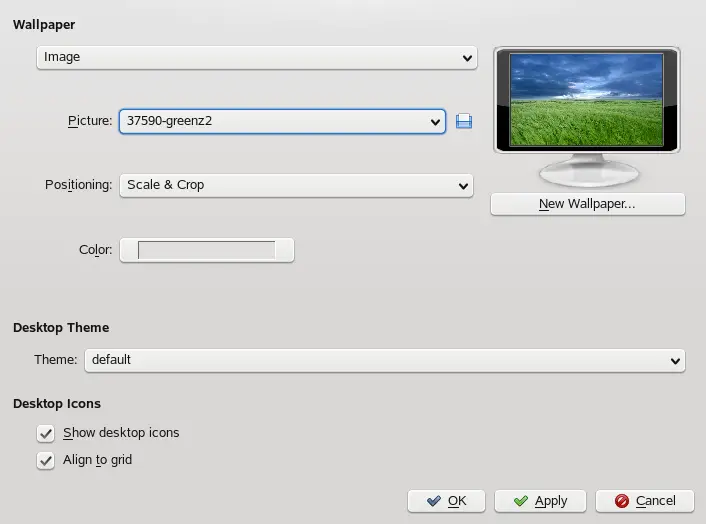
Changing the Desktop Background
-
Right-click an empty patch of the desktop and select
. A configuration dialog
appears.
-
In select the virtual
desktops to which the changes should apply.
-
To change the picture on the background, click
and select one of the pictures in the list. To
use a custom picture, click the folder button beneath the list and select
an image file from the file system.
-
Click to have multiple images appear
in a slide show mode.
-
If you do not want a picture on the background, click .
-
From the group, click the left button
below to select the color for your background.
For a multicolor background, set to an option
other than and click the right button
below to select a second color.
-
Click then to close
the configuration dialog.
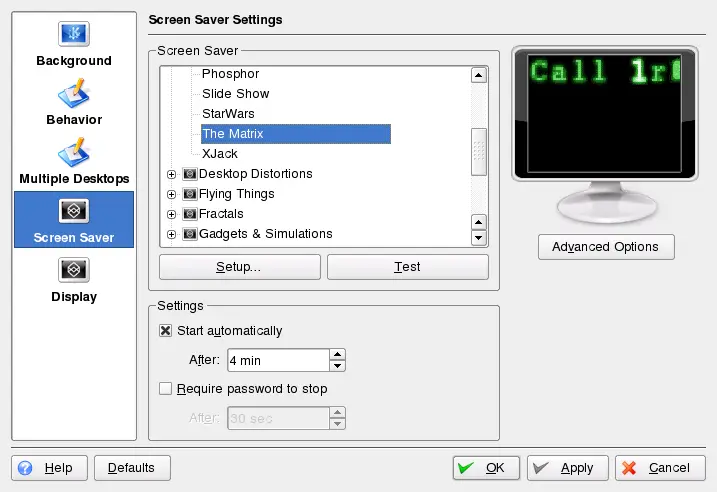
openSUSE® comes with predefined screen saver settings that you can
adjust.
Configuring the Screen Saver
-
Right-click an empty space on the desktop and select
.
-
In the dialog that opens, click .
-
In the list of screen savers, click a screen saver to see a preview
in the right side of the dialog.
-
Click to adjust options like speed or
shapes.
-
You can also choose to view a blank screen instead or to let KDE
start a random screen saver. Find these options at the end of the screen
saver list.
-
Under , determine after how long a time
of inactivity the screen saver should start and whether a password is
required to unlock the screen after the screen saver has started.
-
Click to apply the changes and close the
configuration dialog.
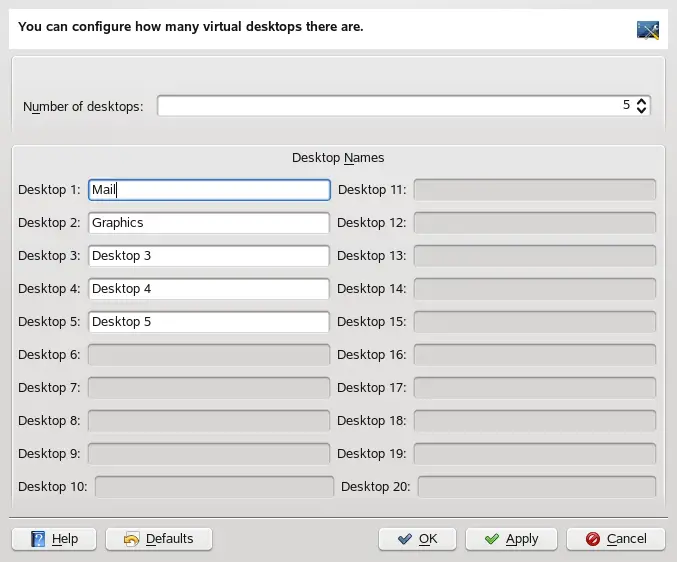
Some users might need more desktops than provided by default.
Adding Additional Virtual Desktops
-
Right-click the desktop previewer in the panel and select
. A configuration dialog appears
where you can increase or reduce the number of virtual desktops. You can
also change the default names of the desktop.
-
Click to apply the changes and close the
configuration dialog.
-
For the names of the desktops to appear in the desktop previewer
rather than the number, right-click the desktop previewer and select
.
|
|
|