2.4 Personal
In the following sections, find examples of how to configure some
personal aspects of your GNOME desktop, like keyboard accessibility,
keyboard shortcuts, assistive technology support, and learn how to change
your password or manage virtual keyrings.
2.4.1 Configuring Assistive Technology Support
Several assistive technologies are included for users with special
needs:
-
Screen reader
-
Screen magnifier
-
On-screen keyboard
To configure assistive technology options, click .
To activate the technologies, first select . Choose the technologies you want to enable every
time you log in.
Click to get to the
designed to help users with
motion impairments using the GNOME desktop. Some of the available
settings on the include:
-
How long a key is pressed and held before being recognized as valid
input
-
Whether the keyboard can be used as a mouse
-
Whether key combinations that use Alt,
Ctrl, and Shift
can be duplicated with sticky keys
You can then define various settings for keys:
- Sticky Keys
-
Some keyboard shortcuts require that one key (a modifier key) is kept
pressed constantly (this applies to Alt,
Ctrl, and Shift)
while the rest of the shortcut is typed. When sticky keys are used,
the system regards those keys as staying pressed after being pressed
once. To enable sticky keys, activate . If is selected, the keys do not stick
anymore when two keys are pressed simultaneously. The system then
assumes that the keyboard shortcut has been completely entered.
- Slow Keys
-
To prevent accidental typing, activate . Set a minimum time limit that a key must be
pressed and held before it is recognized as valid input by the
system.
- Bounce Keys
-
To prevent double typing, activate and set a minimum time limit for accepting two
subsequent keypress events of the same key as the input of two
individual characters.
- Mouse Keys
-
To use the keyboard as mouse, switch to the tab and activate . The mouse pointer is controlled with
the arrow keys of the number pad. Use the sliders to set the maximum
speed of the mouse pointer, the acceleration time until the maximum
speed is reached, and the latency between the pressing of a key and
the cursor movement.
In order to set acoustic notifications for some key or accessibility
events, click and set the options
according to your wishes.
The gok package must be
installed in order to get on-screen keyboard support, and the
gnopernicus and
gnome-mag packages
must be installed in order to get screenreading and magnifying
capabilities.
If these packages are not installed on your system (they are installed
by default during installation), install them with the following
procedure:
-
Start the YaST package manager from the command line or open YaST
and select .
-
For , select .
-
In the field, enter the name of the package
you want to install and press Enter. The package
is listed in the right frame.
-
Select it for installation. Once done, you can search for more
packages and select them for installation in one go.
-
Click to start the installation of the
packages.
For more information about the GNOME accessibility features, refer to
the
GNOME Desktop Accessibility
Guide
available from Yelp.
2.4.2 Changing Your Password
For security reasons, it is a good idea to change your login password
from time to time. To change your password:
-
Click .
-
Type your old (current) password.
-
Type your new password.
-
Confirm your new password by typing it again, then click
.
2.4.3 Managing Keyrings
GNOME Keyring Manager provides an interface for viewing secrets stored
in keyrings on your computer. Secrets include such items as:
Most users will not need to use GNOME Keyring Manager because secrets
are automatically managed by the applications that create them. Whenever
any GNOME application that uses GNOME Keyring needs to access passwords
or credentials stored there, a check is made if the keyring is locked or
not. If it is locked, you will be prompted for the master password to
unlock the keyring.
To open Keyring Manager (independent of any application interaction)
press Alt+F2 and enter gnome-keyring-manager.
To delete a secret:
-
In the list of keyrings on the left side of Keyring Manager, click
.
-
Click the secret you want to delete in the list in the top right area
of Keyring Manager.
-
Click > .
The secret is removed from the list.
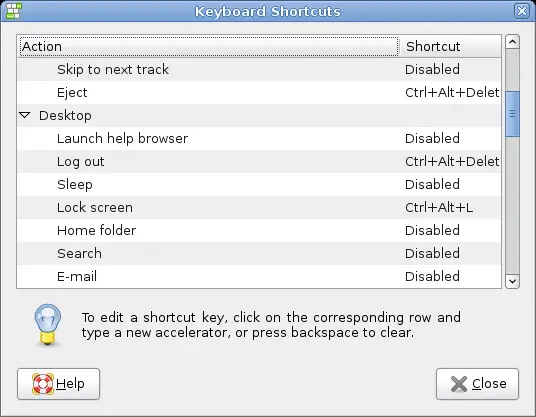
2.4.4 Customizing Keyboard Shortcuts
A keyboard shortcut is a key or combination of keys that provides an
alternative to standard ways of performing an action. You can customize
the keyboard shortcuts for a number of actions.
To open the Keyboard Shortcuts tool, click .
To change the shortcut keys for an action, select the action and then
press the keys you want to associate with the action. To disable the
shortcut keys for an action, click the shortcut for the action, then
press Backspace.