Administrative Web Guard Prototype
This section provides an example of a safe web browsing prototype that
isolates a web server and its web content to prevent attacks from
the Internet. This Web Guard prototype takes advantage of administrative trusted networking
features to configure a two-stage filter that restricts access to a protected
web server and web content. This prototype was implemented solely by administrative
means. No programming was required.
The following figure shows the configuration of the Web Guard prototype in
a multilevel environment. The label relationships are shown by how the labels
are positioned in the figure. Vertical relationships represent label dominance, while horizontal
relationships represent disjoint labels.
Figure 8-1 Web Guard Configuration
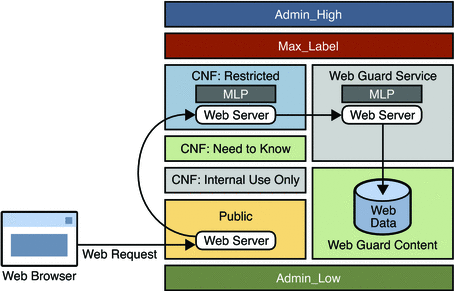
Web requests come in to the web server that is configured in
the public zone and are passed to the web server that is
configured in the restricted zone.
The restricted zone uses a multilevel port (MLP) to listen for requests
at port 8080 of the public zone. This web server passes the
requests to the webservice labeled zone.
The webservice zone also uses an MLP to listen for requests at
port 80 of the restricted zone and reads content from the webcontent
labeled zone.
The webcontent zone is in the ready state and has its web
content stored in the /export/home file system, which is automatically mounted in
all other labeled zones. When a zone is in the ready state,
no processes run in that zone. Thus, the zone is essentially a
disk drive attached directly to the webservice zone.
You configure the Web Guard prototype by performing these high-level tasks:
Modifying the label_encodings file to configure the labels in your safe web browsing environment
The default label_encodings file is updated to configure two new labels: WEB GUARD SERVICE and WEB GUARD CONTENT. See Modifying the label_encodings File.
Configuring trusted networking
The private IP addresses and MLPs are configured on the restricted and webservice labeled zones. See Configuring Trusted Networking.
Configuring the Apache web servers
The public, restricted, and webservice zones all have web servers configured. In this example, the web server used is Apache. See Configuring the Apache Web Servers.
Modifying the label_encodings File
The default label_encodings file is updated to configure two new labels: WEB GUARD SERVICE
and WEB GUARD CONTENT. The SANDBOX label, which is part of the default file,
is modified to serve as the WEB GUARD CONTENT label. The WEB GUARD SERVICE label is
added.
You must install the label_encodings file in the /etc/security/tsol directory. You can
install this file on top of an existing Trusted Extensions installation.
After you install the updated file in the /etc/security/tsol directory, activate the
new label_encodings file:
# svcadm restart svc:/system/labeld
The following shows the label_encodings file used in this Web Guard prototype.
* ident    "@(#)label_encodings.simple    5.15    05/08/09 SMI"
*
* Copyright 2005 Sun Microsystems, Inc.  All rights reserved.
* Use is subject to license terms.
*
* This example shows how to specify labels that meet an actual
* site's legal information  protection requirements for
* labeling email and printer output. These labels may also
* be used to enforce mandatory access control checks based on user
* clearance labels and sensitivity labels on files and directories.

VERSION= Sun Microsystems, Inc. Example Version - 6.0. 2/15/05

CLASSIFICATIONS:

name= PUBLIC; sname= PUB; value= 2; initial compartments= 4;
name= CONFIDENTIAL; sname= CNF; value= 4; initial compartments= 4;
name= WEB GUARD; sname= WEB; value= 5; initial compartments= 0;
name= MAX LABEL; sname= MAX; value= 10; initial compartments= 0 4 5;

INFORMATION LABELS:

WORDS:

name= :; prefix;

name= INTERNAL USE ONLY; sname= INTERNAL; compartments= 1 ~2; minclass= CNF;
name= NEED TO KNOW; sname= NEED TO KNOW; compartments= 1-2 ~3; minclass= CNF;
name= RESTRICTED; compartments= 1-3; minclass= CNF;
name= CONTENT; compartments= 0 ~1 ~2 ~3; minclass= WEB;
name= SERVICE; compartments= 5; minclass= WEB;

REQUIRED COMBINATIONS:

COMBINATION CONSTRAINTS:

SENSITIVITY LABELS:

WORDS:

name= :; prefix;

name= INTERNAL USE ONLY; sname= INTERNAL; compartments= 1 ~2; minclass= CNF;
prefix= :

name= NEED TO KNOW; sname= NEED TO KNOW; compartments= 1-2 ~3; minclass= CNF;
prefix= :

name= RESTRICTED; compartments= 1-3; minclass= CNF; prefix= :

name= CONTENT; compartments= 0 ~1 ~2 ~3; minclass= WEB;

name= SERVICE; compartments= 5; minclass= WEB;

REQUIRED COMBINATIONS:

COMBINATION CONSTRAINTS:

CLEARANCES:

WORDS:

name= INTERNAL USE ONLY; sname= INTERNAL; compartments= 1 ~2; minclass= CNF;
name= NEED TO KNOW; sname= NEED TO KNOW; compartments= 1-2 ~3; minclass= CNF;
name= RESTRICTED; sname= RESTRICTED; compartments= 1-3; minclass= CNF;
name= CONTENT; compartments= 0 ~1 ~2 ~3; minclass= WEB;
name= SERVICE; compartments= 5; minclass= WEB;

REQUIRED COMBINATIONS:

COMBINATION CONSTRAINTS:

CHANNELS:

WORDS:

PRINTER BANNERS:

WORDS:

ACCREDITATION RANGE:

classification= PUB; all compartment combinations valid;
classification= WEB; all compartment combinations valid;
classification= CNF; all compartment combinations valid except: CNF

minimum clearance= PUB;
minimum sensitivity label= PUB;
minimum protect as classification= PUB;

* Local site definitions and locally configurable options.

LOCAL DEFINITIONS:

default flags= 0x0;
forced flags= 0x0;

Default Label View is Internal;

Classification Name= Classification;
Compartments Name= Sensitivity;

Default User Sensitivity Label= PUB;
Default User Clearance= CNF NEED TO KNOW;

COLOR NAMES:

    label= Admin_Low;           color= #bdbdbd;

    label= PUB;                 color= blue violet;
    label= WEB SERVICE;         color= yellow;
    label= CNF;                 color= navy blue;
    label= CNF : INTERNAL USE ONLY;  color= blue;
    label= CNF : NEED TO KNOW;  color= #00bfff;
    label= CNF : RESTRICTED;    color= #87ceff;

    label= Admin_High;          color= #636363;

* End of local site definitions
For more information about the label_encodings file, see Solaris Trusted Extensions Label Administration.
Configuring Trusted Networking
The restricted and webservice zones are assigned a private IP address in
addition to the IP address that they already share. Each private IP
address has a multilevel port configured and is associated with a restricted
label set.
The following table shows the network configuration for each of the labeled
zones.
Zone Name |
Zone Label |
Local IP Address |
Host Name |
Multilevel Port |
Security Label Set |
|---|
restricted |
CONFIDENTIAL : RESTRICTED |
10.4.5.6 |
proxy |
8080/tcp |
PUBLIC |
webservice |
WEB GUARD SERVICE |
10.1.2.3 |
webservice |
80/tcp |
CONFIDENTIAL : RESTRICTED |
webcontent |
WEB GUARD CONTENT |
None |
|
|
|
First, you must create the new zones. You can clone an existing
zone, such as the public zone. After these zones are created, use
the zonecfg command to add a network (with the address specified in
the table) and your local interface name.
For example, the following command associates the 10.4.5.6 IP address and the
bge0 interface with the restricted zone:
# zonecfg -z restricted add net set address=10.4.5.6 set physical=bge0 end exit
After you specify the IP address and network interface for each labeled
zone, you use the Solaris Management Console to configure the remaining values
in the table. When using this tool, make sure that you select
the tool box with Scope=Files and Policy=TSOL.
Follow these steps to finish the zone configuration:
Start the Solaris Management Console as superuser.
# smc &
From the Navigation panel, select This Computer, and then click the System Configuration icon.
Click the Computers and Network icon.
Click the Computers icon, and then choose Add Computer from the Action menu.
Add the host names and IP addresses for the proxy host and the webeservice host.
From the Navigation panel, select Trusted Network Zones.
You might need to expand the columns. If the zone names do not appear in the list, choose Add Zone Configuration from the Action menu.
Assign each zone its label and specify the appropriate port and protocol in the MLP Configuration for Local IP Addresses field.
From the Navigation panel, click the Security Families icon and choose Add Template from the Action menu.
Add templates for the proxy host name and the webservices host name based on the information in the table.
Specify the corresponding host name for the template name.
Specify CIPSO in the Host Type field.
Specify the corresponding zone label in the Minimum Label and Maximum Label fields.
Specify the corresponding security label in the Security Label Set field.
Click the Hosts Explicitly Assigned tab.
In the Add an Entry section, add the corresponding local IP address to each template.
Exit the Solaris Management Console.
After you exit the Solaris Management Console, start or restart the affected
zones. In the global zone, add routes for the new addresses, where
shared-IP-addr is the shared IP address.
# route add proxy shared-IP-addr
# route add webservice shared-IP-addr
Configuring the Apache Web Servers
An instance of the Apache web server runs in the public zone,
the restricted zone, and the webservice zone. The /etc/apache/httpd.conf file is updated
in each of the zones as follows:
public zone – Specify the IP address or host name of the server for the ServerName keyword, and update the proxy configuration as follows:
ServerName myserver

ProxyRequests Off
ProxyPass /demo https://proxy:8080/demo
ProxyPassReverse /demo https://proxy:8080/demo
restricted zone – Specify the listen proxy port and the port. Then, specify the IP address or host name of this zone for the ServerName keyword, and update the proxy configuration as follows:
Listen proxy:8080
Port 8080

ServerName proxy

ProxyRequests Off
ProxyPass /demo https://webservice
ProxyPassReverse /demo https://webservice
You might also want to set up some filtering of the web requests, such as dirty word filters, or other filters to restrict the types of requests for web content.
webservice zone – Specify the IP address or host name of this zone for the ServerName keyword, and point to the location of the web content directory in the DocumentRoot keyword and the <Directory> element as follows:
ServerName webservice

DocumentRoot "/zone/webcontent/export/home/www/htdocs"
<Directory "/zone/webcontent/export/home/www/htdocs">
After you have updated the Apache web server configuration files for each
labeled zone, store your web content in the /export/home/www/htdocs directory of the
webcontent zone.
Create the demo directory in the /export/home/www/htdocs directory, and then create an
index.html file in the demo directory to use for testing.
The /export/home directory is automatically mounted by using lofs into the webservice
zone when it is booted. The webcontent zone only needs to brought
up to the ready state.
# zoneadm -z webcontent ready
When a zone is in the ready state, no processes are running
in that zone. The zone's file system can be mounted read-only by
the webservice zone. Accessing the web content in this way ensures that
the content cannot be changed.
Running the Trusted Web Guard Demonstration
From your browser in the public zone or from a remote browser
running at the PUBLIC label, type the following URL:
https://server-name/demo
The browser should show the default index.html file from the webcontent zone.
Note that the Web Guard flow cannot by bypassed. The web server
in the webservice zone cannot receive packets from the public zone or
from any remote host. The web content cannot be changed because the
webcontent zone is in the ready state.


