Getting Started as a Trusted Extensions Administrator (Task Map)
Familiarize yourself with the following procedures before administering Trusted Extensions.
How to Enter the Global Zone in Trusted Extensions
By assuming a role, you enter the global zone in Trusted Extensions.
Administration of the entire system is possible only from the global zone. Only
superuser or a role can enter the global zone.
After assuming a role, the role can create a workspace at a
user label to edit administration files in a labeled zone.
For troubleshooting purposes, you can also enter the global zone by starting a
Failsafe session. For details, see How to Log In to a Failsafe Session in Trusted Extensions.
Before You Begin
You have created one or more roles, or you plan to enter
the global zone as superuser. For pointers, see Role Creation in Trusted Extensions.
- Use a trusted mechanism.
- In Solaris Trusted Extensions (GNOME), click your user name in the trusted stripe
and choose a role.
If you have been assigned a role, the role names are displayed in
a list.
For the location and significance of Trusted Extensions desktop features, see Chapter 4, Elements of Trusted Extensions (Reference), in Solaris Trusted Extensions User’s Guide.
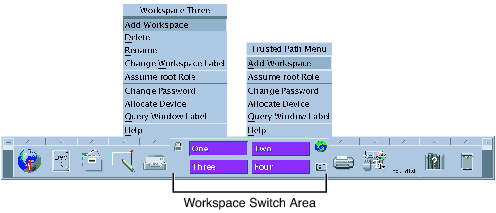
- In Solaris Trusted Extensions (CDE), open the Trusted Path menu.
- Click mouse button 3 over the workspace switch area.

- Choose Assume rolename Role from the Trusted Path menu.
- At the prompt, type the role password.
In Trusted CDE, a new role workspace is created, the workspace switch button
changes to the color of the role desktop, and the title bar
above each window shows Trusted Path. In Trusted GNOME, the current workspace changes to the
role workspace.
In Trusted CDE, you leave a role workspace by using the mouse
to choose a regular user workspace. You can also delete the last role
workspace to exit a role. In Trusted GNOME, you can click the role name
on the trusted stripe, and from the menu, select a different role
or user. This action changes the current workspace to the process of the
new role or user.
How to Exit the Global Zone in Trusted Extensions
The menu locations for exiting a role are different in Trusted GNOME
and Trusted CDE.
Before You Begin
You are in the global zone.
How to Administer the Local System With the Solaris Management Console
The first time that you launch the Solaris Management Console on a
system, a delay occurs while the tools are registered and various directories are
created. This delay typically occurs during system configuration. For the procedure, see Initialize the Solaris Management Console Server in Trusted Extensions.
To administer a remote system, see Administering Trusted Extensions Remotely (Task Map).
Before You Begin
You must have assumed a role. For details, see How to Enter the Global Zone in Trusted Extensions.
- Start the Solaris Management Console.
In Solaris Trusted Extensions (GNOME), use the command line. In Trusted CDE, you
have three choices.
- Use the smc command in a terminal window.
$ /usr/sbin/smc &
- From the Tools pull-up menu on the Front Panel, click the Solaris Management
Console icon.
- In the Trusted_Extensions folder, double-click the Solaris Management Console icon.
- Choose Console -> Open Toolbox.
- From the list, select a Trusted Extensions toolbox of the appropriate scope.
A Trusted Extensions toolbox has Policy=TSOL as part of its name. The Files
scope updates local files on the current system. The LDAP scope updates LDAP
directories on the Sun JavaTM System Directory Server. The toolbox names appear similar
to the following:
This Computer (this-host: Scope=Files, Policy=TSOL)
This Computer (ldap-server: Scope=LDAP, Policy=TSOL)
- Navigate to the desired Solaris Management Console tool.
The password prompt is displayed.
For tools that Trusted Extensions has modified, click System Configuration.
- Type the password.
Refer to the online help for additional information about Solaris Management Console tools.
For an introduction to the tools that Trusted Extensions modifies, see Solaris Management Console Tools.
- To close the GUI, choose Exit from the Console menu.
How to Start CDE Administrative Actions in Trusted Extensions
- Assume a role.
For details, see How to Enter the Global Zone in Trusted Extensions.
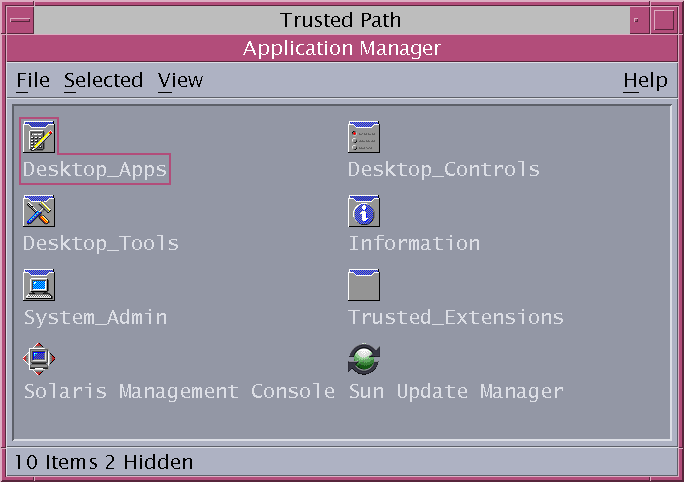
- In Trusted CDE, bring up the Application Manager.
- Click mouse button 3 on the background to bring up the Workspace menu.
- Click Applications, then click the Application Manager menu item.

The Trusted_Extensions folder is in the Application Manager.
- Open the Trusted_Extensions folder.
- Double-click the appropriate icon.
For a list of administrative actions, see Trusted CDE Actions.
How to Edit Administrative Files in Trusted Extensions
Administrative files are edited with a trusted editor that incorporates auditing. This editor
also prevents the user from executing shell commands and from saving to any
file name other than the name of the original file.
- Assume a role.
For details, see How to Enter the Global Zone in Trusted Extensions.
- Open a trusted editor.
- In Solaris Trusted Extensions (CDE), do the following:
- To bring up the editor, click mouse button 3 on the background to
bring up the Workspace menu.
- Click Applications, then click the Application Manager menu item.
The Trusted_Extensions folder is in the Application Manager.
- Open the Trusted_Extensions folder.
- Double-click the Admin Editor action.
You are prompted to provide a file name. For the format, see Step 3
and Step 4.
- In Solaris Trusted Extensions (GNOME), do the following:
- To create a new file, type the full path name for the new
file.
When you save the file, the editor creates a temporary file.
- To edit an existing file, type the full path name for the existing
file.
Note - If your editor provides a Save As option, do not use it.
Use the editor's Save option to save the file.
- To save the file to the specified path name, close the editor.
