Managing Devices in Trusted Extensions (Task Map)
The following task map describes procedures to protect devices at your site.
How to Configure a Device in Trusted Extensions
By default, an allocatable device has a label range from ADMIN_LOW to
ADMIN_HIGH and must be allocated for use. Also, users must be authorized to
allocate the device. These defaults can be changed.
Before You Begin
You must be in the Security Administrator role in the global zone.
- From the Trusted Path menu, select Allocate Device.
The Device Allocation Manager appears.
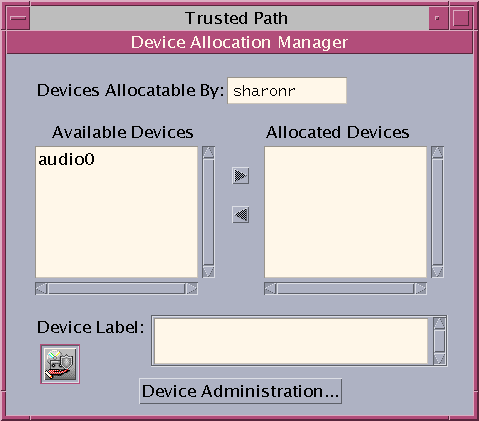
- View the default security settings.
Click Device Administration, then highlight the device. The following figure shows a CD-ROM
drive with default security settings.
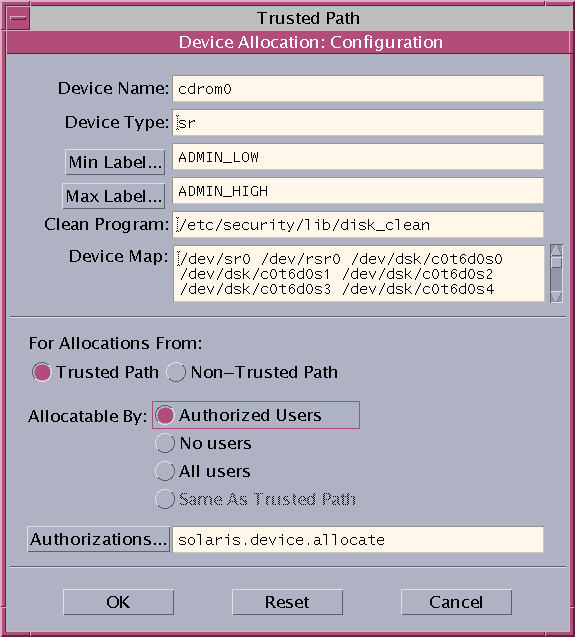
- (Optional) Restrict the label range on the device.
- Set the minimum label.
Click the Min Label... button. Choose a minimum label from the label builder.
For information about the label builder, see Label Builder in Trusted Extensions.
- Set the maximum label.
Click the Max Label... button. Choose a maximum label from the label builder.
- Specify if the device can be allocated locally.
In the Device Allocation Configuration dialog box, under For Allocations From Trusted Path, select
an option from the Allocatable By list. By default, the Authorized Users option
is checked. Therefore, the device is allocatable and users must be authorized.
- To make the device nonallocatable, click No Users.
When configuring a printer, frame buffer, or other device that must not be
allocatable, select No Users.
- To make the device allocatable, but to not require authorization, click All Users.
- Specify if the device can be allocated remotely.
In the For Allocations From Non-Trusted Path section, select an option from the Allocatable
By list. By default, the Same As Trusted Path option is checked.
- To require user authorization, select Allocatable by Authorized Users.
- To make the device nonallocatable by remote users, select No Users.
- To make the device allocatable by anyone, select All Users.
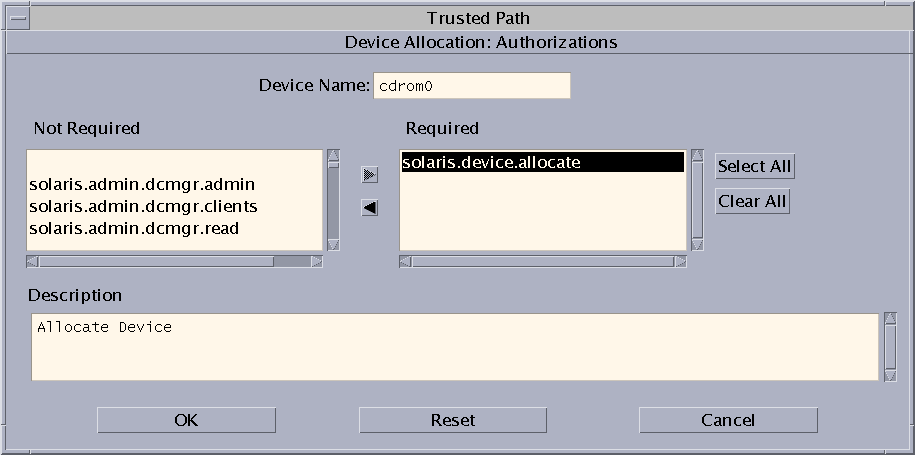
- If the device is allocatable, and your site has created new device authorizations,
select the appropriate authorization.
The following dialog box shows the solaris.device.allocate authorization is required to allocate the
cdrom0 device.
To create and use site-specific device authorizations, see Customizing Device Authorizations in Trusted Extensions (Task Map).
- To save your changes, click OK.
How to Revoke or Reclaim a Device in Trusted Extensions
If a device is not listed in the Device Allocation Manager, it
might already be allocated or it might be in an allocate error state.
The system administrator can recover the device for use.
Before You Begin
You must be in the System Administrator role in the global zone.
This role includes the solaris.device.revoke authorization.
- From the Trusted Path menu, select Allocate Device.
In the following figure, the audio device is already allocated to a user.
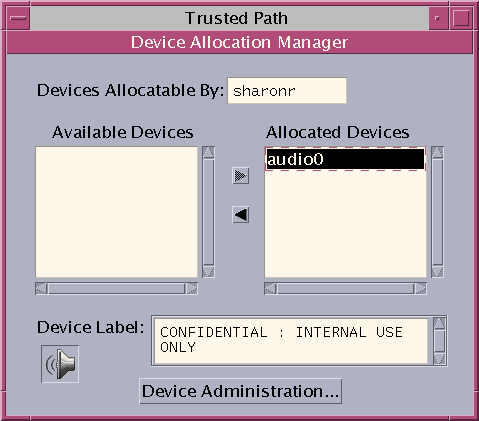
- Click the Device Administration button.
- Check the status of a device.
Select the device name and check the State field.
- If the State field is Allocate Error State, click the Reclaim button.
- If the State field is Allocated, do one of the following:
- Ask the user in the Owner field to deallocate the device.
- Force deallocation of the device by clicking the Revoke button.
- Close the Device Allocation Manager.
How to Protect Nonallocatable Devices in Trusted Extensions
The No Users option in the Allocatable By section of the Device
Configuration dialog box is used most often for the frame buffer and printer,
which do not have to be allocated to be used.
Before You Begin
You must be in the Security Administrator role in the global zone.
- From the Trusted Path menu, select Allocate Device.
- In the Device Allocation Manager, click the Device Administration button.
- Select the new printer or frame buffer.
- To make the device nonallocatable, click No Users.
- (Optional) Restrict the label range on the device.
- Set the minimum label.
Click the Min Label... button. Choose a minimum label from the label builder.
For information about the label builder, see Label Builder in Trusted Extensions.
- Set the maximum label.
Click the Max Label... button. Choose a maximum label from the label builder.
Example 23-1 Preventing Remote Allocation of the Audio Device
The No Users option in the Allocatable By section prevents remote users from
hearing conversations around a remote system.
The security administrator configures the audio device in the Device Allocation Manager as
follows:
Device Name: audio
For Allocations From: Trusted Path
Allocatable By: Authorized Users
Authorizations: solaris.device.allocate
Device Name: audio
For Allocations From: Non-Trusted Pathh
Allocatable By: No Users
How to Configure a Serial Line for Logins
Before You Begin
You must be in the Security Administrator role in the global zone.
- Open the Solaris Management Console in the Files scope.
Figure 23-1 Serial Ports Tool in the Solaris Management Console
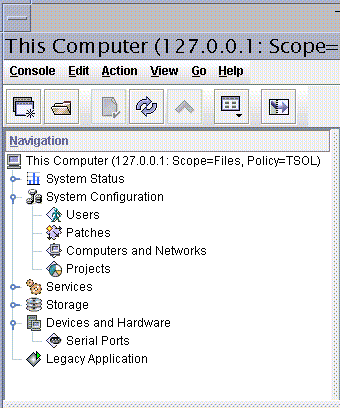
- Under Devices and Hardware, navigate to Serial Ports.
Provide a password when prompted. Follow the online help to configure the serial
port.
- To change the default label range, open the Device Allocation Manager.
The default label range is ADMIN_LOW to ADMIN_HIGH.
Example 23-2 Restricting the Label Range of a Serial Port
After creating a serial login device, the security administrator restricts the label range
of the serial port to a single label, Public. The administrator sets the
following values in the Device Administration dialog boxes.
Device Name: /dev/term/[a|b]
Device Type: tty
Clean Program: /bin/true
Device Map: /dev/term/[a|b]
Minimum Label: Public
Maximum Label: Public
Allocatable By: No Users
How to Configure an Audio Player Program for Use in Trusted CDE
The following procedure enables an audio player to open automatically in a Trusted
CDE workspace when a user inserts a music CD. For the user's
procedure, see the example in How to Allocate a Device in Trusted Extensions in Solaris Trusted Extensions User’s Guide.
Note - In a Trusted GNOME workspace, users specify the behavior of removable media just
as they specify it in a non-trusted workspace.
Before You Begin
You must be in the System Administrator role in the global zone.
- Edit the /etc/rmmount.conf file.
Use the trusted editor. For details, see How to Edit Administrative Files in Trusted Extensions.
- Add your site's CD player program to the cdrom action in the file.
action media action_program.so path-to-program
Example 23-3 Configuring an Audio Player Program for Use
In the following example, the system administrator makes the workman program available
to all users of a system. The workman program is an audio player
program.
# /etc/rmmount.conf file
action cdrom action_workman.so /usr/local/bin/workman
How to Prevent the File Manager From Displaying After Device Allocation
By default, the File Manager displays when a device is mounted. If
you are not mounting devices that have file systems, you might want to
prevent the File Manager from displaying.
Before You Begin
You must be in the System Administrator role in the global zone.
- Edit the /etc/rmmount.conf file.
Use the trusted editor. For details, see How to Edit Administrative Files in Trusted Extensions.
- Find the following filemgr actions:
action cdrom action_filemgr.so
action floppy action_filemgr.so
- Comment out the appropriate action.
The following example shows the action_filemgr.so actions commented out for both the cdrom and
diskette devices.
# action cdrom action_filemgr.so
# action floppy action_filemgr.so
When a CDROM or diskette is allocated, the File Manager does not
display.
How to Add a Device_Clean Script in Trusted Extensions
If no device_clean script is specified at the time a device is created,
the default script, /bin/true, is used.
Before You Begin
Have ready a script that purges all usable data from the physical
device and that returns 0 for success. For devices with removable media, the script
attempts to eject the media if the user does not do so. The
script puts the device into the allocate error state if the medium
is not ejected. For details about the requirements, see the device_clean(5) man page.
You must be in the System Administrator role in the global zone.
- Copy the script into the /etc/security/lib directory.
- In the Device Administration dialog box, specify the full path to the script.
- Open the Device Allocation Manager.
- Click the Device Administration button.
- Select the name of the device, and click the Configure button.
- In the Clean Program field, type the full path to the script.
- Save your changes.


