Starting with no existing documents
The ideal situation is to start with no existing documents, because you can do everything the way you want from the beginning. Writer provides three ways to create a master document:
Method 1. Quick and easy, but not recommended
Method 2. Not too complicated, but with restrictions
Method 3. Complete control
In each case, you need to have a disciplined approach to make sure the master document works correctly and reliably. Each method below describes the steps to take. Be sure to do the steps in the order given.
Method 1. Quick and easy, but not recommended
Writer provides a quick and easy way to create a master document, but the master document is not associated with a template, so changes to styles and formatting are more difficult to apply reliably.
|
Note
|
If the subdocuments were all created with the same template and the styles were not modified in the documents, then the styles are imported into the master document with the subdocuments, and styles and formatting should be correct in the master document. This method works best when these conditions are met.
|
How to do it:
-
Click File > New > Master Document.
-
Use the Navigator to insert new documents or existing files into the master document, as described in “Step 5. Insert the subdocuments into the master document†on page 329.
Method 2. Not too complicated, but with restrictions
This technique works well if you want to use sequential page numbering throughout the final document (not restarting at 1 at any point), and each chapter starts with a Heading 1 on a new page. If you want to restart page numbering anywhere in the document, use Method 3.
How to do it: Follow the instructions in the next section (Method 3. Complete control), but do not put in the text sections between the subdocuments or try to change the page numbering.
Method 3. Complete control
This method gives you complete control over complex documents with several page styles or restarted page numbering. It is a bit more work to set up, but works reliably.
How to do it: Follow these steps, in the order given. Each step is explained in detail in the following subsections.
Step 1. Plan the project
Step 2. Create a template containing the required styles, fields, and other elements
Step 3. Create the master document and subdocuments from the same template
Step 4. Insert some information directly into the master document
Step 5. Insert the subdocuments into the master document
Step 6. Add a table of contents, bibliography, or index
Step 1. Plan the project
Although you can make changes at most steps in this process, the more you can plan before you start, the less work you will have to do to correct any problems later. Here are some things you need to plan:
|
Part
|
Length
|
Page numbering
|
|
Title (cover) page
|
1 page
|
no page number
|
|
Copyright page
|
1 page (back of title page)
|
no page number
|
|
Table of Contents
|
unknown length
|
start with i
|
|
Preface (Foreword)
|
2 pages
|
continue from ToC
|
|
Chapters 1 to 8
|
unknown length
|
start with 1
|
|
Appendixes A, B
|
unknown length
|
continue from Chapter 8
|
|
Index
|
unknown length
|
continue from Appendix B
|
-
|
Part
|
Location
|
|
Title (cover) page
|
In master document
|
|
Copyright page
|
In master document
|
|
Table of Contents
|
In master document
|
|
Preface (Foreword)
|
Subdocument
|
|
Chapters 1 to 8
|
Subdocuments
|
|
Appendixes A, B
|
Subdocuments
|
|
Index
|
In master document
|
-
Page, paragraph, character, frame, and numbering styles. See Chapter 6, “Introduction to Styles†for instructions on how to create or modify styles. Some styles for the example book are:
Page styles
-
|
Name
|
Characteristics
|
Next page style
|
|
Title page
|
No header, footer or page numbers; layout different from other pages
|
Copyright page
|
|
Copyright page
|
No header, footer or page numbers; layout different from other pages
|
Front matter first page
|
|
Front matter first page
|
No header; page number in footer, Roman numbers (i, ii, iii); layout different from following pages
|
Front matter left page
|
|
Front matter left page
|
Header and footer, one containing the page number (Roman)
|
Front matter right page
|
|
Front matter right page
|
Margins mirrored from Front matter left page; Roman page number
|
Front matter left page
|
|
First page
|
No header; page number in footer, Arabic numbers (1, 2, 3); layout same as Front matter first page
|
Left page
|
|
Left page
|
Layout as for Front matter left page, but Arabic page numbers
|
Right page
|
|
Right page
|
Layout as for Front matter right page, but Arabic page numbers
|
Left page
|
Step 2. Create a template containing the required styles, fields, and other elements
You can create your template from an existing document or template that contains some or all of the styles you want for this document, or you can create the template from a blank document. For more about templates, see Chapter 10, “Working with Templatesâ€.
If you use an existing document or template, delete all the text from it except for fields in headers and footers before saving it as the template for this project. It will still have all the styles you defined, even if the text is not there. You can change the styles in the template as your project develops.
Be sure to use File > Templates > Save when creating the template.
Step 3. Create the master document and subdocuments from the same template
If you are starting a new project, create the master document and all the subdocuments from the same template. Not using the same template could create style inconsistencies that require time and effort to correct. For example, if two subdocuments have a style with the same name that is formatted differently in each document, the master document will use the formatting from the first subdocument that was added. This could cause your document not to look like you expect. Using the same template for all subdocuments saves time and frustration.
It does not matter in what order you create the master and subdocuments, and you do not have to create all the subdocuments at the same time, when you are starting the project. You can add new subdocuments at any time, as you need them—as long as you always create them from the same template.
Create the master document
Follow this process to create the master document. You can use other methods, but each method (including this one) has its drawbacks.
-
Open a new document from the template you created in Step 2, by clicking New > Templates and Documents, then selecting the template you created. Be sure the first page of this new document is set to the page style you want for the first page of the final document; if it is not, change it. In our example, the style for the first page is Title page.
-
If any text or page breaks came into this document from the template, delete the text. (Fields in headers and footers can stay.)
-
Click File > Send > Create Master Document. Save the master document in the folder for this project, not in the templates foldert. We will return to this master document later. For now, you can either leave it open or close it, as you prefer.
Create subdocuments
A subdocument is no different from any other text document. It becomes a subdocument only when it is linked into a master document and opened from within the master document. Some settings in the master document will override the settings in a subdocument, but only when the document is being viewed, manipulated, or printed through the master document.
Create a subdocument in the same way as you create any ordinary document:
-
Open a blank document based on the project template (very important) by clicking New > Templates and Documents, then selecting the template.
-
Delete any unwanted text, and set the first page to the page style you specified for the first page of a chapter.
-
Click File > Save As. Give the document a suitable name and save it in the folder for this project.
If you already have some of the chapters written, the files are probably not based on the template you just created for this project. You will need to change the template attached to the existing files. The only way to do this is:
-
Open a blank document based on the project template.
-
Copy the contents of the original document into this new document. Use File > Paste Special to avoid copying the styles from the original documents to the new document.
-
Apply the template styles throughout the document.
-
Click File > Save As and save the new document in the project folder with a suitable name.
-
Rename the original chapter file so you do not use it by mistake.
Step 4. Insert some information directly into the master document
The instructions in steps 4 and 5 use the page numbering requirements given in Step 1. If your book has different requirements, change these instructions to suit.
Theseinstructions are fairly tedious, but once you have the master document set up, you should not have to change it, and with a bit of practice setting it up goes quickly.
-
Open the master document and do the following.
-
Make sure paragraph marks are showing (you can set them in Tools > Options > OpenOffice.org Writer > Formatting Aids, or click the Nonprinting characters icon  ).
).
-
Show text boundaries, table boundaries, and section boundaries (Tools > Options > OpenOffice.org > Appearance).
-
Type the contents of the title page (or leave placeholders and fill in later). With the insertion point in the last blank paragraph on the page, click Insert > Manual Break. On the Insert Break dialog box (Figure 340), select Page break and the page style for the second page (Copyright page in our example), and leave the Change page number checkbox deselected. Click OK.
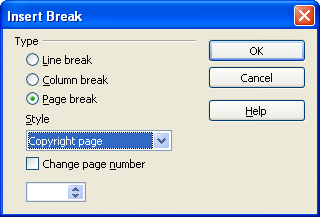
Figure 340. Inserting a page break between the title page and the copyright page
-
Type the contents of the copyright page (or leave placeholders). Insert another manual page break, this time setting the page style to Front matter first page. Select the Change page number checkbox and choose 1 in the box below that, as shown in Figure 341. This number 1 will show in your document as i, because the page style is defined to use Roman numerals.
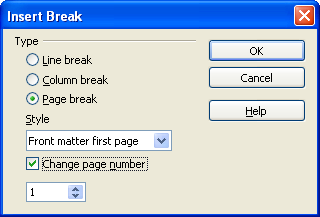
Figure 341. Inserting a page break before the first page of the front matter
-
Let’s assume the third page is for the Table of Contents. Leave a blank paragraph or two on this page and insert another page break, with the next page again set to the Front matter first page style, which we want to use for the first page of the Preface. Because we want the page numbering for the Preface to continue from the page numbers of the Table of Contents, do not select the Change page number checkbox this time. Notice that the Navigator shows one item, labeled Text.
Step 5. Insert the subdocuments into the master document
At last we are ready to add the subdocuments.
|
TIP
|
Subdocuments are inserted into a master document before whatever item is highlighted in the Navigator. If you insert the last subdocument first, and then insert the other subdocuments before the last one, they will end up in the correct sequence without the necessity of moving them up or down in the list.
|
-
Display the Navigator (click Edit > Navigator, or press F5, or click the Navigator icon  .
.
-
On the Navigator, select Text, then long-click on the Insert icon and click File.
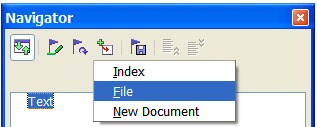
Figure 342. Inserting a subdocument into a master document using the Navigator
A standard File Open dialog box appears. Select the required file (which you created in Step 3) and click OK. This example uses six chapters and a preface; we will load Chapter 6 first, as suggested in the Tip above.
The inserted file is listed in the Navigator before the Text item, as shown in Figure 343.
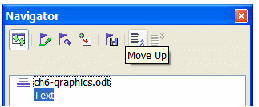
Figure 343. Navigator after inserting one subdocument
-
Because the Text section contains the title page and other material you have already inserted, highlight it and click the Move Up icon to move it to the top of the list.
-
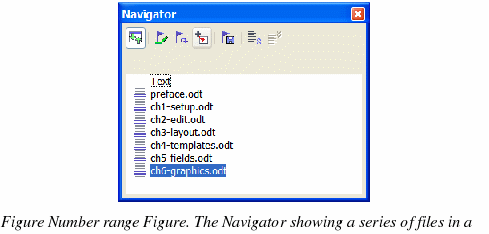
Highlight the subdocument you just inserted (Chapter 6), then long-click on the Insert icon and click File to insert the first subdocument; in this example, Preface. Chapter 6 remains highlighted. Repeat with Chapter 1, Chapter 2, and so on until all the subdocuments have been added to the list. The Navigator will now look something like Figure 344.
-
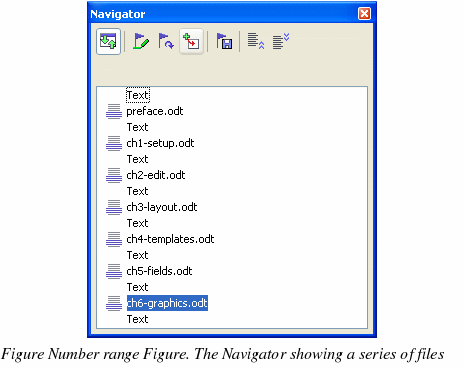
Save the master document again. Now highlight each chapter in turn and insert a Text section before it. When you are done, the Navigator should look like Figure 345.
|
TIP
|
You can define your Heading 1 paragraph style to start on a new page, and thus avoid inserting manual page breaks between chapters, but this causes a page numbering problem if you want to restart page numbering at the beginning of Chapter 1.
To restart page numbering, you must insert a manual page break; but because the Heading 1 style on the first page of Chapter 1 forces yet another page break, you end up with one or more unwanted blank pages before the first page of Chapter 1. The technique described in this chapter avoids this problem.
|
-
Check whether the first page of the master document has the correct page style. If not, change it to the correct style (Title page in this example).
Scroll to the place where the first subdocument begins. Check whether its page style is correct, and change it if necessary (Front matter first page in this example).
The first subdocument (Figure 346) has a blank paragraph at the top of the page; this was inserted as part of the manual page break. Set this paragraph to the PageBreak style you created in Step 2.

Figure 346. Page break before subdocument, which is in a protected section
-
Notice that the document is in a protected section. That means you cannot change any of the contents of this subdocument from within the master document. (If you remove the section, the contents become part of the master document itself; they are no longer in a subdocument. If you make changes in either the master document or the subdocument, those changes are not made in the other document. For more about sections, refer to the online help or to Chapter 4, “Formatting Pagesâ€.)
Scroll down until you find the beginning of Chapter 1. You will find that it is on the same page as the end of the Preface, and there is a blank paragraph in the text area between the two sections (the Preface and Chapter 1), as shown in Figure 347.
Click on this blank paragraph and insert a page break, specifying the First Page style and the page number to start at 1. Click OK.
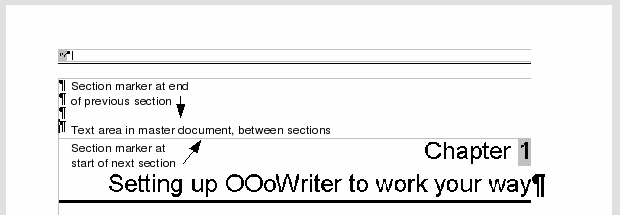
Figure 347. A text area between two sections of a master document
-
Scroll to the first page of Chapter 2. You’ll find that it is on the same page as the end of Chapter 1, and there is a blank paragraph in the text area between the two chapters.
Click on this blank paragraph and insert a page break, specifying the First Page style, but do not select the Change page number checkbox.
Repeat for all of the chapters, so that each chapter starts on a new first page.
-
Save the master document again.
Step 6. Add a table of contents, bibliography, or index
You can generate a table of contents, bibliography, or index for the book, using the master document. You must insert these items into a text section in the master document. For more about these document elements, see Chapter 12, “Creating Tables of Contents, Indexes, and Bibliographiesâ€.
Put the insertion point on the page in the first text section where the table of contents is to go and create the table of contents.
If you do not have a Text section at the end of the master document, insert one before the last subdocument, then move it down so it is after the last subdocument. Now, if you have included bibliographic entries in your subdocuments, you can put the insertion point on the page in this last text section where the bibliography is to go and create the bibliography.
If you have included index entries in your subdocuments, put the insertion point on the page in the last text section where the index is to go and create the index.
