Creating a new list style
The dialog box to create a new list style consists of six pages, in addition to the usual Organizer page discussed in
The Organizer page.
Bullets, Numbering Styles, and Graphics pages
The Bullets, Numbering Style, and Graphics pages contain predefined formatting for either the bullets (Bullets and Graphics pages) or for numbering. To use one of them for your style, it is sufficient to click on the image. A thick border indicates the selection. If you choose a graphics bullet, you can select the Link Graphics option to create a link to the graphic object rather than embedding it in the document. If you decide to link the graphic, keep in mind that the bullet will not be displayed when the document is opened on a different computer (unless the same graphic file is located in the same location on both computers) or if the graphic file used is moved to a different location on the computer.
Outline page
Use the Outline page to select among predefined nested structures. You can also select one and use it as a starting point for your style, customizing such a list using the Position page and the Options page, as described below.
Position page
Use the Position page to fine tune the indentation and spacing of the bullet point and its text. This page is particularly effective when used in combination with the Options page.
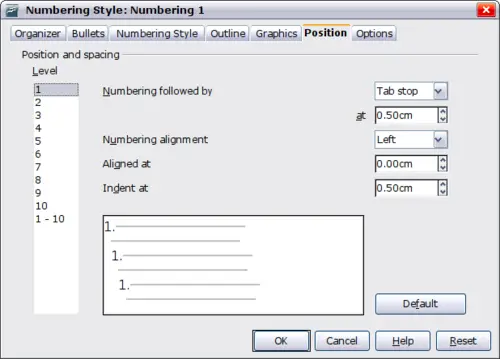
Position settings for a List style.
For each individual level, you can adjust the following settings. It is generally easier to adjust the settings in the order given below, instead of the order on the dialog box. That is, start from the overall indentation for the list elements, then fix the position of the symbols, and finally the alignment of the symbols.
- Numbering followed by: use this field to determine the character to follow the numbering symbol. Choose between a tab stop, a space, or nothing. If you select the tab stop, you can specify the position of the tab.
- Indent at: this value determines how much space is reserved for the numbering symbol, measured from the left page margin. Note that the alignment of the first line of the list is also affected by any tab you may have set to follow the numbering.
- Aligned at: this value determines the position of the numbering symbol, measured from the left margin of the page.
- Numbering alignment: select in the drop-down menu how the numbering (including any text before or after as set in the Options page) should be aligned. The symbol alignment is performed around the Aligned at value.
 | When defining an indentation different from 0, the position of the tabulation is not considered.
|
 | In normal circumstances, setting the Numbering followed by distance to be equal to the Indent at distance works well. See
this example for a graphic representation of the effects of the above parameters.
|
If your document was created with an earlier version of OOo, or if the document was saved for compatibility reasons using the ODF file format version 1.1 or earlier, the position dialog will appear as shown below.

The Position page for documents created with earlier versions of OOo.
In this case you can adjust the following settings:
- Indent: use this field to determine the indentation of the number or bullet area. The indentation is measured from the left margin of the paragraph linked to the numbering style (in other words, if the paragraph style already has an indentation, when the list style is applied the indentations are added together). For any level other than Level 1, selecting the Relative option causes the indentation to be measured from the start of the previous level rather than from the page margin.
- Width of numbering: this value determines how much space is used by the numbering symbol. Writer reserves this space, even if only part of it is used.
- Minimum spacing numbering <-> text: this is the spacing between the right edge of the numbering symbol and the text. If the spacing to text is not sufficient, Writer will honor this setting by expanding the numbering area. Setting the minimum spacing between numbering and text is very useful when right-aligning the numbering or when there is much text before or after the numbering.
- Numbering alignment: select in the drop-down menu how the numbering (including any text before or after) should be aligned.
|
| To fully appreciate how the Numbering alignment works, try to create a numbered list with more than ten elements and make sure that enough room has been made for numbers with two or more digits. You may also wish to right-align numbers 10 or greater, as in
this example.
|
Options page
Use the Options page to alter the style of all the outline levels. The options available on this page depend on the type of marker selected for the list. Select first the level you want to modify on the left hand side of the box. To modify all ten levels at once, select 1 – 10 as the level. If you started from a predefined outline, some of the levels will already have settings.
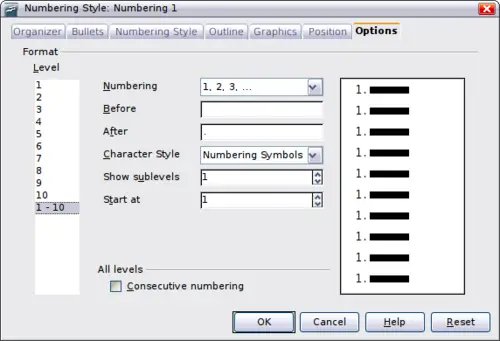
The Options page for a list style.
Depending on the numbering style selected in the Numbering box (bullet, graphic, numbering), some of the following options become available on the page:
- Before: enter any text to appear before the number (for example, Step).
- After: enter any text to appear after the number (for example, a punctuation mark).
- Color: pick the color for the list marker (number or bullet character).
- Relative size: specify the size of the number relative to the size of the characters in the paragraph of the list.
- Start at: enter the first value of the list (for example, you might want the list to start at 4 instead of 1).
- Character Style: choose a character style to be used for the number or bullet.
- Character button: click this button to select the character for the bullet.
- Graphics selection button: opens a list of available graphics (Gallery) or allows the selection of a file on the hard disk to be used as marker.
- Width and Height: specify the dimensions of the graphic marker.
- Alignment: specify th alignment of the graphic object.
- Keep ratio option: If selected, the ratio between the width and the height of the graphic marker is fixed.
The right-hand side of the dialog box shows a preview of the modifications made.
To revert to the default values, click the Reset button in the bottom right corner. Finally, if you wish to use consecutive numbers regardless of the outline level, check the Consecutive numbering box at the bottom of the page.


