When a picture is selected, the Picture toolbar becomes available. This toolbar provides a number of formatting options which are described in this section. If the picture toolbar does not show when an image is selected, display it by selecting View > Toolbars > Picture from the menu bar.

The Picture toolbar.
Applying filters
Use the left-most icon on the toolbar to apply various filters to the selected picture. The best way to judge if a filter works for your picture is to try it (step 4 of the following procedure explains how to undo). To apply a filter:
- Select the image so that the green handles around it show.
- Click on the magic wand icon
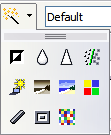
 in the Picture toolbar. The toolbar will expand to show the icons below.
- Select the filter to apply. To show the name of the filter, hover the mouse pointer over the icon and wait for the tooltip to appear.

The graphic filters available in Impress.
- If not satisfied with the effect obtained, before doing anything else click the Undo button or select Edit > Undo: Bitmap Graphic Filter from the menu bar or press Control+Z.
Table 1 describes briefly each of the available graphic filters and their effects. See the
Documentation/OOoAuthors User Manual/Draw Guide for examples of the effects.
Table 1: Graphic filters and their effects
| Icon | Name | Effect
|
 | Invert | Inverts the color values of a color image, or the brightness values of a grayscale image.
|
 | Smooth | Softens the contrast of an image.
|
 | Sharpen | Increases the contrast of an image.
|
 | Remove noise | Removes single pixels from an image.
|
 | Solarization | Mimics the effects of too much light in a picture. A further dialog opens to adjust the parameters.
|
 | Aging | Simulates the effects of time on a picture. Can be applied several times. A further dialog will open to adjust the aging level.
|
 | Posterize | Makes a picture appear like a painting by reducing the number of colors used.
|
 | Pop Art | Modifies the picture dramatically.
|
 | Charcoal | Displays the image as a charcoal sketch.
|
 | Relief | A dialog is displayed to adjust the light source that on turn will create the shadow and hence the relief effect.
|
 | Mosaic | Joins groups of pixels into a single area of one color.
|
Changing the Graphics mode
Use the next box in the Picture toolbar to change the mode of the image. Choose between:
- Default: no changes to the graphic object.
- Grayscale: the image is converted to scales of gray.
- Black/White: each pixel of the image is converted to black or white depending on the brightness value.
- Watermark: adjusts the brightness of the image making it suitable to be used as a watermark. For more information on creating watermarks, refer to
Chapter 2.
Adjusting the color
Clicking the color adjustment button
 on the Picture toolbar opens the color adjustment dialog.
Use this dialog to modify the individual color components of the image (red, green, blue) as well as the brightness, contrast, and gamma of the image. If the result is not satisfactory, press Control+Z to restore the default values.
-

The color adjustment dialog.
Setting the object transparency
Modify the percentage value in the Transparency box
 on the Picture toolbar to make the image more transparent. Note that this is different from the transparency settings for a line or a shape (described in
Chapter 5).
Adjusting the line, area and shadow settings
These settings are not very commonly used for images, with the exception of the shadow setting that applies a shadow to the image.
Cropping pictures
Impress 3 provides two ways to crop a picture: interactively (new in OOo 3) or using a dialog box. The interactive method is easier to use, but the dialog box provides more precise control. You can use both methods: first cropping interactively, then using the dialog box to fine tune the result.
To crop a selected picture interactively, click the Crop icon [[Image:]] on the Picture toolbar. A set of crop marks appears around the picture.

Interactive crop marks
When you place the cursor over any of the crop marks, the cursor changes shape. Drag the mark to crop the picture. Click outside the picture to deactivate cropping mode.
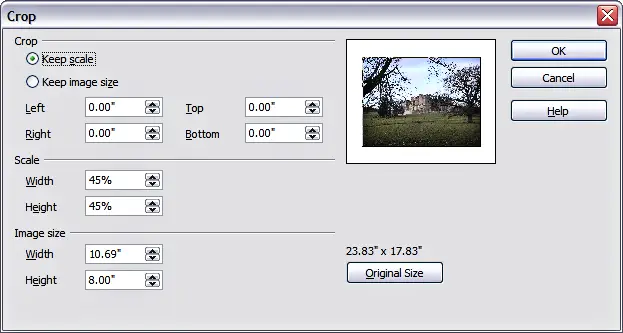
To crop using the dialog box, right-click a selected picture and choose Crop Picture (or choose Format > Crop Picture from the menu bar).

The options available when cropping a picture.
The Crop dialog box has the following options:
- Keep scale / Keep image size buttons: when Keep scale is selected (default), cropping the image does not alter the scale of the picture. When Keep image size is selected, cropping produces enlargement (for positive cropping values), shrinking (for negative cropping values), or distortion of the image so that the image size remains constant.
- Left, Right, Top, and Bottom: the function of these boxes changes according to the choice made between Keep scale and Keep image size. In both cases, when a value is entered in one of these boxes, the image is cropped by that amount. For example, a value of 3cm in the Left box will cut 3cm from the left side of the picture.
- When Keep scale is selected, the size of the image also changes, so in this example the width will be reduced by 3 cm. If Keep image size is selected instead, the remaining part of the image is enlarged (positive values for cropping) or shrunk (negative values for cropping) so that the width and height of the image remains unchanged.
- Note that the Width and Height fields change as you enter the values when in this mode. Use the thumbnail next to these fields to determine the correct amount by which to crop.
- Scale Width and Height: specify in percentages the scaling of the picture. The size of the image changes accordingly.
- Image size: specify the size of the image in your preferred unit of measurement. The image enlarges or shrinks accordingly.
- Original size: when clicked, restores the original image size.
