Using data sources in OOo documents
Data can be placed into Writer and Calc documents from the tables in the data source window. In Writer, values from individual fields can be inserted. Or, a complete table can be created in the Writer document. One common way to use a data source is to perform a mail merge.
 | Selecting Tools > Mail Merge Wizard or clicking on the Mail Merge icon (a small paper-and-envelope icon on the View Data Source pane) launches the Mail Merge wizard which steps through creating a mail merge document. This is discussed in Chapter 11 (Using Mail Merge) in the Writer Guide.
|
Writer documents
To insert a field from a table opened in the data source window into a Writer document, click on the field name (the gray square at the top of the field list) and, with the left mouse button held down, drag the field onto the document. In a Writer document, it will appear as <FIELD> (where FIELD is the name of the field you dragged).
For example: enter the cost of meals and who paid for them on a certain date of a vacation. Make a sentence of this data: “On (date), our breakfast cost (amount) paid by (name), our lunch cost (amount) paid by (name), and our supper cost (amount) paid by (name). Write the words of the sentence with the exception of the words in parentheses. Use the correct field names in the place of the words in parentheses.
- Replacing (data)
- Begin the sentence by typing the word On.
- Click the field name Data in the data source window and drag it to the right of the word On.
- The sentence becomes: On <Date>. If you have Field shadings turned on (View > Field shading), <Date> has a gray background. Otherwise it does not.
- Replacing first (amount)
- Continue typing after <Date>: our breakfast cost.
- Click the Breakfast field name and drag it to the right of what you have just typed.
- Make sure you have the proper spacing between the field names and the words before and after them.
- Results so far: On <Date> our breakfast costs <Breakfast>,
- Replacing the first name:
- Continue typing after <Breakfast>: paid by making sure to add a space afterward.
- Click the Bpayment field name and drag it to the right of what you just typed.
- Place a comma after <Bpayment>.
- Results so far: On <Date> our breakfast cost <Breakfast> paid by Dan<BPayment>,
- Follow these examples to fill in the rest of the fields in the sentence.
- Use <Lunch> and <Lpayment> for the second set of (amount) and (name) in the sentence.
- Use <Supper> and <Spayment> for the third set of (amount) and (name) in th sentence.
- Final results: On <Date> our breakfast cost <Breakfast> paid by <BPayment>, our lunch cost <Lunch> paid by <LPayment>, our supper cost <Supper> paid by <SPayment>.
- Add data to the fields of the sentence:
- Click the gray box to the left of the row of data you want to add. That row should be highlighted like the second row of Figure 61.
- Click the Data to Fields icon (circled in black in Figure 61).This should fill the fields with the data from the row you chose.
- Click another row and then click this icon again. The data in the sentence changes to this selected row of data.
- Save the document.
Adding data in table format is a little easier and takes perhaps a few less steps. Some of the steps will be quite similar.
 | Data can be added this way as a fields or text. Following the following steps. I leave this to the reader with which to experiment by changing the selections in the Insert Database Columns to see what results you can get.
|
- Navigate to the place you want to place the table and click the location.
- Click the gray box to the left of each row of the data source that you want to be a row in your table.
- Click the Data to text icon to open the Insert Database Columns dialog. (The Data to text icon is circled in red below.)

Selected row in data source window.
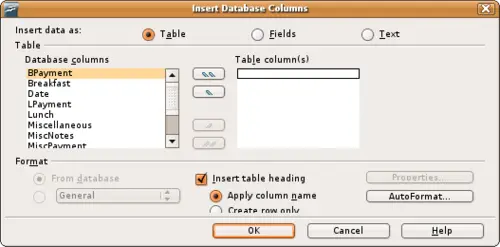
Insert Database Columns dialog.
- Move the fields you want in your table from the Database Columns list to Table column(s) list.
- To place the fields in the order you select, click the field and use the single arrow to move the fields in the order you desire. You can also limit the fields you use to less than all of the fields available.
- If you want to use all of the fields, use the double arrow pointing to the right to move all of them at one time. The order of the fields in the table you create will be the same as in the data source table.
- If you want to remove a single field from the Table Column(s) list, click the field and use the single arrow pointing to the left.
- If you want to start over by moving all of the fields back to the Database Columns list, click the double arrow pointing to the left.
- Select the settings for your table. Use the default settings as in the figure above.
- Click OK.
- Save the document.
Calc spreadsheets
There are two ways to enter data in a Calc spreadsheet. One enters the data into the spreadsheet cells. The other creates records in the spreadsheet just like they are done in creating a form in a database. While you can directly access the data in the spreadsheet cells, you can only see the data in the records created in the spreadsheet.
Entering data directly to the spreadsheet cells uses the Data to Text icon as we did to make a table in a Writer document. But differences exist in these two situations.
The steps are straightforward.
- Click the cell of the spreadsheet which you want to be the top left of your data including the column names.
- Use F4 to open the database source window and select the table whose data you want to use.
- Select the rows of data you want to add to the spreadsheet:
- Click the gray box to the left of the row you want to select if only selecting one row. That row is highlighted.
- To select multiple rows, hold down the shift key while clicking the gray box of the rows you need. Those rows are highlighted.
- To select all the rows, click the gray box in the upper left corner. All rows are highlighted.
- Click the Data to text icon to insert the data into the spreadsheet cells.
- Save the spreadsheet.
Adding records to a spreadsheet is fairly easy. You need to have the Data Source window open, your spreadsheet open, and the table you want to use selected.
- Click the gray box above the field name you wish to use to highlight it.
- Drop and drag the gray box to where you want the record to appear in the spreadsheet.
- Repeat until you have moved all of the fields you need to where you want them.
- Close the Data Source window: use F4.
- Save the spreadsheet and click the Edit File button to make the spreadsheet read only. All of the fields will show the value for the data of the first record you selected.
- Add the Form Navigation toolbar: View > Toolbars > Form Navigation.
- Click the arrows on the Form Navigation toolbar to view the different records of the table. (The arrows are circled in red.) The number in the box changes when you change the record number by clicking an arrow. The data in the fields changes correspondingly to the data for that particular record number.

Navigation arrows of a form.
Top of page


