Creating tables in Design View
Design View is a more advanced method for creating a new table. It allows you to directly enter information about each field in the table. We will use this method for the tables of our database.
 | While the Field type and formatting are different in Design View, the concepts are the same as in the Wizard.
|
The first table to be created is Fuel. Its fields are FuelID, Date, FuelCost, FuelQuantity, Odometer, and PaymentType. FuelCost uses currency and two decimal places. FuelQuantity and Odometer use the number format with 3 decimal places and 1 decimal place respectively. PaymentType uses the text format.
- Click Create Table in Design View.
- FuelID entries:
- Enter FuelID as the first Field Name.
- Select Integer [INTEGER] as the Field Type from the dropdown list. (The default setting is Text[VARCHAR].)
 | Shortcut for selecting from the Field Type dropdown list: use the key for the first letter of the choice. This might require using the letter more than once to get the choice you want. You can cycle through the choices for a given letter by repeatedly using that letter. After typing the name of the field in the Fields column, use the Tab key to move to the Field Type column. This will enter the field name and highlight the dropdown list. You can then use the key for the first letter of your choice to select the field type. Just remember to use it the correct number of times if necessary.
|
- Change the Field Properties in the bottom section.
Change AutoValue from No to Yes.
-
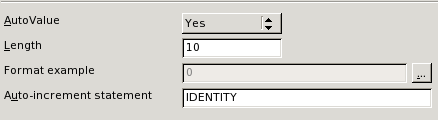
Field Properties section (AutoValue).
- Set FuelID as the Primary key.
Right-click on the green triangle to the left of FuelID.
-

Primary key field.
Click Primary Key in the context menu. This places a key icon in front of FuelID.
|
| The primary key serves only one purpose. Any name can be used for this field. It is not necessary to use FuelID as the name of the primary key field. We have used it so we know to which table it belongs by its name.
|
- All other entries:
- Enter the next field name in the first column (Field Name column).
- Select the Field Type for each field.
- For Date use Date [DATE]. (Use the D key once to select it.)
- PaymentType uses Text [VARCHAR], the default setting.
- All other fields use Number [NUMERIC]. (Use the N key once to select it.)
- Select the Field Properties.
-
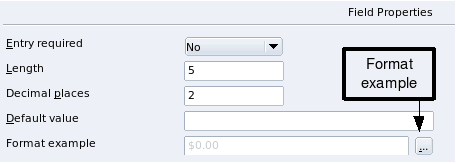
Field Properties section.
- FuelCost, FuelQuantity, and Odometer need changes in the Field Properties section.
- FuelQuantity: Change Length to 6 and Decimal places to 3. (Many fuel pumps measure fuel to thousands of a gallon in the USA where I live.)
- Odometer: Change the Length to 10 and the Decimal places to 1.
- FuelCost: Change the Length to 5 and Decimal places to 2. Click the Format example button. This opens the Field Format window.
-
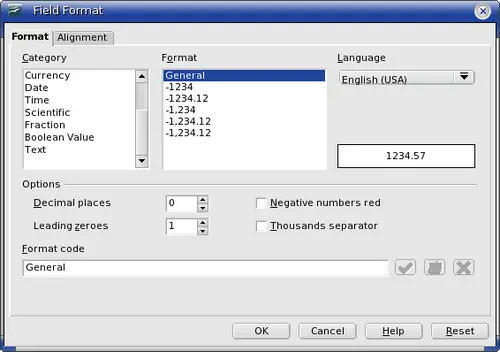
Field Format options.
- Use Currency as the Category and your currency as the Format. My currency has two decimal places. Use what is appropriate for your currency.
- Repeat these steps for each field in the table.
To access additional formatting options, click the button to the right of the Format example panel (Format example button).
- Description can be anything, or can be left blank. (The figure below is an example of this.)
- To save and close the table, select File > Close. Name the table Fuel.
-
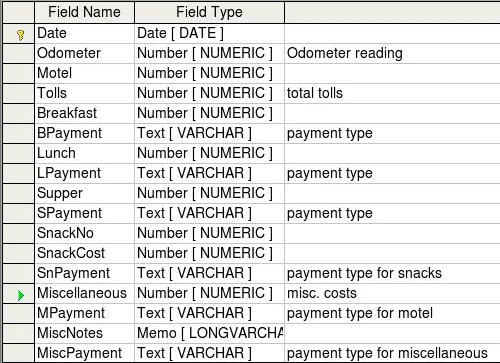
Example of Description entries.
Follow the same steps to create the Vacations table. The fields and their field types are listed in Figure 9. Make sure you make Date field the primary key before closing. (Right click the Grey box to the left of Date. Select Primary key from the context menu.) Name the table Vacations, and save it.
Top of page


