KWord has the built in ability to generate tables for the display of data.
These tables can consist of up to 128 rows and 128 columns,
with text centered or justified differently in different cells. Text flows easily around in the
table and cells are resized (if specified by the user) automatically to fit comfortably around the data.
Tables in KWord are for the display of data only. No calculations can be performed.
Tip
Remember, if you need the functions of a spreadsheet, you can embed a KSpread Table in your
document.
This section of the document will cover the formatting of tables
created in KWord
only.
You can create a table in KWord in one of three ways:
-
Select
->
from the menubar.
-
You can use the keyboard shortcut:
F5
.
-
or by clicking
 on the toolbar.
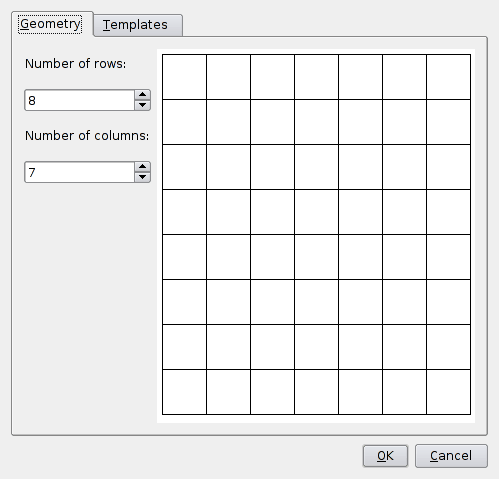
This will open a dialog box. The dialog box has two tabs:
Geometry
and
Templates
.
This dialog box is divided into two halves.
The right half of the dialog box provides you a quick visual guide
to how many rows and columns will be created in the table. This is
useful for laying out your table. You cannot edit
your table layout here.
The left half of the dialog box consists of two combo boxes.
The spin box labeled
Number of
rows:
, allows you to specify from 1 to 128 rows in the
table.
The spin box labeled
Number of
columns:
, allows you to specify from 1 to 128 columns in the
table.
While adjusting either of these two options, the preview box
adjusts to your new settings.
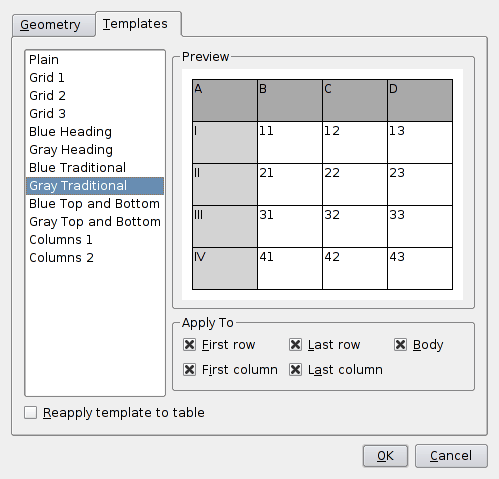
If you click on the tab labeled
Templates
, you can use predefined table looks to format the look of your table.
For more information see the section on Using formatting templates.
Click
OK
to insert the table.
Click
Cancel
to cancel this action and return to editing your document.
Moving between cells in a table
You can navigate between cells of the table by using the mouse (simply click in the cell you want to edit),
or by using the keyboard (use the arrow keys to move up, down, left or right one cell at a time).
To delete a table in KWord:
Place the mouse pointer over the frame of any cell of the table you want to
delete and click once with the left mouse button.
Warning
Be sure you have selected the correct table before continuing.
KWord will not ask for confirmation.
Select
->
from the menubar
The table will be immediately deleted.
You can insert a row into any place in a table.
To insert a row into a table, place the mouse pointer over the border of any cell of the table you want to add
a row to. Using your mouse, select either
->
->
from the menubar or
click
 on the
toolbar.
on the
toolbar.
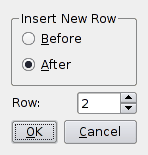
This will bring up a dialog box.
The spin box labeled
Row:
, allows
you to select any row within the table. This number selection box
limits you to the rows currently in the table.
Select the row you want to use as a reference.
Now select either
Before
or
After
as is appropriate.
Click
OK
to add the row or click
Cancel
to not add any rows.
To insert a column into a table, place the mouse pointer over the border of any cell of the table you want to add
a column to. Select either
->
->
from the menubar or click
 on the
toolbar.
on the
toolbar.
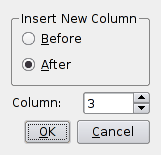
This will bring up a dialog box.
The number selection box labeled
Column:
,
allows you to select any column within the table. This number selection
box limits you to the columns currently in the table.
Select the column you want to use as a reference.
Now select either
Before
or
After
as is appropriate.
Click
OK
to add the column or click
Cancel
to not add any columns.
To delete a row from a table:
Click once with the left mouse button in any cell in the row you want to delete Then:
This will bring up a dialog box confirming that your have selected the correct row(s).
Warning
Make sure you have selected the correct row(s) before
continuing.
KWord will delete any data contained within the selected rows.
Click
Delete
to delete the row, or click
Cancel
to not
delete any rows.
To delete a column from a table:
Click once with the left mouse button in any cell in the column you want to delete Then:
This will bring up a dialog box confirming that your have selected the correct column(s).
Warning
Make sure you have selected the correct column(s) before
continuing.
KWord will delete any data contained within these columns.
Click
Delete
to delete the column(s), or click
Cancel
to not delete any columns.
When a table is created, all columns are equal in width. You can change the width of individual columns by using
the mouse or the keyboard.
First select any cell in the column you want to change, by holding down the
Ctrl
key and clicking once with the left mouse button.
The cell is now surrounded by 8 colored boxes. Place the mouse over the box in the middle of the
right vertical border of the cell. The mouse pointer changes to a double-headed arrow. Click on the box and drag the right edge of the
cell to the desired width. When you release the left mouse button, the entire column will assume the width of this cell.
First, select any cell in the column you want to change, by holding down the
Ctrl
key and clicking once with the left mouse button.
Tip
You can select any cell in the table to change column widths. By selecting a cell in the column you want to change
the dialog box will default to the correct column automatically.
Select
->
->
from the menubar.
A dialog box will appear. In the spin box labeled
Column:
, you can chose a different column to set.
In the spin box labeled
Width:
, enter the desired width of the column.
Click
OK
to change the width, or click
Cancel
to leave the column
width unchanged.
A table is traditionally made of a grid of rows and columns, with
equal sized cells throughout the table.
Sometimes you would like to spread text out over several cells in
a table. This is especially common with titles.
KWord allows you to do this by
Joining
two (or
more) adjacent cells of a table together.
This is an example of three cells joined together in the middle of
a table.
Tip
You can join cells vertically, as well as horizontally.
To join several cells you must first select the cells. To select the cells, hold down the
Ctrl
key
and click once with the left mouse button
in a cell. Click on the next cell with the left mouse button. Continue
this until you have selected all the cells you want to join together.
Tip
If you have a number of cells in a row that you want to select,
you can select them in two quick steps:
First hold down the
Ctrl
key and click on one of the end cells.
Now hold down the
Shift
key and click on the cell at the other
end of the row or column you want to join.
All cells between these two cells will be selected.
Once you have selected all the cells you want to join,
select
->
->
from the menubar
The cells will now be joined.
Any text in the left most frame will now be located in the joined
frame. Any text from any other frames will be deleted.
In addition to combining two or more cells into a single cell, it is easy to split one cell into many cells.
If you decide that you do not want the previously joined cells to
be joined any longer, you can “split” them back into individual cells
again. You can also split cells within a column or row. They do not need
to have been previously joined.
To split a cell, select the cell you want to split by holding the
Ctrl
button down and
clicking on it with the
left mouse button. Select
->
->
from the menubar.
This will bring up a small dialog box which allows you to set the number of rows and
the number of columns you want to split this cell into.
Once you have set the correct number of rows and columns in the spin boxes, click
OK
to split the cells. Click
Cancel
to abort.
If you select a cell in a table and then choose
->
from the menubar, KWord will convert each cell in your table
into an individual frame. You can then move these frames around independently on the page.
Protecting a cell in a table.
You can protect any or all cells in a table from accidental modification or deletion.
Simply select the cell(s) you want to protect, then:
Select
->
->
from the menubar or hold down the
Ctrl
button, click in the cell once with the right mouse button and select
->
from the popup menu.
You will not be able to change the contents or formatting of that cell.
Note
To disable the protection, simply repeat the steps above, and the cells will no longer be protected.
There are many aspects of a table that can be formatted.
For information of formatting text with a table see Format characters.
For information on formatting borders between frames in individual cells, see Borders
For information on formatting background color of individual cells, see Frame background
For information on changing the width of columns, see Resizing Columns
KWord also provides the user with a set of tools to help speed up the formatting of tables.
Altering the number of rows and columns in a table.
Previously in the manual, we have discussed how to individually add or delete rows and/or columns. KWord also provides the
user the ability to make major changes to the number of rows and columns in a table.
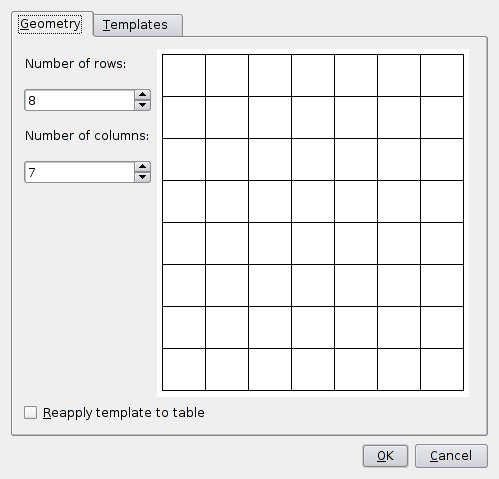
Select
->
from the menubar. A dialog will appear.
You can use this dialog to change the number of rows in your table by using the spin box labeled
Number of rows:
.
Warning
If you reduce the number of rows using this dialog box, KWord will delete the bottom row(s)
including the data within the rows
.
Be sure you do not have any data in these rows
that you need to preserve.
You can use this dialog to change the number of columns in your table by using the spin box labeled
Number of columns:
.
Warning
If you reduce the number of columns using this dialog box, KWord will delete the right most column(s)
including the data within the columns
.
Be sure you do not have any data in these columns
that you need to preserve.
Placing a mark in the check box labeled
Reapply template to table
, will cause KWord to re-apply the
template to the table
after adding or deleting the specified number of rows and/or columns
.
Click
OK
to make changes permenant, or click
Cancel
to abort all
changes.
Selecting an entire column for formatting
To select an entire column for formatting, move the mouse pointer to the white space directly
above
the desired column. The mouse pointer will turn from an arrow to a hand. If you click with the left mouse button, the entire column will be selected.
Selecting an entire row for formatting
To select an entire row for formatting, move the mouse pointer to the white space directly
to the left
of
the desired row. The mouse pointer will turn from an arrow to a hand. If you click with the left mouse button, the entire row will be selected.
Using table templates to format an entire table
KWord has templates for many commonly used table formatting options. Table templates provide
the same formatting functionality for tables that
document templates provide you for formating your documents.
Select
->
from the menubar. A dialog will appear. Click on the tab labeled
Templates
.
Along the left of the dialog box, is a list of table templates.
On the right is a preview box that
gives an example of what a table template will look like when applied to your table.
Below the preview box, are 5 check boxes.
-
First row
-
This check box will toggle formatting of all cells in the top row.
-
Last row
-
This check box will toggle formatting of all cells in the bottom row.
-
Body
-
This check box will toggle formatting of all cells in the body. The body of the table is any cells which are not formatted
by any of the other four options.
-
First column
-
This check box will toggle formatting of all cells in the left column.
-
Last column
-
This check box will toggle formatting of all cells in the right column.
Placing a mark in the check box labeled
Reapply template to table
, will cause KWord to re-apply the
template to the table
after adding or deleting the specified number of rows and/or columns
.
Click
OK
to make changes permenant, or click
Cancel
to abort all
changes.
Table styles are a rapid way for you to format individual cells of your table to common formats. You can add or remove
table styles, and change predefined table styles to suit your needs. A table style consists of a frame style and a text style
which are grouped together and named.
Formatting a cell with a table styles
To format a cell using a predefined table style simply:
Select the cell(s) by holding down
Ctrl
and clicking within the cell with the left mouse button. You can also
select columns and rows.
Select
->
from the menubar. A submenu will appear, listing all the currently defined table styles. Select the name of the table style
you want and all selected cells will automatically be formatting using the options of that table style.
To change the options of a table style, you will use the Table Style Manager.
Select
->
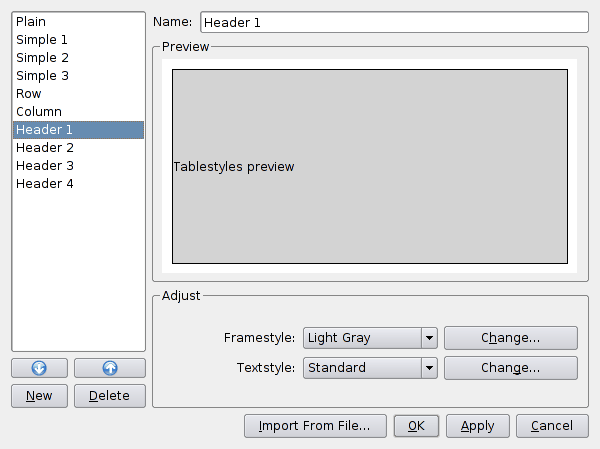
from the menubar. A dialog box will appear.
All of the currently defined table styles are listed in the listbox on the left. The currently selected table style is highlighted, and
the name of the currently selected table style is listed in the text box labeled
Name
. (In this example,
the currently selected table style is
Header 1
.)
Select the name of the table style you want to change by clicking on the name of the table style in the listbox on the left.
In the section labeled
Adjust
is a combo box labeled
Framestyle
which is used to select the desired frame style.
If you want to add or alter a frame style, click the
Change...
button, and you will be taken to the
Framestylist to make those changes.
Below that, is a combo box labeled
Textstyle:
which is used to select the desired text style for this table style.
If you want to add or alter a text style, click on the
Change...
button, and you will be taken directly to the
Stylelist to make those changes.
Once all changes have been made, click
OK
to save your changes. All of the affected table styles will
be changed to reflect the new options.
Creating a new table style
To create a new table style, select
->
from the menubar. A dialog box will appear.
Select a table style from the list at the left which most closely matches your new desired table style.
The selected table style will be used as a template for the new table style. Select the table style by clicking
once with the left mouse button in the list on the left.
Click on the
New
button. KWord will generate a new table style, which is a copy
of the previously selected table style.
Choose a name for your new table style, and type it in the text box labeled
Name
.
You can now change your table style options to customize your newly created table style. For details, see
Editing a table style.
To delete table style, select
->
from the menubar. A dialog box will appear.
Select the table style you want to delete
by clicking once with the left mouse button on the name of the table style you want to delete.
Click on the
Delete
button.
Note
KWord will not allow you to delete the
Plain
table style.
Changing the order of the table style in the list
To change the order that the table style are listed, select
->
from the menubar. A dialog box will appear.
The order the table styles are listed in the menu is determined by the order of the table styles in the list on the left.
Select the table style you want to move from the list at the left by clicking once with the left mouse button.
Now click on the Up Arrow and Down Arrow located at the bottom of the list of table styles.
This will move theselected table style up or down in the list of table styles.
When you are satisfied with the order of the list, select
OK
.
Importing a table style from another KWord file
To import a table style from another KWord file, select
->
from the menubar. A dialog box will appear.
Click the button labeled
Import From File
. You can
select the KWord file using the file selection dialog. Choose your file, and click
OK
.
A new dialog box will appear listing all available table styles for importing.
Tip
If KWord encounters a duplicate table style name in the selected file, it will append a number to the end of the
table style name to identify the imported style.
As an example, if you import the
Plain
table style from another KWord file, KWord will change
the name to
Plain-1
.
Select
all
the table styles you want to import. Then click
OK
.
The table styles will now appear at the bottom of your list of table styles. Click
OK
to save the table styles in the new document.