9.4. Control Protocol dissection
The user can control how protocols are dissected.
Each protocol has its own dissector, so dissecting a complete packet will
typically involve several dissectors. As Wireshark tries to find the
right dissector for each packet (using static "routes" and heuristics
"guessing"), it might choose the wrong dissector in your specific
case. For example, Wireshark won't know if you use a common protocol
on an uncommon TCP port, e.g. using HTTP on TCP port 800 instead of
the standard port 80.
There are two ways to control the relations between protocol
dissectors: disable a protocol dissector completely or temporarily
divert the way Wireshark calls the dissectors.
9.4.1. The "Enabled Protocols" dialog
box
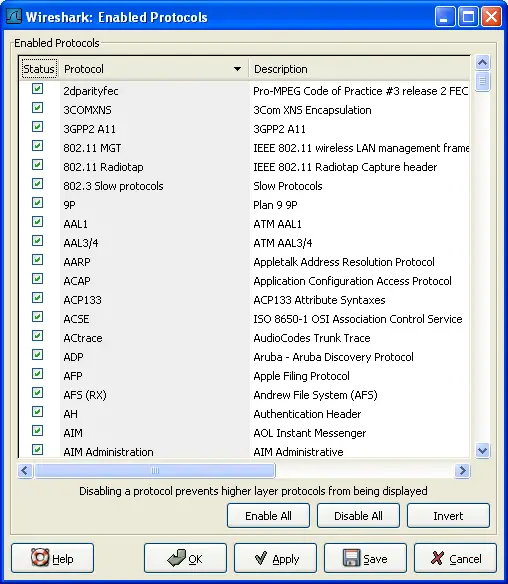
The Enabled Protocols dialog box lets you enable or
disable specific protocols; all protocols are enabled by default.
When a protocol is disabled, Wireshark stops processing a packet
whenever that protocol is encountered.
![[Note]](wsug_graphics/note.png)
|
Note! |
|
Disabling a protocol will prevent information about higher-layer
protocols from being displayed. For example,
suppose you disabled the IP protocol and selected
a packet containing Ethernet, IP, TCP, and HTTP
information. The Ethernet information would be
displayed, but the IP, TCP and HTTP information
would not - disabling IP would prevent it and
the other protocols from being displayed.
|
To enable/disable protocols select the
Enabled Protocols...
item from the
Analyze
menu; Wireshark will pop up the "Enabled Protocols"
dialog box as shown in Figure 9.5, “The "Enabled Protocols" dialog box”.
To disable or enable a protocol, simply click on it using the
mouse or press the space bar when the protocol is highlighted.
Note that typing the first few letters
of the protocol name when the Enabled Protocols dialog box is active
will temporarily open a search text box and
automatically select the first matching protocol name (if it exists).
![[Warning]](wsug_graphics/warning.png)
|
Warning! |
|
You have to use the Save button to save your settings. The OK or Apply
buttons will not save your changes permanently, so they will be lost
when Wireshark is closed.
|
You can choose from the following actions:
-
Enable All
: Enable all protocols in the list.
-
Disable All
: Disable all protocols in the list.
-
Invert
: Toggle the state of all protocols in the
list.
-
OK
: Apply the changes and close the dialog box.
-
Apply
: Apply the changes and keep the dialog box
open.
-
Save
: Save the settings to the disabled_protos, see
Appendix A, Files and Folders
for details.
-
Cancel
: Cancel the changes and close the dialog box.
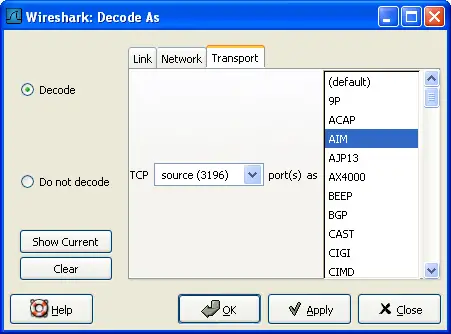
9.4.2. User Specified Decodes
The "Decode As" functionality let you temporarily divert specific
protocol dissections. This might be useful for example, if you do some
uncommon experiments on your network.
Decode As is accessed by selecting the
Decode As...
item from
the
Analyze
menu; Wireshark will pop up the "Decode As"
dialog box as shown in Figure 9.6, “The "Decode As" dialog box”.
The content of this dialog box depends on the selected packet when it
was opened.
|
|
Warning! |
|
The user specified decodes can not be saved. If you quit Wireshark,
these settings will be lost.
|
-
Decode
: Decode packets the selected way.
-
Do not decode
: Do not decode packets the selected
way.
-
Link/Network/Transport
: Specify the network layer
at which "Decode As" should take place. Which of these pages are
available depends on the content of the selected packet when this
dialog box is opened.
-
Show Current
: Open a dialog box showing the
current list of user specified decodes.
-
OK
: Apply the currently selected decode and close
the dialog box.
-
Apply
: Apply the currently selected decode and keep
the dialog box open.
-
Cancel
: Cancel the changes and close the dialog box.
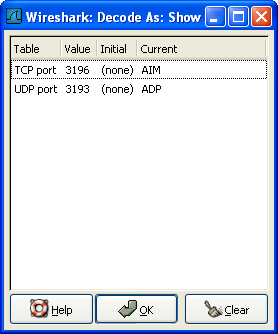
9.4.3. Show User Specified Decodes
This dialog box shows the currently active user specified decodes.
-
OK
: Close this dialog box.
-
Clear
: Removes all user specified decodes.