| |
The builder of a house must ensure that all construction takes place on a firm foundation.
The same is true for the builder of a TCP/IP-based networking system. Fundamental network configuration problems
will plague all network users until they are resolved.
MS Windows workstations and servers can be configured either with fixed
IP addresses or via DHCP. The examples that follow demonstrate the use of DHCP
and make only passing reference to those situations where fixed IP configuration
settings can be effected.
It is possible to use shortcuts or abbreviated keystrokes to arrive at a
particular configuration screen. The decision was made to base all examples in this
chapter on use of the Start button.
MS Windows XP Professional
There are two paths to the Windows XP TCP/IP configuration panel. Choose the access method that you prefer:
Click .
Alternately,
click , and right-click
then select .
The following procedure steps through the Windows XP Professional TCP/IP configuration process:
-
On some installations the interface will be called and
on others it will be called . On our system it is called .
Right-click on . See
???.
-
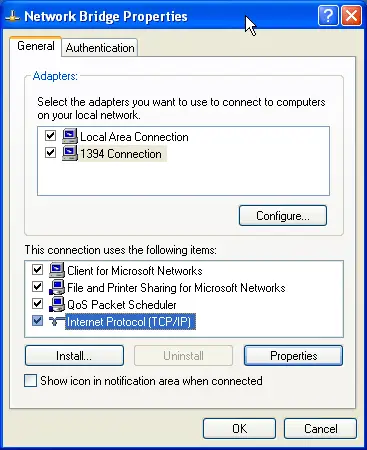
The Network Bridge Configuration, or Local Area Connection, panel is used to set TCP/IP protocol settings.
In box,
click on , then click on Properties.
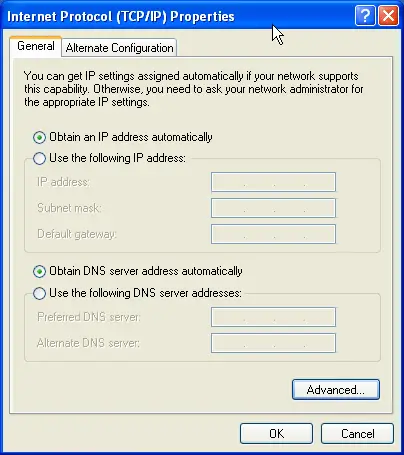
The default setting is DHCP-enabled operation
(i.e., “Obtain an IP address automatically”). See
???.
Many network administrators will want to use DHCP to configure all client TCP/IP
protocol stack settings. (For information on how to configure the ISC DHCP server
for Windows client support see
the DNS and DHCP Configuration Guide,
DHCP Server.
If it is necessary to provide a fixed IP address, click on “Use the following IP address” and enter the
IP Address, the subnet mask, and the default gateway address in the boxes provided.
-
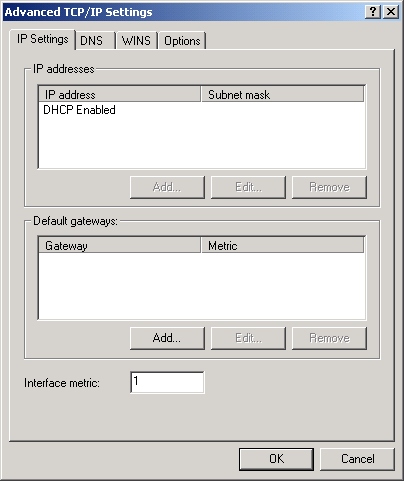
Click the Advanced button to proceed with TCP/IP configuration.
This opens a panel in which it is possible to create additional IP addresses for this interface.
The technical name for the additional addresses is
IP aliases
, and additionally this
panel permits the setting of more default gateways (routers). In most cases where DHCP is used, it will not be
necessary to create additional settings. See
??? to see the appearance of this panel.
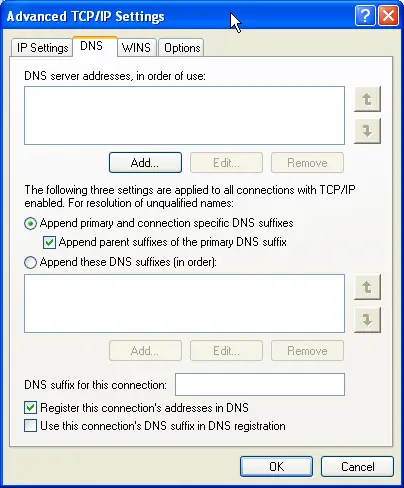
Fixed settings may be required for DNS and WINS if these settings are not provided automatically via DHCP.
-
Click the tab to add DNS server settings.
The example system uses manually configured DNS settings. When finished making changes, click the
OK to commit the settings. See
???.
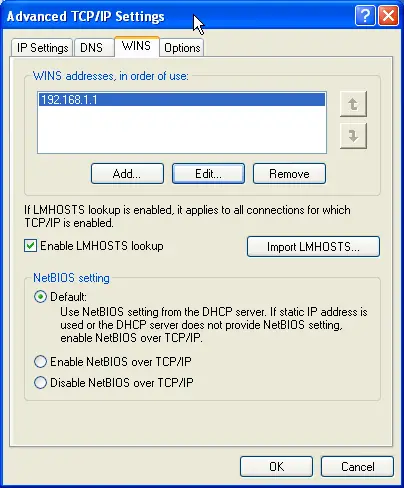
-
Click the WINS tab to add manual WINS server entries.
This step demonstrates an example system that uses manually configured WINS settings.
When finished making changes, click OK to commit
the settings. See
???.
There are two paths to the Windows 2000 Professional TCP/IP configuration panel. Choose the access method that you prefer:
Click .
Alternatively,
click , then right-click , and
select .
The following procedure steps through the Windows XP Professional TCP/IP configuration process:
-
Right-click on , then click
. See
???.
-
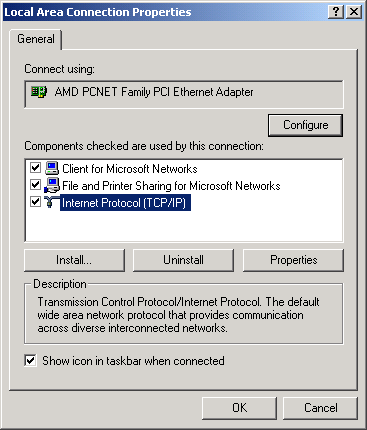
The Local Area Connection Properties is used to set TCP/IP protocol settings. Click on
in the box, then click the Properties button.
-
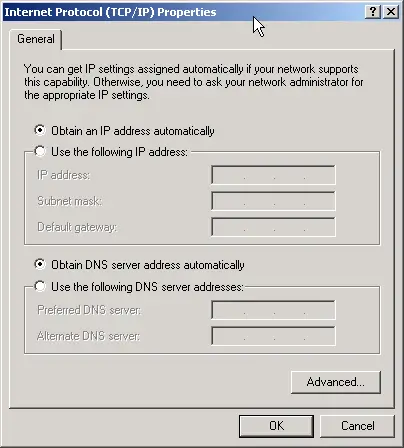
The default setting is DHCP-enabled operation
(i.e., “Obtain an IP address automatically”). See
???.
Many network administrators will want to use DHCP to configure all client TCP/IP
protocol stack settings. (For information on how to configure the ISC DHCP server
for Windows client support, see,
???.
If it is necessary to provide a fixed IP address, click on “Use the following IP address” and enter the
IP Address, the subnet mask, and the default gateway address in the boxes provided.
For this example we are assuming that all network clients will be configured using DHCP.
-
Click the button to proceed with TCP/IP configuration.
Refer to
???.
Fixed settings may be required for DNS and WINS if these settings are not provided automatically via DHCP.
-
Click the tab to add DNS server settings.
The example system uses manually configured DNS settings. When finished making changes,
click OK to commit the settings. See
???.
-
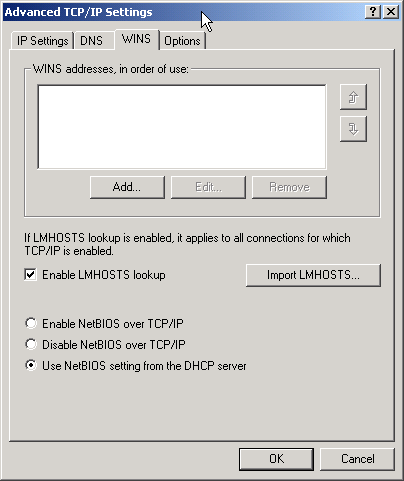
Click the WINS tab to add manual WINS server entries.
This step demonstrates an example system that uses manually configured WINS settings.
When finished making changes, click OK to commit the settings.
See
???.
There are two paths to the Windows Millennium edition (Me) TCP/IP configuration panel. Choose the access method that you prefer:
Click .
Alternatively,
click on , and right click on
then select .
The following procedure steps through the Windows Me TCP/IP configuration process:
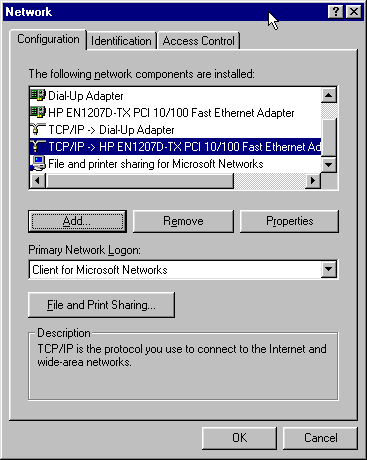
-
In the box labeled ,
click on , then click on the Properties button.
See
???.
-
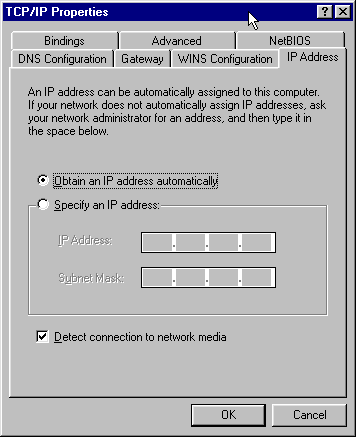
Many network administrators will want to use DHCP to configure all client TCP/IP
protocol stack settings. (For information on how to configure the ISC DHCP server
for Windows client support see
the DNS and DHCP Configuration Guide,
DHCP Server. The default setting on Windows Me workstations is for DHCP-enabled operation
(i.e., is enabled). See
???.
If it is necessary to provide a fixed IP address, click on and enter the
IP Address and the subnet mask in the boxes provided. For this example we are assuming that all
network clients will be configured using DHCP.
-
Fixed settings may be required for DNS and WINS if these settings are not provided automatically via DHCP.
-
If necessary, click the tab to add DNS server settings.
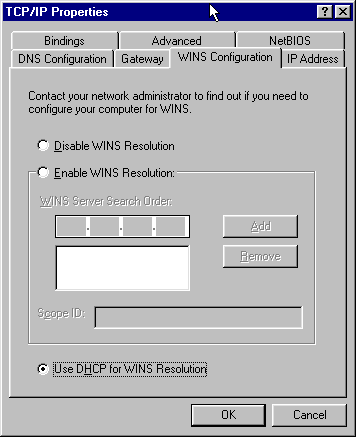
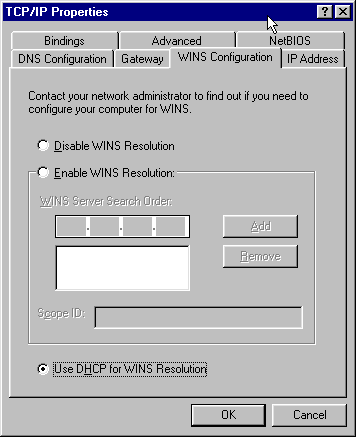
Click the WINS Configuration tab to add WINS server settings.
The tab allows additional gateways (router addresses) to be added to the network
interface settings. In most cases where DHCP is used, it will not be necessary to
create these manual settings.
-
The following example uses manually configured WINS settings. See
???.
When finished making changes, click OK to commit the settings.
This is an example of a system that uses manually configured WINS settings. One situation where
this might apply is on a network that has a single DHCP server that provides settings for multiple
Windows workgroups or domains. See
???.
|
|