|
For now let's ignore the excess of decoration. Instead we will build
the basic interface components. There's not much that we need in the
interface. Certainly we need to identify the file to be word counted.
Also we want to identify whether to just count the words or also the
lines and bytes.
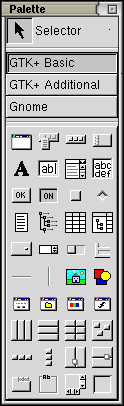
We go back to the GTK+ Basic palette for one of the layout
widgets. These are towards the bottom of the palette--third row from
the bottom in fact. Hover the mouse over each of them to find the
Horizontal Box, Vertical Box, Table, and
Fixed Positions. Click on the Vertical Box layout.
Now on the central canvas area of your Gwords interface
click the left mouse button. You will be asked for the number of rows
for your box--the default of 3 will do for now so just click on the
OK button. Your canvas will be divided into 3 rows. Each one
of the 3 rows can now be constructed independently--each can contain
a different widget, including further layout widgets.
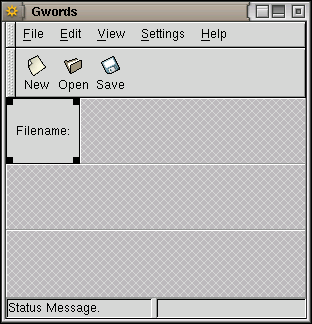
We will use the first row to identify the name of the file whose
contents we will be counting. We will use a file entry box to allow
for the entry of the filename. We will also add a label so that we
know what the file entry box is for. That means two widgets and all
we have is a single row--so we need to add a Horizontal Box
with two columns. Find the Horizontal Box on the
GTK+ Basic palette, click it with the left mouse button and
then click in the top row of the three rows of our canvas. When
prompted select just 2 (rather than the default 3) columns for this
Horizontal Box.
Labels should probably go to the left of the entry box so we will
place the label first. Select the Label widget from the
GTK+ Basic palette--the first item on the second row.

Now click in the top left box of our canvas (this is the left most of
the two cells we have just created). A GtkLabel widget should
now appear with the label label1 (and some resizing of the
cell might occur). This is now our first ``real'' widget. Of course
we don't want the label to read label1 (even though we might
leave it's name--as distinct from it's label text--as
label1 for now). We can change the label text through the
Properties window where you will find the fields relevant to
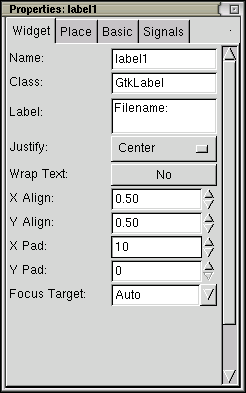
this widget (assuming it is still the selected widget). Change the
Label field to be `File:' (replacing
label1). For good measure set the X Pad field to be
10 (so that the widgets won't look so cramped). You will see the
effect of these immediately.
To summarise so far. A basic Gnome Application Window has
been created with the default menu bar and toolbar and a Gnome
Application Bar at the bottom. We have added a 3 row
Vertical Box and in the top row of this a 2 column
Horizontal Box. In the resulting top left cell we have added
a Label widget and changed the text to be
`File:.' It also has it's X Padding set to 10 to give a
less cramped layout.
Copyright © 1995-2006 [email protected]
|