Graphical installation remains the recommended method for installing Fedora. If you are installing Fedora on a system that lacks a graphical display, consider performing the installation over a VNC connection – see Chapter 12, Installing Through VNC.
If your system has a graphical display, but graphical installation fails, try booting with the xdriver=vesa option – see Chapter 9, Boot Options
The cursor is used to select (and interact with) a particular widget. As the cursor is moved from widget to widget, it may cause the widget to change color, or the cursor itself may only appear positioned in or next to the widget.
Note
While text mode installations are not explicitly documented, those using the text mode installation program can easily follow the GUI installation instructions. However, because text mode presents you with a simpler, more streamlined insatallation process, certain options that are available in graphical mode are not also available in text mode. These differences are noted in the description of the installation process in this guide, and include:
customizing the partition layout.
customizing the bootloader configuration.
selecting packages during installation.
Note also that manipulation of LVM (Logical Volume Management) disk volumes is only possible in graphical mode. In text mode it is only possible to view and accept the default LVM setup.
Note
Not every language supported in graphical installation mode is also supported in text mode. Specifically, languages written with a character set other than the Latin or Cyrillic alphabets are not available in text mode. If you choose a language written with a character set that is not supported in text mode, the installation program will present you with the English versions of the screens.
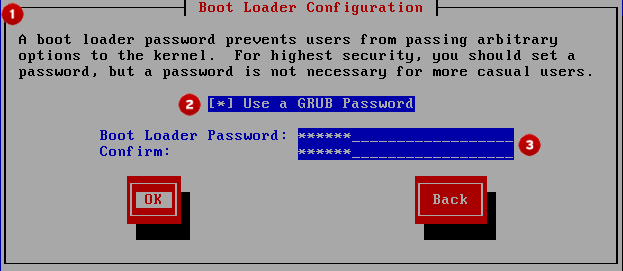
Installation Program Widgets as seen in Boot Loader Configuration
Figure 7.1. Installation Program Widgets as seen in Boot Loader Configuration
Legend
Window — Windows (usually referred to as dialogs in this manual) appear on your screen throughout the installation process. At times, one window may overlay another; in these cases, you can only interact with the window on top. When you are finished in that window, it disappears, allowing you to continue working in the window underneath.
Checkbox — Checkboxes allow you to select or deselect a feature. The box displays either an asterisk (selected) or a space (unselected). When the cursor is within a checkbox, press Space to select or deselect a feature.
Text Input — Text input lines are regions where you can enter information required by the installation program. When the cursor rests on a text input line, you may enter and/or edit information on that line.
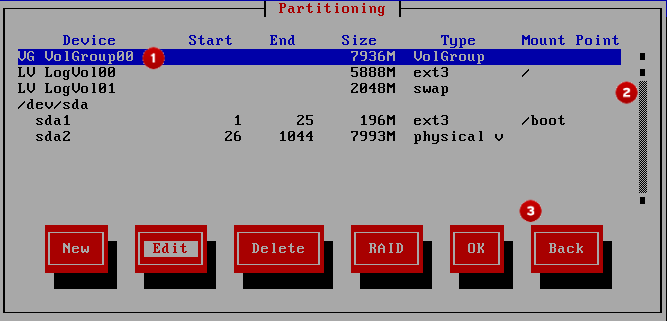
Installation Program Widgets as seen in the partitioning screen
Figure 7.2. Installation Program Widgets as seen in the partitioning screen
Legend
Text Widget — Text widgets are regions of the screen for the display of text. At times, text widgets may also contain other widgets, such as checkboxes. If a text widget contains more information than can be displayed in the space reserved for it, a scroll bar appears; if you position the cursor within the text widget, you can then use the Up and Down arrow keys to scroll through all the information available. Your current position is shown on the scroll bar by a # character, which moves up and down the scroll bar as you scroll.
Scroll Bar — Scroll bars appear on the side or bottom of a window to control which part of a list or document is currently in the window's frame. The scroll bar makes it easy to move to any part of a file.
Button Widget — Button widgets are the primary method of interacting with the installation program. You progress through the windows of the installation program by navigating these buttons, using the Tab and Enter keys. Buttons can be selected when they are highlighted.