|
Revision History
|
| Revision $Revision: 1.30 $ |
2005-11-28 |
lexa |
A brush
is a pixmap or set of pixmaps used for painting. GIMP includes a set of 10
"paint tools", which not only perform operations that you would think of as
painting, but also operations such as erasing, copying, smudging,
lightening or darkening, etc. All of the paint tools, except the ink tool,
use the same set of brushes. The brush pixmaps represent the marks that
are made by single "touches" of the brush to the image. A brush stroke,
usually made by moving the pointer across the image with the mouse button
held down, produces a series of marks spaced along the trajectory, in a
way specified by the characteristics of the brush and the paint tool being
used.
Brushes can be selected by clicking on an icon in the Brushes dialog. GIMP's
current brush is shown in the
Brush/Pattern/Gradient area of the Toolbox. Clicking on the brush
symbol there is one way of activating the Brushes dialog.
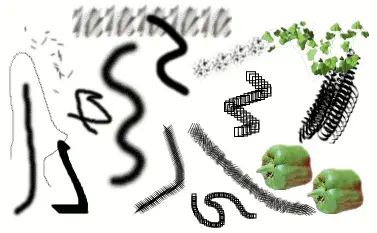
When you install GIMP, it comes presupplied with a number of basic
brushes, plus a few bizarre ones that serve mainly to give you
examples of what is possible (i. e., the "green pepper" brush in
the illustration). You can also create new brushes, or
download them and install them so that GIMP will recognize them.
GIMP can use several different types of brushes. All of them, however, are
used in the same way, and for most purposes you don't need to be aware of
the differences when you paint with them. Here are the available types of
brushes:
-
Ordinary brushes
-
Most of the brushes supplied with GIMP fall into this
category. They are represented in the Brushes dialog by
grayscale pixmaps. When you paint using them, the current
foreground color (as shown in the Color Area of the Toolbox)
is substituted for black, and the pixmap shown in the brushes
dialog represents the mark that the brush makes on the image.
To create such a brush:
Create a small image in gray levels using zoom. Save it with the
.gbr extension. Click on Refresh button in the Brush Dialog to get
it in preview without it being necessary to restart GIMP.
-
Color brushes
-
Brushes in this category are represented by colored images in
the Brushes dialog. They can be a text. When you paint with them,
the colors are used as shown; the current foreground color does
not come into play. Otherwise they work the same way as ordinary
brushes.
To create such a brush: Create a small RGBA image. For this, open
New Image, select RGB for image type and Transparent for fill type.
Draw your image and save it first to .xcf file to keep its
properties. Then save it to .gbr format. Click
on Refresh button in Brush Dialog to get your
brush without it being necessary to restart Gimp.
![[Tip]](../images/tip.png)
|
Tip |
|
You can transform a selection to a brush by using the command:
->->.
|
-
Image hoses / Image pipes
-
Brushes in this category can make more than one kind of mark
on an image. They are indicated by small red triangles at th
lower right corner of the brush symbol in the Brushes dialog.
They are sometimes called "animated brushes"
because the marks change as you trace out a brushstroke. In
principle, image hose brushes can be very sophisticated,
especially if you use a tablet, changing shape as a function
of pressure, angle, etc. These possibilities have never
really been exploited, however; and the ones supplied with
GIMP are relatively simple (but still quite useful).
You will find an example on how to create such brushes in
Animated brushes
-
Parametric brushes
-
These are brushes created using the Brush Editor, which
allows you to generate a wide variety of brush shapes by
using a simple graphical interface. A nice feature of
parametric brushes is that they are
resizable. In GIMP 2.2, it is possible,
using the Preferences dialog, to make key presses or mouse
wheel rotations cause the current brush to become larger or
smaller, if it is a parametric brush.
One category that GIMP does not have is full-fledged
procedural brushes: brushes whose marks are
calculated procedurally, instead of being taken from a fixed
pixmap. (Actually this is not quite correct: the Ink tool uses a
procedural brush, but it is the only one available in GIMP.) A
more extensive implementation of procedural brushes is a goal of
future development for GIMP.
In addition to the brush pixmap, each GIMP brush has one other
important property: the brush Spacing. This
represents the distance between consecutive brush-marks when a
continuous brushstroke is painted. Each brush has an assigned
default value for this, which can be modified using the Brushes
dialog.