4.3.3 Gradients
When used in layer and channel masks, gradients are very useful
blending tools. Figure
4.20
Figure 4.20:
Two Images
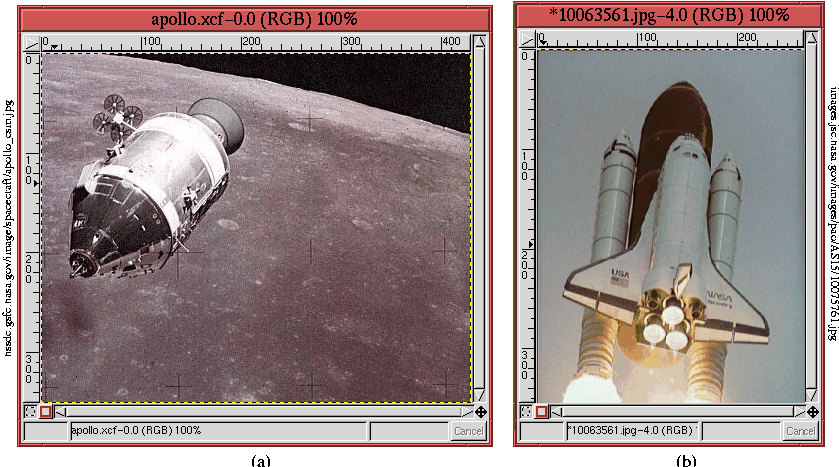 |
is used to illustrate how two images can be blended together using a
gradient in a layer mask. To begin, a new transparent layer is
created in the lunar module image
(Figure
4.20(a)), and the space shuttle image
(Figure
4.20(b)) is copied and pasted into it.
The paste actually creates a floating selection that is subsequently
positioned and anchored to the transparent layer. The result of the
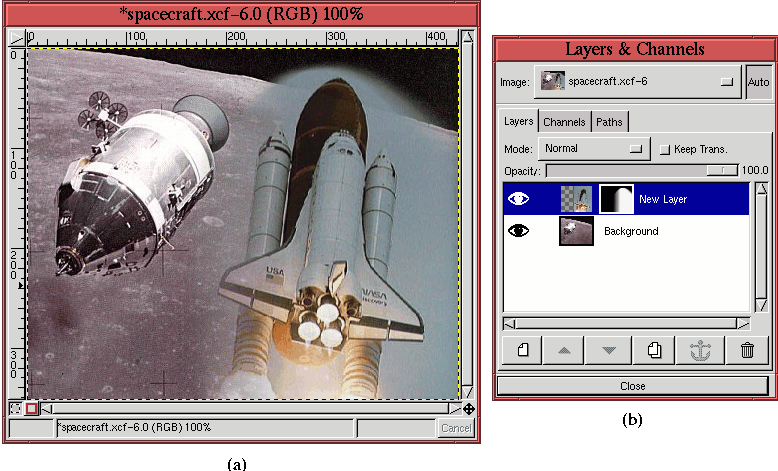
paste is illustrated in Figure
4.21(a),
Figure 4.21:
Pasting and Positioning the Shuttle Over the Lunar Module
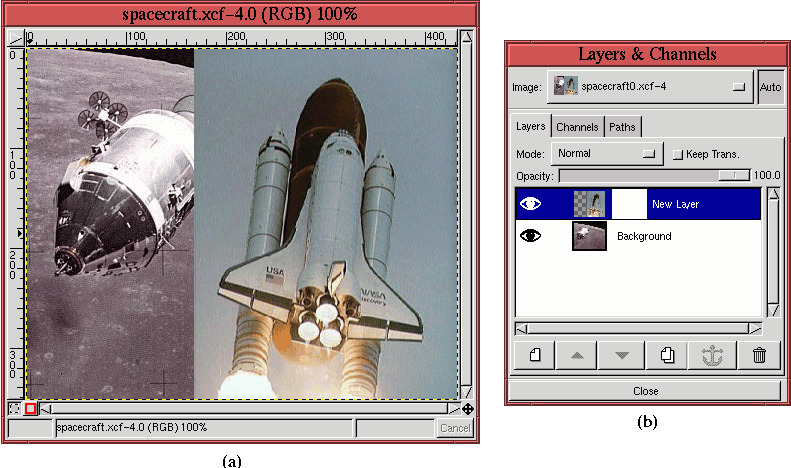 |
and the image's Layers dialog is shown in
Figure
4.21(b). It can be seen from the Layers
dialog that the space shuttle is in the upper layer and that, in
preparation for the next step, a layer mask has been created for it.
The blending of the two layers is performed by constructing a
gradient in the layer mask. The
following steps are used to accomplish this:
- 1.
- The layer mask is made active by clicking on its thumbnail in
the Layers dialog.
- 2.
- The Gradient tool is chosen from the Toolbox, and the Active Foreground Color and the Active Background Color are set
to black and white, respectively.
- 3.
- The Tool Options dialog is opened by
double-clicking on the Gradient icon in the Toolbox, and the
Blend option is set to FG to BG (RGB).
- 4.
- The gradient is applied by clicking and dragging in the image window
starting at the leftmost edge of the space shuttle layer, and
releasing slightly to the left of the left shuttle rocket.
The resulting gradient can be seen in the layer mask's thumbnail, shown
in Figure
4.22(b).
Figure 4.22:
Two Images Blended Using a Gradient in a Layer Mask
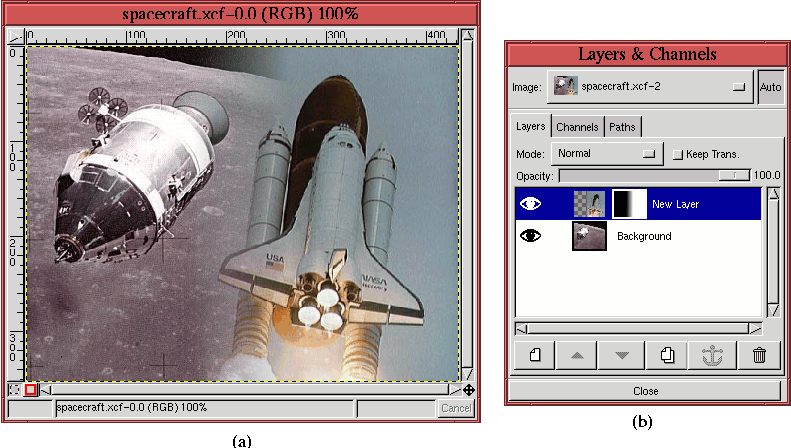 |
Several points are worth noting here. First, the gradient is created
in the layer mask by clicking and dragging in the image window.
The gradient is applied to the layer mask because it was made
active in the first step of the preceding procedure. Second, as seen
in Figure
4.22(a), the gradient in the layer mask
blends the upper layer with the lower one by creating a gradual
transition from black to white in the mask. The black pixels of the
mask make the upper layer completely transparent. The trend from the
dark gray to light gray pixels in the mask gradually blends the upper
layer into the lower until the mask is totally white, at which point
the upper layer is totally opaque. The width of the blend is
controlled by the width of the gradient.
The blend made in Figure
4.22 produces a
straight, horizontally varying gradient, but what if a more
complicated blending interface is desired? This can be solved using
the Mode menu found in the Brush
Selection dialog.
Figure
4.23(a)
Figure 4.23:
The Brush Selection Dialog and the Mode Menu
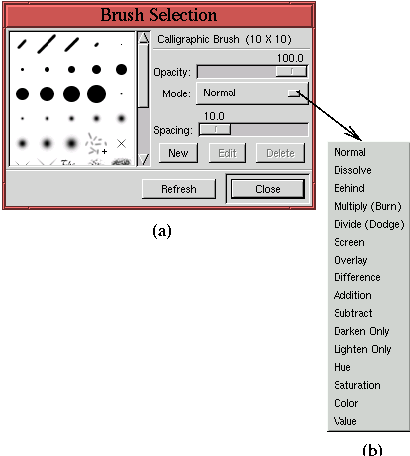 |
shows the
Brush Selection dialog, and
Figure
4.23(b) shows the mode menu's
choices.
The Mode menu controls how the paint of the gradient combines with
what is already active in the image window (whether that be an image
layer, a channel mask, or a layer mask). The Normal mode is the
default, and this mode just replaces anything that was in the layer
with the paint from the gradient. The other modes combine the paint
from the gradient in various ways, which are described in depth in
Chapter
5. For the moment, however, let's turn our
attention to the Multiply and Screen modes. These modes
will permit us to create gradients with tailor-made interfaces. To
illustrate this, Figure
4.24(a)
Figure 4.24:
Using Blending Modes to Combine Gradients
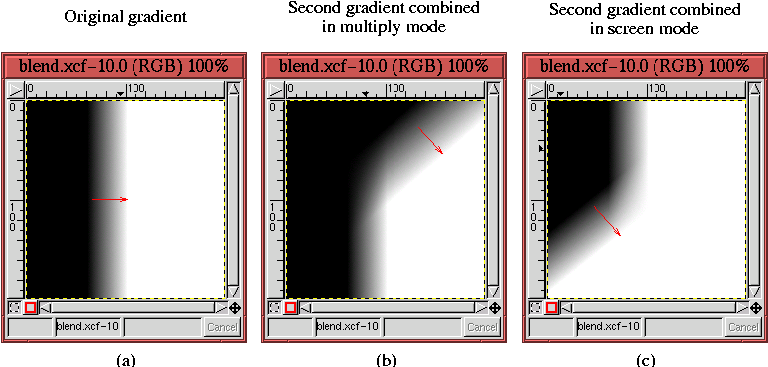 |
shows a horizontally varying gradient created by clicking and dragging
with the mouse in the image window, beginning at the tail of the red
arrow and releasing at its tip. (Note that the red arrow is just for
illustrative purposes and is not part of the image or the gradient.)
Choosing the Multiply mode
from the Brush Selection dialog's Mode menu and applying a
second gradient to the first is shown in
Figure
4.24(b). The direction of the
applied gradient is indicated by the red arrow. If the normal
combining mode had been used, the second gradient would have replaced
the first. However, setting the blending mode to Multiply has
produced a completely different effect. The two gradients have been
multiplied together. What does it mean to multiply two gradients?
Assigning a value of 0 to black, a value of 1 to white, and
proportional values for grays provides us with a definition. This
numerical correspondence is used to create a gradient that is the
product of the first two. More precise definitions for the blending
modes are given in Chapter
5.
Figure
4.24(c) shows the result of using
the Screen mode, applied as shown by
the red arrow in the figure. This mode works in a manner similar to
Multiply mode. It performs a multiplication, except that it is
white that is assigned the value of 0 and black the value of 1. As
can be seen in Figure
4.24, the Multiply and Screen blending modes can be used to create custom
gradient interfaces. The Multiply mode can be used to make a
black pivot around the point of application, and the Screen mode
to make a white pivot.
Figure
4.22 shows an example of using a gradient
in a layer mask to blend two layers. In the upper part of this
figure, the blend seems too abrupt, because the black space of the
lunar module image contrasts strongly with the gray-blue sky of the
space shuttle launch. This can be softened by making the gradient
interface curve around the space shuttle image, letting more of the
lunar module's black show through from below. Using the Multiply and Screen blending modes to do this produces the
effect shown in Figure
4.25(a).
Figure 4.25:
Custom Blending in the Upper Portion of the Image by
Combining Additional Gradients Using the Multiply and
Screen Modes
 |
The corresponding curved gradient interface can be seen in the layer
mask thumbnail shown in Figure
4.25(b).
Effects similar to what were achieved with Multiply and Screen can be had using two other blending modes: Darken Only
and Lighten Only. The results
are a little different from those obtained with Multiply and
Screen because these two modes provide more angular, predictable
results at the corners of intersection. The result is more like a
mitred picture frame than a fluid, smooth transition.
Figures
4.26(a), (b), and (c)
Figure 4.26:
Compare Darken Only and Lighten Only with
Multiply and Screen in Figure
4.24
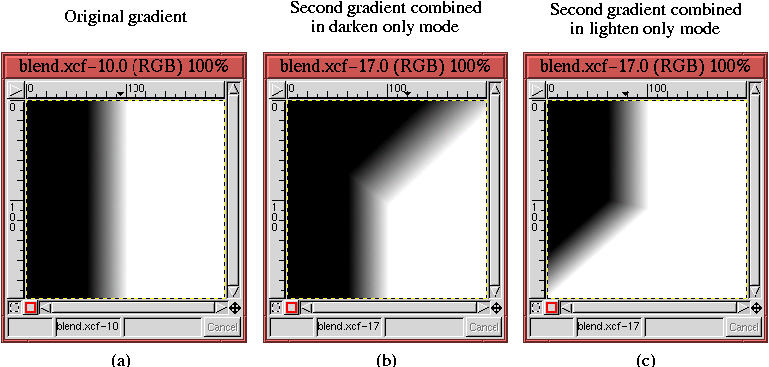 |
illustrates the application of the
Darken Only and
Lighten
Only modes. Compare them with the application of the
Multiply
and
Screen modes, shown in
Figure
4.24.
Blending modes are discussed in more detail in
Section
5.6. A sophisticated use of gradients
and blending modes in layer masks is illustrated in
Section
7.3.


