2.6.2.4 Layer Resizing
As with scaling, a layer can be resized smaller or larger. This is
done with Layer Boundary Size, found
in the Layers menu. Typically you resize a layer to a smaller
dimension to eliminate undesirable parts. However, resizing a layer
smaller has the same problem as resizing an image. That is, the
subject matter of the layer must be properly positioned within the
resulting layer boundaries. For images, the positioning problem was
solved using the Crop tool, but this will not work for resizing
layers. Fortunately there is a simple procedure that produces the
same effect and allows for the interactive positioning of the layer
contents within the smaller layer boundaries.
Figures
2.19 and
2.20 illustrate
Figure 2.19:
Resizing a Layer Smaller: Floating a Rectangular Selection
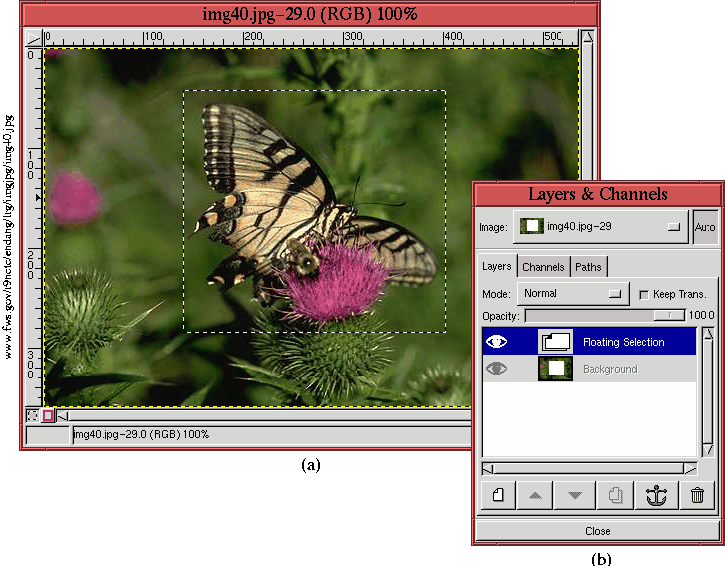 |
Figure 2.20:
Resizing a Layer Smaller: Anchoring the Float to a New Layer and Deleting
the Old Layer
 |
how this is done. The method consists of a four-step procedure:
- 1.
- The region to be framed in the layer is selected with the Rectangle Select tool (see
Chapter
3 for more on selections).
Figure
2.19(a) shows how a rectangular selection has
been made in an image window.
- 2.
- The selection is then converted to a floating selection using the
function Float from the Image:Select
menu or by typing C-S-l in the image window.
Figure
2.19(b) shows the Layers dialog after the
selection has been converted to a float.
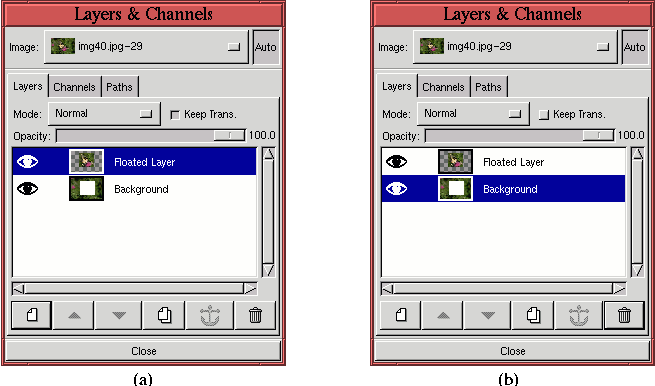
- 3.
- The floating selection is then made into a new layer by choosing the
New Layer function in the Layers menu or by clicking the New Layer button in the Layers dialog.
Figure
2.20(a) shows the Layers dialog corresponding
to this step.
- 4.
- The old layer is made active, as shown by the Layers dialog in
Figure
2.20(b), and is deleted by clicking on the
trash can icon in the button bar.
The result of resizing the layer smaller is shown in
Figure
2.21.
Figure 2.21:
The Resulting Resized Layer
 |
In Figure
2.21(a) the layer has been resized
smaller, which can be seen by the black-and-yellow dashed layer
boundary. Figure
2.21(b) shows the resulting Layers
dialog. The procedure, as described, allows the layer contents to be
carefully positioned within the resized layer.
Although there are good reasons to resize an image larger, it is
difficult to imagine a good reason for resizing a layer larger.
However, due probably to a rationale of symmetry, a layer can be
resized larger. It should be noted that, as for layer scaling, the
GIMP does not allow a layer to be resized to dimensions larger than
the window boundaries of an image. To resize a layer larger than the
current image boundaries, the image must first be resized to
accommodate it.


